This article is a part of our Content Hub. For more in-depth resources, check out our content hub on Selenium 4.
Selenium 4, the latest version of the Selenium framework, has become the talk of the town since its announcement in 2018. The excitement around Selenium 4 is evident since it is packed with a host of new features and enhancements than its predecessor. Though there is no official announcement on the ‘final’ release of Selenium 4, Selenium users and test automation enthusiasts have already started exploring and experimenting by downloading the Alpha version of Selenium 4.

If you are thinking of upgrading from Selenium 3 to Selenium 4, this Selenium 4 tutorial will help you take the version leap! For folks waiting on the sidelines to try Selenium 4, the comparison between Selenium 3 vs. Selenium 4 could excite you to try Selenium 4 much sooner than you ever expected☺.
Though Selenium has various language bindings like Java, C#, Python, JavaScript, Ruby, and PHP, this Selenium 4 tutorial would focus on installing Java bindings.
Selenium 3 vs. Selenium 4
Wondering ‘What uniqueness does Selenium 4 have compared to Selenium 3?’ Well, to answer that question, we’ll do a quick walk-through of the newness offered by Selenium 4 in this section of Selenium 3 vs. Selenium 4 tutorial:
Selenium WebDriver W3C Standardization
In Selenium 3, the JSON Wire Protocol was the primary communication mode between the test code and web browser. Major browser drivers like ChromeDriver, GeckoDriver, etc., follow the W3C standard. This resulted in the encoding and decoding of requests as per the W3C protocol.
Under the hood, Selenium 4 uses the WebDriver W3C protocol. This eliminates the overhead of encoding and decoding that was necessary with JSON Wire Protocol in Selenium 3. This major architectural change will result in less flaky and more stable cross browser tests (i.e., tests across different versions and types of browsers) with Selenium 4. You can refer to our detailed coverage on Selenium W3C WebDriver in Selenium 4 to gain more insights.
Selenium 4 IDE
The IDE in Selenium 4 is much more than a rudimentary playback and record testing tool. Along with Firefox, it is available for the Chrome browser (as a Chrome extension).
The SIDE Runner tool in Selenium 4 IDE lets you run Selenium tests parallel on local Selenium Grid and cloud-based Selenium Grid. The ‘export’ feature enables you to export the recorded tests in Selenium supported languages like Python, C#, Java, and more. Selenium 4 IDE is a renewed and super-useful offering available only in Selenium 4.
Optimized Selenium Grid
If you’re a Selenium 3 user, you must be aware of how painful it’s to start the Hub and Node jars each time you want to perform automation testing on the Grid. Distributed test execution is all set to change with the optimized Selenium Grid in Selenium 4.
In Selenium Grid 4, Hub and Node are packed in a single jar file. Selenium Grid 4 has a more scalable and traceable infrastructure that supports four processes – Router, Session Map, Distributor, and Node. Improved GUI and built-in support for Docker are some of the additional perks you get in Selenium Grid 4.
Chrome DevTools
In Selenium 4, there is native support for Chrome DevTools Protocol (CDP) through the DevTools interface. The Chrome DevTools interface’s APIs would make issue diagnosis and on-the-fly editing of pages much easier.
The native support of CDP will help emulate geolocation and network conditions in Selenium 4 with more ease. With Selenium 4, you could test the web product built for a global audience by emulating geolocation in the code. At the same time, you could also check how the product performs against varying network conditions (e.g., 3G, 4G, etc.).
Relative Locators
In Selenium 3, you have to use a series of findelement commands on the appropriate WebElement to locate its vicinity elements. There was no shortcut to finding an element that is above/below/right to/etc. of a particular WebElement.
Relative Locators (above, below, toRightOf, toLeftOf, and near) that are newly introduced in Selenium 4 Alpha help locate web elements’ relative’ to a particular element in the DOM. Our detailed coverage of relative locators in Selenium 4 could help you get started with this feature exclusively available in Selenium 4.
Apart from these big enhancements in Selenium 4, it is packed with other new features:
- _TakeElementScreensho_t API lets you capture a screenshot of a particular WebElement on the page.
- Introduction of newWindow API helps in the simplified creation of a new Window (WindowType.WINDOW) or Tab (WindowType.TAB).
- Optimized and accelerated debugging process.
As far as Selenium 3 vs. Selenium 4 comparison is concerned, the overall experience with Selenium 4 (Alpha) is much more superior to Selenium 3. This is one of the primary motivating factors to download Selenium 4 (Alpha) and get your hands on the awesome features offered by Selenium 4.
Upgrade from Selenium 3 to Selenium 4
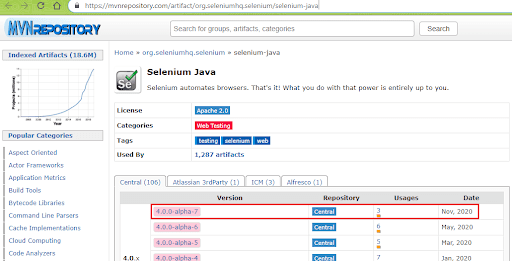
As of writing this article, Selenium 4.0.0-alpha-7 was the latest Selenium 4 (Alpha) version available for download on the Selenium website. Selenium 4 for different language bindings is shown below:
Selenium with Maven – Upgrade from Selenium 3 to Selenium 4
If you are using Selenium with Java, you will likely use Selenium with Maven to manage the dependencies associated with your Selenium project. For Selenium with Maven users, changing the Selenium version to 4 in pom.xml is all you need to upgrade from Selenium 3 to Selenium 4.
<?xml version="1.0" encoding="UTF-8"?>
<project xmlns="http://maven.apache.org/POM/4.0.0"
         xmlns:xsi="http://www.w3.org/2001/XMLSchema-instance"
         xsi:schemaLocation="http://maven.apache.org/POM/4.0.0 http://maven.apache.org/xsd/maven-4.0.0.xsd">
    <modelVersion>4.0.0</modelVersion>

    <groupId>org.demo</groupId>
    <artifactId>TestProject</artifactId>
    <version>1.0-SNAPSHOT</version>

    <dependencies>
        <dependency>
            <groupId>org.testng</groupId>
            <artifactId>testng</artifactId>
            <version>6.9.10</version>
            <scope>test</scope>
        </dependency>
        <dependency>
            <groupId>org.slf4j</groupId>
            <artifactId>slf4j-nop</artifactId>
            <version>1.7.28</version>
            <scope>test</scope>
        </dependency>
        <dependency>
            <groupId>org.seleniumhq.selenium</groupId>
            <artifactId>selenium-java</artifactId>
            <version>4.0.0-alpha-7</version>
       </dependency>
        <dependency>
            <groupId>org.seleniumhq.selenium</groupId>
            <artifactId>selenium-remote-driver</artifactId>
            <version>4.0.0-alpha-7</version>
        </dependency>
        <dependency>
            <groupId>org.seleniumhq.selenium</groupId>
            <artifactId>selenium-chrome-driver</artifactId>
            <version>4.0.0-alpha-7</version>
        </dependency>
    </dependencies>

    <build>
    <defaultGoal>install</defaultGoal>
    <plugins>
        <plugin>
            <artifactId>maven-compiler-plugin</artifactId>
            <version>3.0</version>
            <configuration>
                <source>1.8</source>
                <target>1.8</target>
            </configuration>
        </plugin>
    </plugins>
    </build>
</project>
Maven Central repository is the ideal location to look for dependencies or libraries for all the versions. As shown above, we downloaded the Maven Dependency for Selenium 4 Java and added the same in pom.xml

Along with Selenium 4 Java, we also added the Selenium 4 packages for selenium-chrome-driver and selenium-remote-driver in the POM file (pom.xml).
Selenium with Gradle – Upgrade from Selenium 3 to Selenium 4
Gradle is a popular build tool that is used for Java-based applications. The build scripts in Gradle are written in Groovy or Kotlin DSL. If you are using Gradle for your Selenium Java project, the necessary dependencies must be configured in the build.gradle file, which is placed at the root level (of the project).
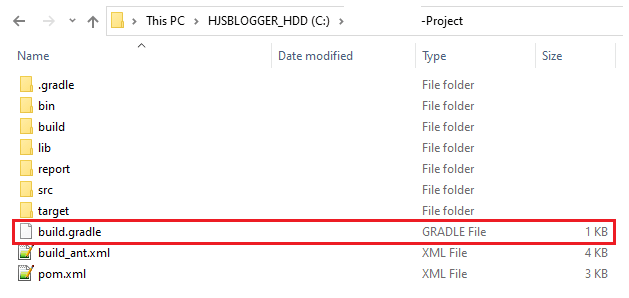
The necessary dependencies to be downloaded have to be added in build.gradle. Like Maven, the Maven Central Repository should be used for finding the required dependencies for the project.
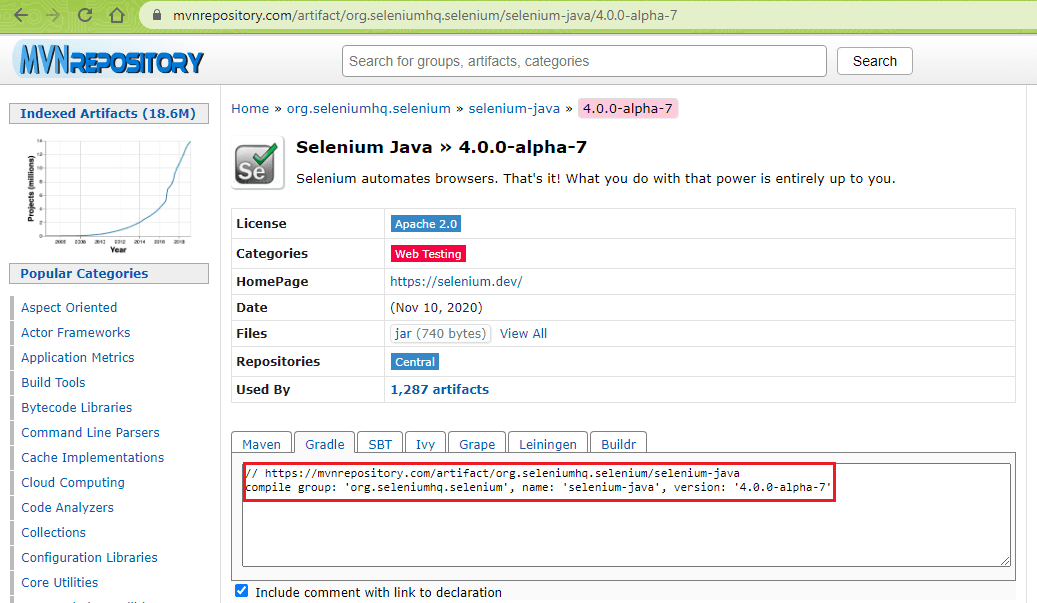
Here is the build file (build.gradle) for a Gradle project where we have used the 4.0.0-alpha-7 version of the Selenium Java binding. Since we are using the TestNG framework in the implementation, we have added the other dependencies in the build.gradle.
plugins {
    id 'java'
}

group 'org.demo'
version '1.0-SNAPSHOT'

sourceCompatibility = 1.8

repositories {
    mavenCentral()
}

dependencies {
   compile group: 'org.seleniumhq.selenium', name: 'selenium-java',
            version: '4.0.0-alpha-7'
    compile group: 'org.seleniumhq.selenium', name: 'selenium-chrome-driver',
            version: '4.0.0-alpha-7'
    compile group: 'org.seleniumhq.selenium', name: 'selenium-remote-driver',
            version: '4.0.0-alpha-7'
    compile group: 'org.testng', name: 'testng',
            version: '6.14.3'
}

test {
    useTestNG()
}
Test Setup – Demonstration of upgrading from Selenium 3 to Selenium 4
To demonstrate how to upgrade from Selenium 3 to Selenium 4, we take a cross browser testing example where the search for “LambdaTest” is performed on Google. The test is performed on the Chrome browser.
Test Scenario
- Go to Google
- Search for LambdaTest
- Click on the first search result
- Assert if the page title does not match the expected page title
Implementation
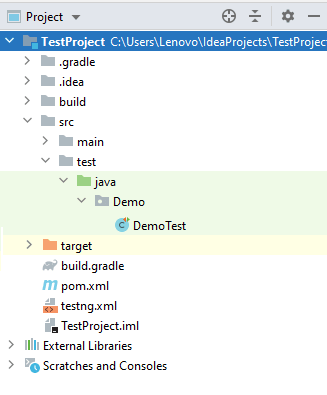
Here is the overall project structure in IntelliJ IDEA:
Downloading Selenium 4 using Maven
In a Maven project, the pom.xml file consists of the required details about the configuration, dependencies, and more. Along with Selenium 4 Java, we have also added the Selenium 4 Chrome Driver and Selenium 4 remote Driver dependencies in pom.xml.
<?xml version="1.0" encoding="UTF-8"?>
<project xmlns="http://maven.apache.org/POM/4.0.0"
         xmlns:xsi="http://www.w3.org/2001/XMLSchema-instance"
         xsi:schemaLocation="http://maven.apache.org/POM/4.0.0 http://maven.apache.org/xsd/maven-4.0.0.xsd">
    <modelVersion>4.0.0</modelVersion>

    <groupId>org.demo</groupId>
    <artifactId>TestProject</artifactId>
    <version>1.0-SNAPSHOT</version>

    <dependencies>
        <dependency>
            <groupId>org.testng</groupId>
            <artifactId>testng</artifactId>
            <version>6.9.10</version>
            <scope>test</scope>
        </dependency>
        <dependency>
            <groupId>org.slf4j</groupId>
            <artifactId>slf4j-nop</artifactId>
            <version>1.7.28</version>
            <scope>test</scope>
        </dependency>
        <dependency>
            <groupId>org.seleniumhq.selenium</groupId>
            <artifactId>selenium-java</artifactId>
            <version>4.0.0-alpha-7</version>
       </dependency>
        <dependency>
            <groupId>org.seleniumhq.selenium</groupId>
            <artifactId>selenium-remote-driver</artifactId>
            <version>4.0.0-alpha-7</version>
        </dependency>
        <dependency>
            <groupId>org.seleniumhq.selenium</groupId>
            <artifactId>selenium-chrome-driver</artifactId>
            <version>4.0.0-alpha-7</version>
        </dependency>
    </dependencies>

    <build>
    <defaultGoal>install</defaultGoal>
    <plugins>
        <plugin>
            <artifactId>maven-compiler-plugin</artifactId>
            <version>3.0</version>
            <configuration>
                <source>1.8</source>
                <target>1.8</target>
            </configuration>
        </plugin>
    </plugins>
    </build>
</project>
As we are using the TestNG framework, the details of the test scenarios are added in testng.xml.
<?xml version="1.0" encoding="UTF-8"?>
<!DOCTYPE suite SYSTEM "http://testng.org/testng-1.0.dtd">
<suite name="Demo Project">
    <test verbose="2" preserve-order="true" name="Demo Project">
        <classes>
            <class name="Demo.DemoTest">
                <methods>
                    <include name="test_search_demo"/>
                </methods>
            </class>
        </classes>
    </test>
</suite>
package Demo;

import org.openqa.selenium.By;
import org.openqa.selenium.Keys;
import org.openqa.selenium.WebDriver;
import org.openqa.selenium.WebElement;
import org.openqa.selenium.chrome.ChromeDriver;
import org.openqa.selenium.remote.DesiredCapabilities;
import org.openqa.selenium.remote.RemoteWebDriver;
import org.testng.annotations.AfterTest;
import org.testng.annotations.BeforeTest;
import org.testng.annotations.Test;
import java.net.MalformedURLException;
import java.net.URL;
import static org.testng.AssertJUnit.assertEquals;

public class DemoTest
{
    ChromeDriver web_driver = null;

    @BeforeTest
    public void testSetUp()
    {
        web_driver = new ChromeDriver();

        web_driver.get("https://www.google.com");
        web_driver.manage().window().maximize();
    }

    @Test
    public void test_search_demo() throws InterruptedException
    {
        WebElement elem_search = web_driver.findElement(By.name("q"));
        elem_search.sendKeys("LambdaTest" + Keys.ENTER);

        Thread.sleep(3000);
        WebElement elem_search_result = web_driver.findElement(By.xpath("//h3[.='LambdaTest: Most Powerful Cross Browser Testing Tool Online']"));
        elem_search_result.click();

        assertEquals(web_driver.getTitle(), "Most Powerful Cross Browser Testing Tool Online | LambdaTest");
    }

    @AfterTest
    public void tearDown()
    {
        if (web_driver != null)
        {
            System.out.println("Demo Test is Completed");
            web_driver.quit();
        }
    }
}
Setting up Gradle
The same project is used for demonstrating upgrading from Selenium 3 to Selenium 4 using Gradle. Dependencies, plugins, and the build scripts should be available in the build.gradle file, which is placed at the root level of the project.
For a quick recap on Gradle, you can refer to the detailed coverage of Gradle (with JUnit) in our earlier blog here. The dependencies of Selenium 4 Java, Selenium Chrome Driver (4.0.0-alpha-7), Selenium Remote Driver (4.0.0-alpha-7), and TestNG (6.14.3) are added in the build.gradle.
plugins {
    id 'java'
}

group 'org.demo'
version '1.0-SNAPSHOT'

sourceCompatibility = 1.8

repositories {
    mavenCentral()
}

dependencies {
    compile group: 'org.seleniumhq.selenium', name: 'selenium-java',
            version: '4.0.0-alpha-7'
    compile group: 'org.seleniumhq.selenium', name: 'selenium-chrome-driver',
            version: '4.0.0-alpha-7'
    compile group: 'org.seleniumhq.selenium', name: 'selenium-remote-driver',
            version: '4.0.0-alpha-7'
    compile group: 'org.testng', name: 'testng',
            version: '6.14.3'
}

test {
    useTestNG()
}
Execution
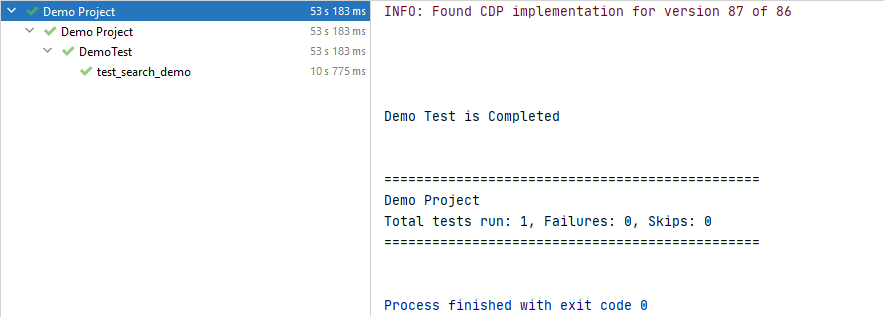
To execute the test scenario, right-click on testng.xml and select “run …\testng.xml”.

The execution snapshot below shows that the Chrome WebDriver was instantiated, and the test scenario was executed successfully.
For Gradle, we use the command line option (gradle test) to trigger the test in the project. As the test scenario (test_search_demo) is located in the class file DemoTest, we run the test using the following command (after navigating to the root folder of the project):
gradle test --tests DemoTest.test_search_demo
As seen in the execution snapshot, the test was executed successfully.

Upgrade From Selenium 3 To Selenium 4 Using The cloud-based Selenium Grid
The advantages offered by Selenium 4 can be best exploited on a Selenium Grid where tests can execute in parallel on the appropriate nodes. The Selenium 4 Grid provides a host of new features that ease and accelerate Selenium web automation testing.
A cloud-based Selenium Grid like LambdaTest offers much-needed scalability, reliability, and security, difficult to attain with a local Selenium Grid. Selenium testing on the cloud helps achieve better browser coverage, test coverage, and test coverage, as a number of tests can be executed in parallel on the cloud-based Selenium Grid.
We port the test demonstrated earlier so that it executes on LambdaTest’s Selenium 4 Grid. To get started, we generate the desired capabilities for Java language binding using LambdaTest Capabilities Generator.

As a part of the setup, the method implemented under the @BeforeTest annotation will use the RemoteWebDriver instead of the local Chrome Driver. Shown below is the updated DemoTest.java where we use the LambdaTest Selenium Grid for running the test:
package Demo;

import org.openqa.selenium.By;
import org.openqa.selenium.Keys;
import org.openqa.selenium.WebDriver;
import org.openqa.selenium.WebElement;
import org.openqa.selenium.chrome.ChromeDriver;
import org.openqa.selenium.remote.DesiredCapabilities;
import org.openqa.selenium.remote.RemoteWebDriver;
import org.testng.annotations.AfterTest;
import org.testng.annotations.BeforeTest;
import org.testng.annotations.Test;
import java.net.MalformedURLException;
import java.net.URL;
import static org.testng.AssertJUnit.assertEquals;

public class DemoTest
{
    /* ChromeDriver web_driver = null; */
    public WebDriver web_driver;
    public static String username = "user-name";
    public static String access_key = "access-key";

    @BeforeTest
    public void testSetUp() throws MalformedURLException {
        /* web_driver = new ChromeDriver(); */
        DesiredCapabilities capabilities = new DesiredCapabilities();

        capabilities.setCapability("build", "Testing on the LambdaTest Grid");
        capabilities.setCapability("name", "Testing on the LambdaTest Grid");
        capabilities.setCapability("platform", "Windows 10");
        capabilities.setCapability("browserName", "Chrome");
        capabilities.setCapability("version","88.0");

        web_driver = new RemoteWebDriver(new URL("http://" + username + ":" + access_key + "@hub.lambdatest.com/wd/hub"), capabilities);

        web_driver.get("https://www.google.com");
        web_driver.manage().window().maximize();
    }

    @Test
    public void test_search_demo() throws InterruptedException
    {
        WebElement elem_search = web_driver.findElement(By.name("q"));
        elem_search.sendKeys("LambdaTest" + Keys.ENTER);

        Thread.sleep(3000);
        WebElement elem_search_result = web_driver.findElement(By.xpath("//h3[.='LambdaTest: Most Powerful Cross Browser Testing Tool Online']"));
        elem_search_result.click();

        assertEquals(web_driver.getTitle(), "Most Powerful Cross Browser Testing Tool Online | LambdaTest");
    }

    @AfterTest
    public void tearDown()
    {
        if (web_driver != null)
        {
            System.out.println("Demo Test is Completed");
            web_driver.quit();
        }
    }
}
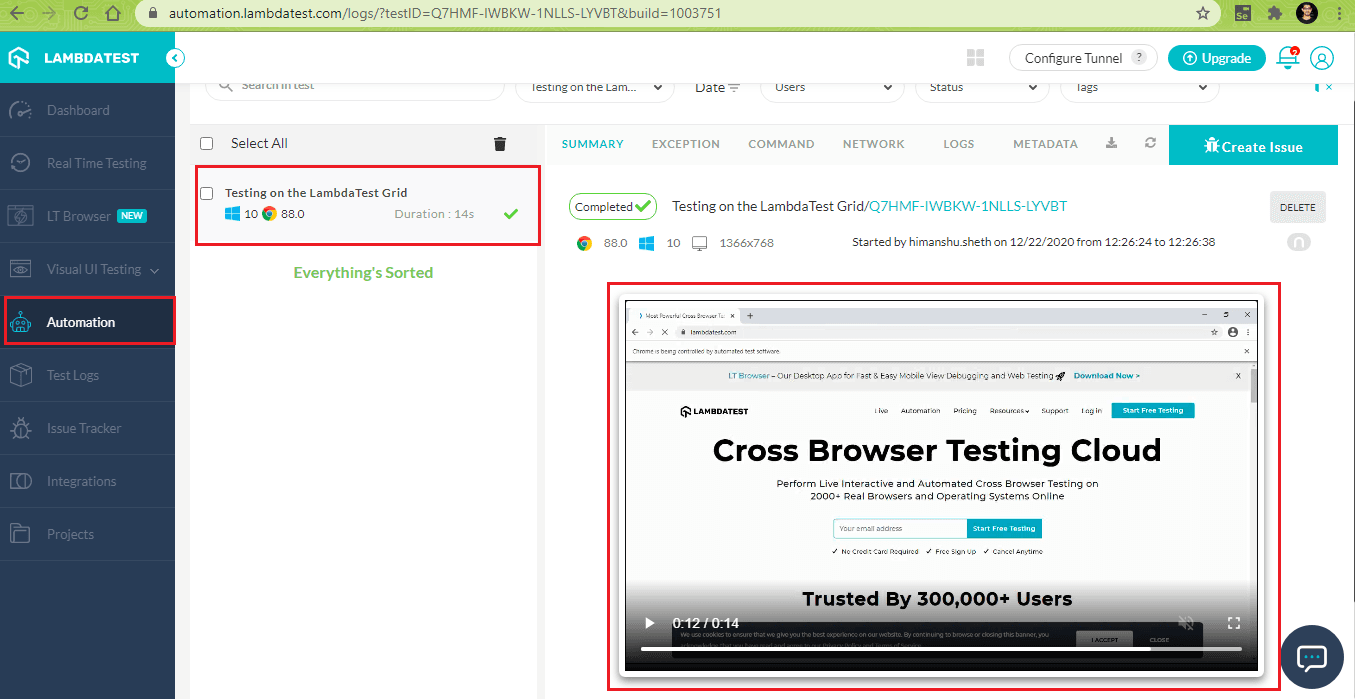
The execution information is available in the Automation Dashboard of LambdaTest. As seen below, the test was executed successfully on the LambdaTest Selenium Grid:
That’s All Folks

Selenium 4 offers several new features like relative locators, Chrome DevTools, improved Selenium Grid, and more, making it a worthy upgrade over Selenium 3. In this Selenium 4 tutorial, we had a detailed look at how to upgrade from Selenium 3 to Selenium 4 for Java language bindings. If you are using Maven for the project, upgrading to Selenium 4 is about fetching the Selenium 4 from the Maven Repository and adding the same in pom.xml.
Apart from Java, it is easy to upgrade to Selenium 4 for Selenium supported languages like Python, C#, PHP, Ruby, and JavaScript. As far as Selenium 3 vs. Selenium 4 is concerned, Selenium 4 (which is still in the Alpha stage) has a huge upper-edge over its predecessor.
If you are using Selenium 4, have you tried Selenium with Maven? Do share your experience in the comments section. Also, let us know which is your ‘go-to feature’ in Selenium 4.
Happy Automation Testing.☺
