Table of contents
- What are Selenium Webdriver Commands?
- Web Browser Commands
- 1. Url
- 2. Title
- 3. PageSource
- 4. Quit
- 5. Close
- 6. Navigate
- Web Element Commands
- 1. Click
- 2. Enabled
- 3. Displayed
- 4. Clear
- 5. SendKeys
- 6. GetAttribute
- 7. GetCssValue
- 8. Submit
- 9. Text
- 10. TagName
- 11. Selected
- 12. Size
- Drop Down Commands
- 1. SelectByIndex
- 2. DeselectByIndex
- 3. SelectByText
- 4. DeselectByText
- 5. SelectByValue
- 6. DeselectByValue
- 7. DeselectAll
- 8. IsMultiple
- 9. Options
- 10. AllSelectedOptions
- It’s A Wrap!
Selenium Framework interacts with the web browser via the Selenium WebDriver commands. It does so with the help of certain Selenium WebDriver commands to automate browser actions such as open, close or maximise the browser window. Also, you can handle different web elements or drop down elements browser to perform Selenium test automation.
Different programming languages such as Python, Java,C# etc uses an interface to interact with the browser. In this Nunit tutorial, I’ll be exploring Selenium commands for NUnit, which is a Selenium test automation framework for C# , the interface used through which the browser is controlled is the IWebDriver.
In this NUnit tutorial on Selenium WebDriver Commands in NUnit, I’ll take deep dive into various Selenium WebDriver Commands for web browsers, browser elements & drop down. In case you’re not familiar with ‘what is Selenium?’, you can refer to our detailed page on the topic.
If you’re new to Selenium and wondering what it is then we recommend checking out our guide — What is Selenium?
What are Selenium Webdriver Commands?
Selenium Webdriver commands are the methods used to run your Selenium test automation scripts. You can use these browser commands to automate different browser actions to perform testing.
Selenium WebDriver commands in NUnit are divided in three different categories on the basis of different kinds of browser interactions. The commands are categorized based on the type of interaction and the element/application on which action is being performed. Automated browser testing involves the following Selenium commands:
Web Browser Commands — Performs actions on the web browser (e.g. open, close, maximize, etc.)
Web Element Commands — Performs actions on the web elements in the current window (e.g. checking a button, entering text in a textbox, clicking a button, etc.)
Drop Down Commands — Performs actions on the drop-down elements in the current window (e.g. selecting or deselecting a value from drop-down window).
A comprehensive end to end Testing tutorial that covers what E2E Testing is, its importance, benefits, and how to perform it with real-time examples.
Web Browser Commands
When C# is used along with the Selenium testing framework, the IWebDriver interface is used to perform actions on the web browser. To access the methods of the IWebDriver interface, an instance/driver object from IWebDriver should be created. The complete list of methods for iWebDriver comes up as soon as you press the dot key.
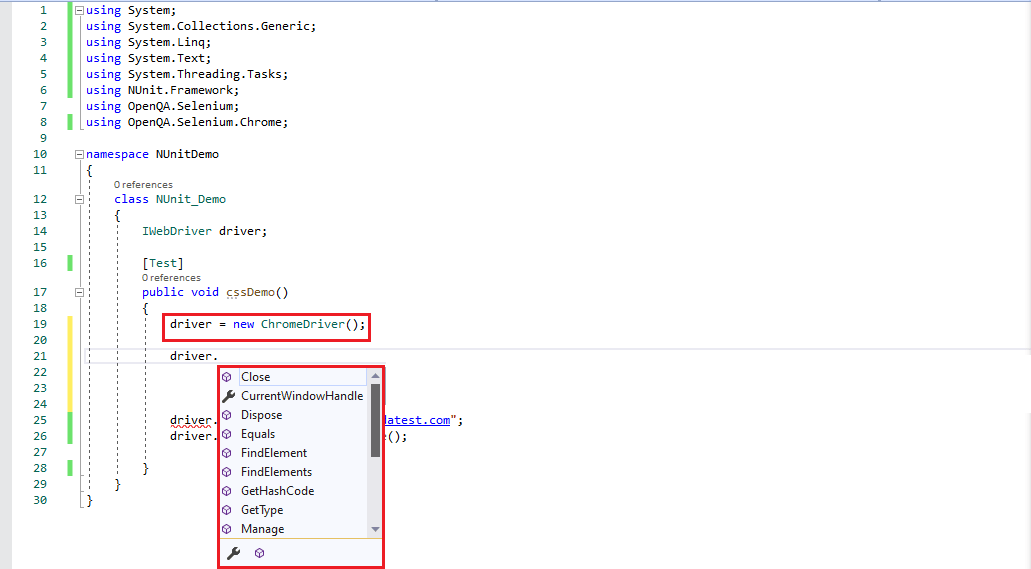
Below are the Selenium WebDriver Commands in Nunit for handling browsers:
1. Url
Using this Selenium Webdriver command you can Get or Set the URL/web page that needs to be displayed.
Syntax:
string IWebDriver.Url { get; set;}
Example
/* Selenium Webdriver command for URL*/
String URL;


driver = new ChromeDriver();
/* Set Operation */
driver.Url = "https://www.lambdatest.com";
/* Get Operation */
URL = driver.Url;
2. Title
This Selenium webdriver command gets the title of the current browser window.
Syntax:
string IWebDriver.Title{get;}
Example
/* Selenium Webdriver command for getting title */
String page_title;
driver = new ChromeDriver();
driver.Url = "https://www.lambdatest.com";
page_title = driver.Title;
3. PageSource
You can get the source of the page that is loaded by the web browser with this Selenium Webdriver command.
Syntax:
string IWebDriver.PageSource{get;}
Example
/* Selenium Webdriver command for getting page source*/
String page_source;
driver = new ChromeDriver();
driver.Url = "https://www.lambdatest.com";
page_source = driver.PageSource;
4. Quit
You can quit the driver and close every browser window associated with this Selenium Webdriver command in NUnit.
Syntax:
void IWebDriver.Quit()
Example
/* Selenium Webdriver command for URL*/
driver = new ChromeDriver();
driver.Url = "https://www.lambdatest.com";
/* Sleep for 4 seconds after page is displayed */
System.Threading.Thread.Sleep(4000);
/* Quit the window for this NUnit tutorial*/
driver.Quit();
Automated Functional Testing tests helps to ensure that your web app works as it was intented to. Learn more about functional tests, and how automating them can give you a faster release cycle.
5. Close
With close() Selenium Webdriver command, you can close the current window, quit the browser in case if it is the last window open. In case you want more detailed information on how to handle browser windows, you can refer to our blog.
Syntax:
void IWebDriver.Close()
Example
/* Selenium Webdriver command for Closing window*/
driver = new ChromeDriver();
driver.Url = "https://www.lambdatest.com";
driver.Close();
6. Navigate
With this Selenium WebDriver command in NUnit you can navigate the browser to another location i.e. Refresh the current window/Go Back to the previous window/Go to the next page as per browsing history/Go to a particular URL.
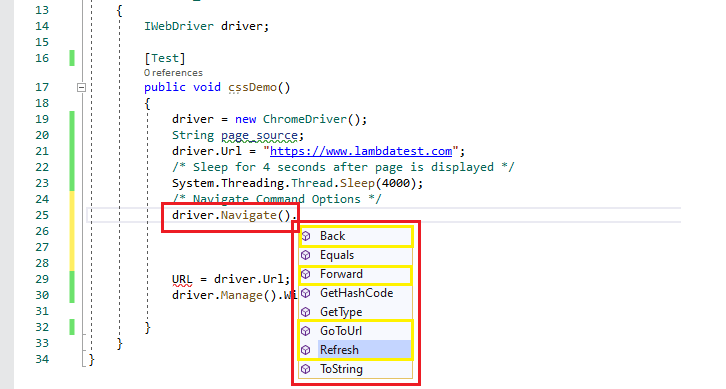
Syntax:
INavigation IWebDriver.Navigate()
Shown below are the different options available with the Navigate() command:
Back()
Move back a single entry as per the browser’s history.
Syntax:
void INavigation.Back()
Example:
driver.Navigate().Back();
Forward()
Move a single item forward as per the browser’s history
Syntax:
void INavigation.Forward()
Example:
driver.Navigate().Forward();
GoToUrl()
Navigate to a particular URL which is passed as a parameter to the Navigate() command
Syntax:
void INavigation.GoToUrl(string url)
Example:
driver.Navigate().GoToUrl(“https://www.lambdatest.com")
Refresh()
Refresh the current browser window
Syntax:
void INavigation.Refresh()
Example:
driver.Navigate().Refresh();
Web Element Commands
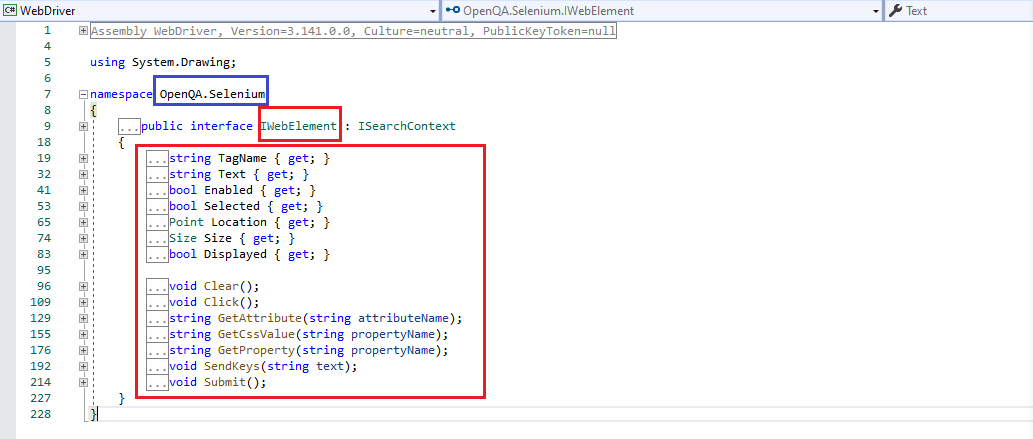
While performing Selenium Test automation with NUnit you’ll often have to rely on Selenium Webdriver command to perform operations on web elements (e.g. textboxes, radio buttons, hyperlinks, etc.) on a page, that are triggered via the IWebElement interface.
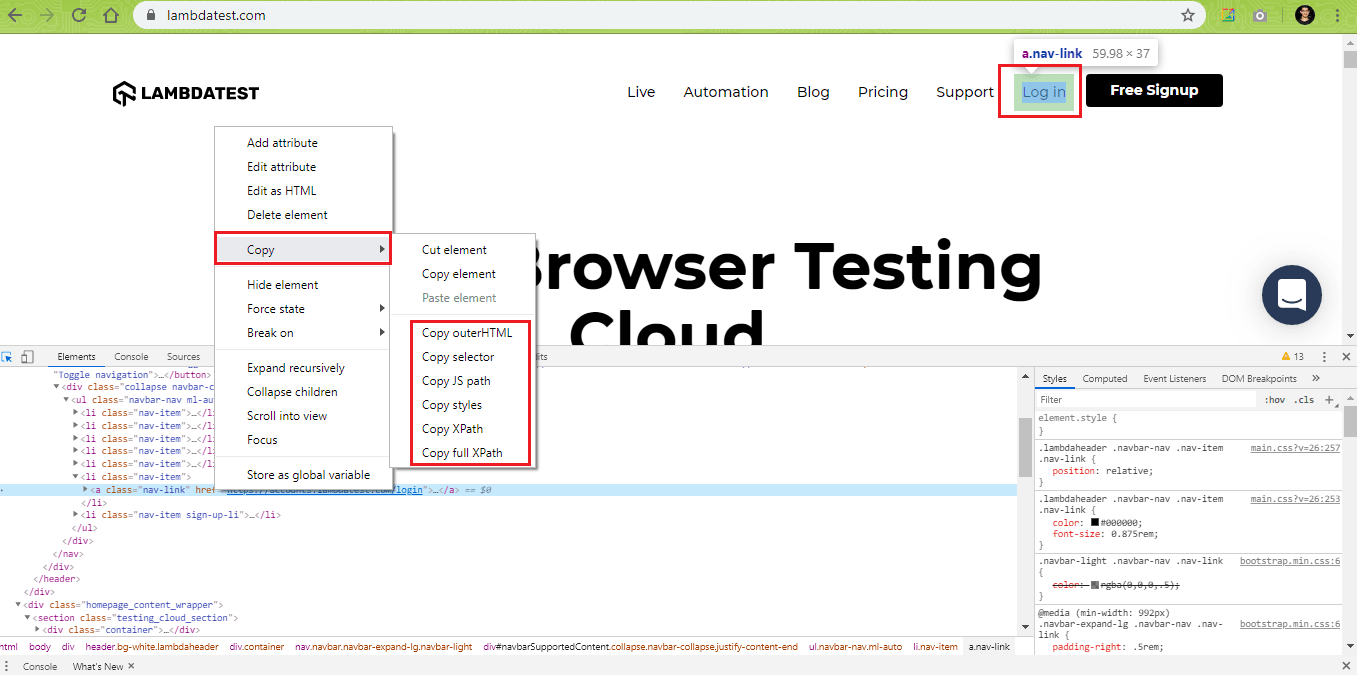
To find the details of a web element e.g. XPath, outerHTML, etc.; you can make use of the Inspect Tool available in web browsers like Chrome, Firefox, etc. Once the web element is located, you can perform the corresponding operation on that element. To know more about how to access web elements, you can refer to our detailed article on Selenium locators.
Shown below in this Nunit tutorial are the Selenium Webdriver command for web elements.
[Note — For demonstrating the usage of the web element commands, we have used the test URL as https://www.lambdatest.com]
1. Click
Using the Click() Selenium Webdriver command, you can click on a particular web element present on the web page. The Click operation can be performed on hyperlinks, buttons, checkboxes, or any other element that is clickable on the page. The element is first located on the page, after which the Click operation is performed.
Syntax:
void IWebElement.Click()
Example
/*Selenium Webdriver command for click*/
driver = new ChromeDriver();
driver.Url = "https://www.lambdatest.com";
/* The Xpath of the Login Button on LambdaTest homepage */
IWebElement web_element = driver.FindElement(By.XPath("//*[@id="navbarSupportedContent"]/ul/li[6]/a"));
web_element.Click();
2. Enabled
You can check whether a particular web element is enabled or not with the Enabled Selenium Webdriver command. It returns True if the web element on the page is enabled else it returns False.
Syntax:
Bool IWebElement.Enabled{get;}
Example
/*Selenium Webdriver command to check whether a particular web element is enabled */
driver = new ChromeDriver();
driver.Url = "https://www.lambdatest.com";
/* The Xpath of the Login Button on LambdaTest homepage */
IWebElement web_element = driver.FindElement(By.XPath("//*[@id="navbarSupportedContent"]/ul/li[6]/a"));
Boolean element_enabled = web_element.Enabled;
3. Displayed
This Selenium Webdriver command checks whether a particular web element is displayed or not. It returns True if the web element on the page is displayed else it returns False.
Syntax:
Bool IWebElement.Displayed{get;}
Example
/*Selenium Webdriver command to check whether a particular web element is displayed */
driver = new ChromeDriver();
driver.Url = "https://www.lambdatest.com";
/* The Xpath of the Login Button on LambdaTest homepage */
IWebElement web_element = driver.FindElement(By.XPath("//*[@id="navbarSupportedContent"]/ul/li[6]/a"));
Boolean element_enabled = web_element.Displayed;
4. Clear
The Clear() Selenium WebDriver command clears the content in the web element present on the page. It is used for clearing the pre-loaded contents in a text box.
Syntax:
void IWebElement.Clear()
Example
driver = new ChromeDriver();
driver.Url = "https://www.lambdatest.com";
/* The Xpath of the Email address text box on LambdaTest homepage */
IWebElement web_element = driver.FindElement(By.XPath("//*[@id='useremail']");
web_element.Clear();
5. SendKeys
This Selenium Webdriver command Inputs the values in an element like a textbox on the web page.
Syntax:
void IWebElement.SendKeys(string text)
Example
driver = new ChromeDriver();
driver.Url = "https://www.lambdatest.com";
/* The Xpath of the Email address text box on LambdaTest homepage */
IWebElement web_element = driver.FindElement(By.XPath("//*[@id='useremail']");
web_element.SendKeys("test@email.com");
6. GetAttribute
There may be attributes and properties associated to web elements present on a web page. These are added by the website developer. WIth GetAttribute you get the value of a certain attribute as a string of the webelement.
Syntax:
string IWebElement.GetAttribute(string attributename)
Example
driver = new ChromeDriver();
driver.Url = "https://www.lambdatest.com";
/* The Xpath of the Email address text box on LambdaTest homepage */
IWebElement web_element = driver.FindElement(By.XPath("//*[@id='navbarSupportedContent']/ul/li[6]/a"));
String titleValue = web_element.GetAttribute("class");
Through this usability testing tutorial, you will learn how usability testing is a great way to discover unexpected bugs, find what is unnecessary or unused before going any further, and have unbiased opinions from an outsider.
7. GetCssValue
Gets the value of a CSS property of a web element present on the web page. Color values are returned in the form of rgba string. For example, a “background-color” property set as “green” in the HTML source, will return “#008000” for its value.
Syntax:
string IWebElement.GetCssValue(string propertyname)
Example:
driver = new ChromeDriver();
driver.Url = "https://www.lambdatest.com";
/* The Xpath of the Login Button on LambdaTest homepage */
IWebElement web_element = driver.FindElement(By.XPath("//*[@id='navbarSupportedContent']/ul/li[6]/a"));
/* returns #000000 */
String cssvalue = web_element.GetCssValue("background-color");
To get the background color of the ‘Login’ button on LambdaTest homepage, we check the properties associated with the element using Inspect Tool.
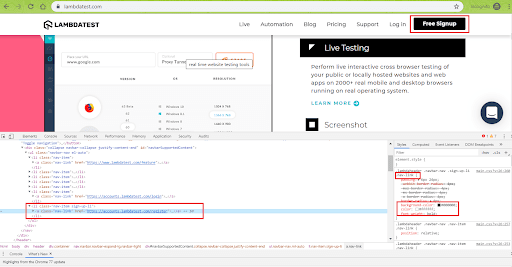
As seen in the snapshot, background-color is the property associated with Login button. The same is used with GetCssValue().
8. Submit
Performs a click on a button which is of the type submit.
Syntax:
void IWebElement.Submit()
Example
driver = new ChromeDriver();
driver.Url = "https://accounts.lambdatest.com/login";
/* The Xpath of the Login Button on which is of the type submit */
IWebElement web_element = driver.FindElement(By.XPath("//*[@id='app']/section/form/div/div/button"));
web_element.Submit();
9. Text
Gets the innerText of a web element, without any leading or trailing whitespace & other whitespaces collapsed.
Syntax:
string IWebElement.Text{get;}
Example
driver = new ChromeDriver();
driver.Url = "https://www.lambdatest.com";
/* The Xpath of the Login Button on LambdaTest homepage */
IWebElement web_element = driver.FindElement(By.XPath("//*[@id='navbarSupportedContent']/ul/li[6]/a"));
String text_value = web_element.Text;
10. TagName
Gets the tag name of a web element on the web page.
Syntax:
string IWebElement.TagName{get;}
Example
driver = new ChromeDriver();
driver.Url = "https://www.lambdatest.com";
/* The Xpath of the Login Button on LambdaTest homepage */
IWebElement web_element = driver.FindElement(By.XPath("//*[@id='navbarSupportedContent']/ul/li[6]/a"));
String tag_name = web_element.TagName;
11. Selected
Checks whether a web element is selected or not. The web element can be radio button, checkbox, etc.
Syntax:
bool IWebElement.Selected{get;}
Example
driver = new ChromeDriver();
driver.Url = "https://lambdatest.github.io/sample-todo-app/";
IWebElement web_element = driver.FindElement(By.XPath("/html/body/div/div/div/ul/li[1]/input"));
bool selected_status = web_element.Selected;
12. Size
Gets the height & width associated with a web element or the current browser window. The return type is of type struct Size.
Syntax:
Size IWebElement.Size{get;}
Example
driver = new ChromeDriver();
driver.Url = "https://www.lambdatest.com";
/* Get the window size */
Console.WriteLine(driver.Manage().Window.Size);
Take this certification to master the fundamentals of Selenium automation testing with C# and prove your credibility as a tester.
Here’s a short glimpse of the Selenium C# 101 certification from LambdaTest:
Drop Down Commands
Drop down elements are common in web pages, especially when a user is registering on a website and has to enter the country/city related information. In C#, drop down operations are performed using the SelectElement class. SelectElement is declared in using OpenQA.Selenium.Support.UI package which is imported before performing any operation on the drop down box.
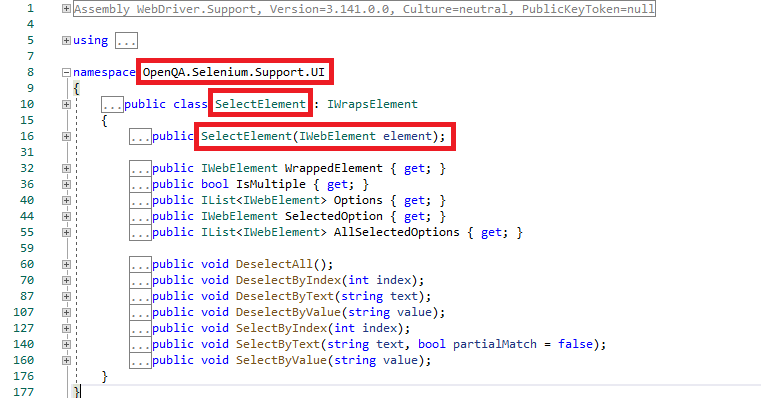
[Note — For demonstrating the usage of the web element commands, we have used the test URLs http://demos.dojotoolkit.org/dijit/tests/test_Menu.html and http://www.tizag.com/phpT/examples/formex.php].
Below are drop down operations in C#:
1. SelectByIndex
Select a value based on the index value. The starting index in drop down is 0.
Syntax:
void SelectElement.SelectByIndex(int index)
Example
driver = new ChromeDriver();

driver.Url = "http://demos.dojotoolkit.org/dijit/tests/test_Menu.html";
IWebElement element = driver.FindElement(By.XPath("//select[@aria-label='select']"));
SelectElement select_elem = new SelectElement(element);

/* Sleep for 4 seconds after page is displayed */
System.Threading.Thread.Sleep(4000);

select_elem.SelectByIndex(1);
2. DeselectByIndex
Deselect a selected value based on the index.
Syntax:
void SelectElement.DeselectByIndex(int index)
Example
driver = new ChromeDriver();

driver.Url = "http://demos.dojotoolkit.org/dijit/tests/test_Menu.html";
IWebElement element = driver.FindElement(By.XPath("//select[@aria-label='select']"));
SelectElement select_elem = new SelectElement(element);

/* Sleep for 4 seconds after page is displayed */
System.Threading.Thread.Sleep(4000);

select_elem.DeselectByIndex(1);
3. SelectByText
Select an option based on the text of the options available in the drop down. There is an option to do partial matching of the text and by default partial matching is False.
Syntax:
void SelectElement.SelectByText(string text, [bool partialMatch = false])
Example
driver = new ChromeDriver();

driver.Url = "http://demos.dojotoolkit.org/dijit/tests/test_Menu.html";
IWebElement element = driver.FindElement(By.XPath("//select[@aria-label='select']"));
SelectElement select_elem = new SelectElement(element);

/* Sleep for 4 seconds after page is displayed */
System.Threading.Thread.Sleep(4000);

select_elem.SelectByText("on IE6");
4. DeselectByText
Deselect an already selected option based on the text of the options available in the drop down.
Syntax:
void SelectElement.DeselectByText(string text)
Example
driver = new ChromeDriver();

driver.Url = "http://demos.dojotoolkit.org/dijit/tests/test_Menu.html";
IWebElement element = driver.FindElement(By.XPath("//select[@aria-label='select']"));
SelectElement select_elem = new SelectElement(element);

/* Sleep for 4 seconds after page is displayed */
System.Threading.Thread.Sleep(4000);

select_elem.DeselectByText("on IE6");
5. SelectByValue
Select an option based on the value supplied as input.
Syntax:
void SelectElement.SelectByValue(string value)
Example
driver = new ChromeDriver();

driver.Url = "http://www.tizag.com/phpT/examples/formex.php";

IWebElement element = driver.FindElement(By.XPath("//*[@id='examp']/form/select[1]"));
SelectElement select_elem = new SelectElement(element);

/* Sleep for 4 seconds after page is displayed */
System.Threading.Thread.Sleep(4000);

select_elem.SelectByValue("HighSchool");
6. DeselectByValue
Deselect an already selected option based on the value supplied as input.
Syntax:
void SelectElement.DeselectByValue(string value)
Example
driver = new ChromeDriver();

driver.Url = "http://www.tizag.com/phpT/examples/formex.php";

IWebElement element = driver.FindElement(By.XPath("//*[@id='examp']/form/select[1]"));
SelectElement select_elem = new SelectElement(element);

/* Sleep for 4 seconds after page is displayed */
System.Threading.Thread.Sleep(4000);

select_elem.DeselectByValue("HighSchool");
7. DeselectAll
Used to clear the selected options in multi select drop down menus.
Syntax:
void SelectElement.DeselectAll()
Example
driver = new ChromeDriver();
driver.Url = "http://www.example-site.com";
IWebElement element = driver.FindElement(By.XPath("x-path"));
SelectElement select_elem = new SelectElement(element);
select_elem.DeselectAll();
8. IsMultiple
This Selenium Webdriver command gets a value showing if the parent element supports multiple selections. If the drop down is multi select capable it returns True else otherwise it returns False.
Syntax:
bool SelectElement.IsMultiple{get;}
Example
driver = new ChromeDriver();

driver.Url = "http://demos.dojotoolkit.org/dijit/tests/test_Menu.html";
IWebElement element = driver.FindElement(By.XPath("//select[@aria-label='select']"));

SelectElement select_elem = new SelectElement(element);
bool is_multi_select = select_elem.IsMultiple;
Console.WriteLine("Multi Select {0}", is_multi_select);
9. Options
You can get the list of options for the select element with this Selenium WebDriver command.
Syntax:
IList<IWebElement> SelectElement.Options{ get; }
Example
using System;
using System.Collections.Generic;
using System.Linq;
using System.Text;
using System.Threading;
using System.Threading.Tasks;
using System.Drawing;
using NUnit.Framework;
using OpenQA.Selenium;
using OpenQA.Selenium.Chrome;
using OpenQA.Selenium.Support.UI;

namespace NUnitDemo
{
    class NUnit_Demo
    {
        IWebDriver driver;

        [Test]
        public void cssDemo()
        {
            driver = new ChromeDriver();
            driver.Url = "http://demos.dojotoolkit.org/dijit/tests/test_Menu.html";

            IWebElement element = driver.FindElement(By.XPath("//select[@aria-label='select']"));

            SelectElement select_elem = new SelectElement(element);
            /* Sleep for 4 seconds after page is displayed */
            System.Threading.Thread.Sleep(4000);

            select_elem.SelectByText("on IE6");

            /* List will contain details of all the options */
            IList<IWebElement> avail_options = select_elem.Options;

            int ListSize = avail_options.Count;

            for (int loop_var = 0; loop_var < ListSize; loop_var++)
            {
                String text_value = select_elem.Options.ElementAt(loop_var).Text;
                System.Diagnostics.Debug.WriteLine("Selected item is " + text_value);
            }

        }

        driver.Close();
    }
}
10. AllSelectedOptions
Gets all of the selected options within the select element. It is similar to Options except that it should be used on a multi select drop down menu.
Syntax:
IList<IWebElement> AllSelectedOptions { get; }
Example
£
using System;
using System.Collections.Generic;
using System.Linq;
using System.Text;
using System.Threading;
using System.Threading.Tasks;
using System.Drawing;
using NUnit.Framework;
using OpenQA.Selenium;
using OpenQA.Selenium.Chrome;
using OpenQA.Selenium.Support.UI;

namespace NUnitDemo
{
    class NUnit_Demo
    {
        IWebDriver driver;

        [Test]
        public void cssDemo()
        {
            driver = new ChromeDriver();
            driver.Url = "http://demos.dojotoolkit.org/dijit/tests/test_Menu.html";

            IWebElement element = driver.FindElement(By.XPath("//select[@aria-label='select']"));

            SelectElement select_elem = new SelectElement(element);
            /* Sleep for 4 seconds after page is displayed */
            System.Threading.Thread.Sleep(4000);

            select_elem.SelectByText("on IE6");

            /* List will contain details of all the options */
            IList<IWebElement> avail_options = select_elem.AllSelectedOptions;

            int ListSize = avail_options.Count;
            System.Diagnostics.Debug.WriteLine("List size is " + ListSize);

            for (int loop_var = 0; loop_var < ListSize; loop_var++)
            {
                String text_value = avail_options.ElementAt(loop_var).Text;
                System.Diagnostics.Debug.WriteLine("Selected item is " + text_value);
            }

        }
        driver.Close();
    }
}
A complete Manual testing tutorial covering all aspects of Manual testing, including strategies and best practices.
It’s A Wrap!
The IWebDriver interface is the base on which the browser interactions for Selenium test automation happens. In this NUnit tutorial, I had a look at the most widely used Selenium WebDriver commands in Nunit for automated browser testing.
Using these Selenium WebDriver Tutorial commands in Nunit, you can interact with different types (and categories) of Web Elements such as text boxes, drop-downs, radio buttons, and more. This forms the basis of automated browser testing with Selenium, C#, and NUnit framework.
I hope you found this NUnit tutorial informative, In case of any questions feel free to t reach out to us in the comment section down below. That’s all for now. Happy Testing!
