


Automation testing has become an absolute necessity in an agile and fast-paced business environment with an immense focus on accelerated time to market. However, as far as automation is concerned, Selenium automation testing still reaps the maximum benefits in terms of test coverage and browser coverage.
As the product development progresses, automation testers are also on the war-footing to ensure that test scenarios are in line with features being implemented in the product. For example, if the tests are implemented without keeping scalability and maintainability in mind, minimal changes in the web application’s UI would change the Selenium test automation scripts.
The bigger challenge is to keep the test implementation ‘more decoupled’ from the web elements used in the test scripts. Page Object Model in Selenium, also called POM, is a popular design pattern in Selenium, used to create an object repository for storing WebElements.
Need to create secure Gost hashes? Protect your sensitive information with our Gost hash calculator. Get started today and keep your data safe from hackers.
Streamlining Test Automation with Page Factory in Selenium
Page Factory in Selenium is an advanced design pattern that streamlines the creation of Page Objects in automation testing. It minimizes repetitive code, enhancing the readability and maintainability of test scripts.
Watch this video to learn how to create page object model patterns with live demonstrations using TestNG.
In this blog on Selenium Page Factory tutorial, we deep dive into Page Factory in Selenium, which makes the usage of Page Objects simpler & easier through the factory class in Selenium WebDriver. Page Factory in Selenium can be considered the optimized Page Object Model (POM) for Selenium WebDriver.
Let’s look at what is Page Factory in Selenium along with deep-diving into the difference between Page Factory and Page Object Model in Selenium testing.
If you’re new to Selenium and wondering what it is then we recommend checking out our guide — What is Selenium?
What is Page Factory in Selenium
Page Factory in Selenium is an efficient and built-in implementation of the Page Object Model (POM) for WebDriver, surpassing the traditional POM in terms of optimization. Serving as an extension to Page Objects, Page Factory simplifies the usage of POM by providing a dedicated class. By leveraging the Page Factory class in Selenium, testers can streamline their interaction with web elements, making it a catalyst for enhanced efficiency and simplicity in utilizing Page Objects.
It is safe to mention that Page Factory is a combination of POM enabled through Page Factory Class in Selenium. Shown below is the top-level difference of Page Object Model (POM) and Page Factory:
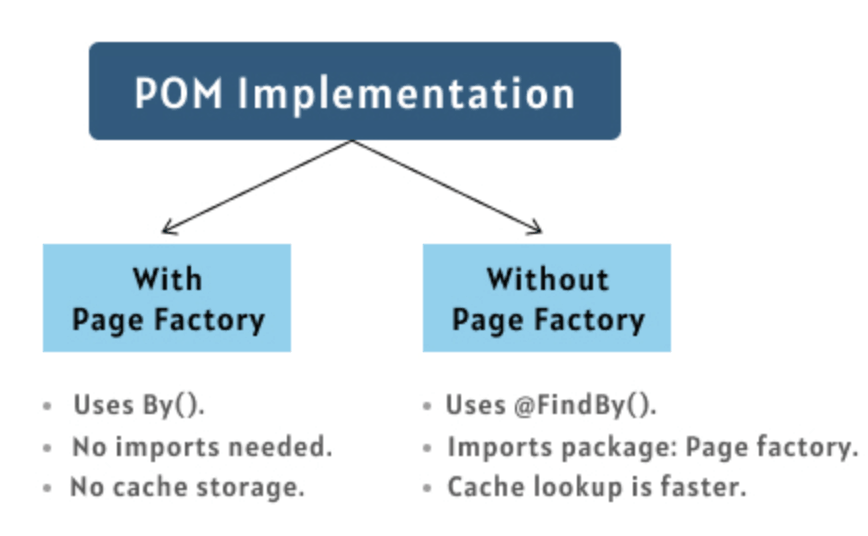
Though Page Factory in Selenium can be used in many ways, it surely helps improve the maintainability and re-usability aspects of the test implementation.
Make your data tamper-proof with our Whirlpool Hash Calculator. Create secure hashes quickly and easily with just a few clicks. Try it out now!
Introduction to PageFactory Class in Selenium
To support the Page Object (or PageObject) design pattern, Selenium WebDriver’s support library contains the PageFactory class that makes the usage of Page Objects simpler and easier. When using Page Factory in Selenium, automation testers can use the @FindBy annotation for locating the web elements. These web elements are defined in web page classes (or Page Objects).
The major benefit of the @FindBy annotation is that it lets you initialize page elements without using the FindElement (or FindElements) in Selenium.
PageFactory class in Selenium also provides the initElements method for initializing the web elements. In further sections of this Selenium Page Factory tutorial, we deep dive into the most widely-used methods of the class. This will be further helpful when we demonstrate the Page Factory design pattern in Selenium using an automation example.
How to initialize Page Factory in Selenium
For using POM with Page Factory, the Page Objects (or page classes) containing the web elements (or element locators) for the page need to be initialized using relevant methods of the Page Factory class.
This is done to ensure that the web elements are initialized before any relevant actions are performed.
One of the Selenium best practices with Page Factory is to create all the web element variables at the beginning of the class and initialize those variables when the page is loaded.
The initialization of web elements can be done through the use of initElements methods of the PageFactory class. Here are some of the common annotations and methods that are widely used in Page Factory with Selenium.
@FindBy annotation in Page Factory
The @FindBy annotation is used to declare and initialize web element variables using the desired web locators in Selenium. Hence, you can find the web elements using popular locators like ID, Name, Link Text, Class Name, etc.
The first step is passing the attribute and its value (or element locator) for locating the web element to the @FindBy annotation. The second step is declaring the variable so that it can be used further in the test implementation.
There are two ways in which @FindBy annotation can be used:
Option 1
@FindBy(how = How.ID, using=" element-id")
private WebElement element-name;
– ‘How’ — The org.openqa.selenium.support.How class in Selenium provides Enum values (or contents) that signify the desired locator (e.g. CLASS_NAME, ID, CSS, ID_OR_NAME, NAME, LINK_TEXT, PARTIAL_LINK_TEXT, XPATH, TAG_NAME, etc.)
– ‘using’ is used for assigning value to the static variable
Option 2 [A more concise form]
@FindBy(id="element-id")
private WebElement element-name;
In the syntax shown above, we have used the ID property for locating the element ‘element-id.’ Apart from ID, you can also use popular locators like CSS Selectors in Selenium, Name locator, Class Name locator, XPath locators, and more.
If there are multiple elements matching given locators, you can use @FindAll annotation with multiple @FindBy annotations.
@FindAll
   (
       {
           @FindBy(how = How.ID, using = "element"),
           @FindBy(className = "element-field")
       }
   )
private WebElement element_name;
Need to protect your data? Our SHA384 Hash Calculator creates secure, reliable, one-way hashes quickly and easily with just a few clicks. Try it out now!
Example
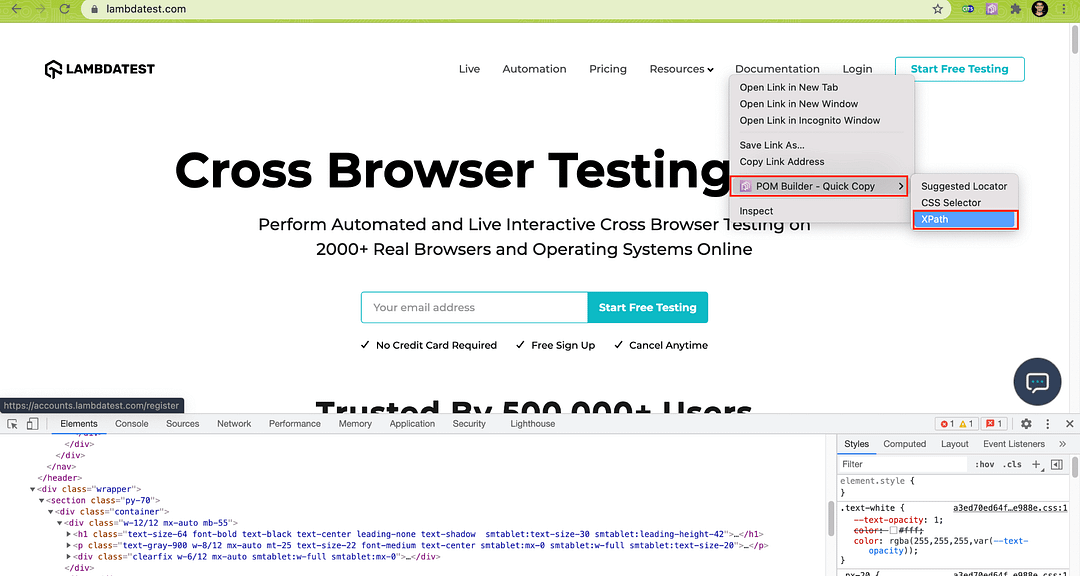
We located the button with the link text ‘Start Free Testing’ on the LambdaTest homepage using the ‘Inspect tool’ in Google Chrome.
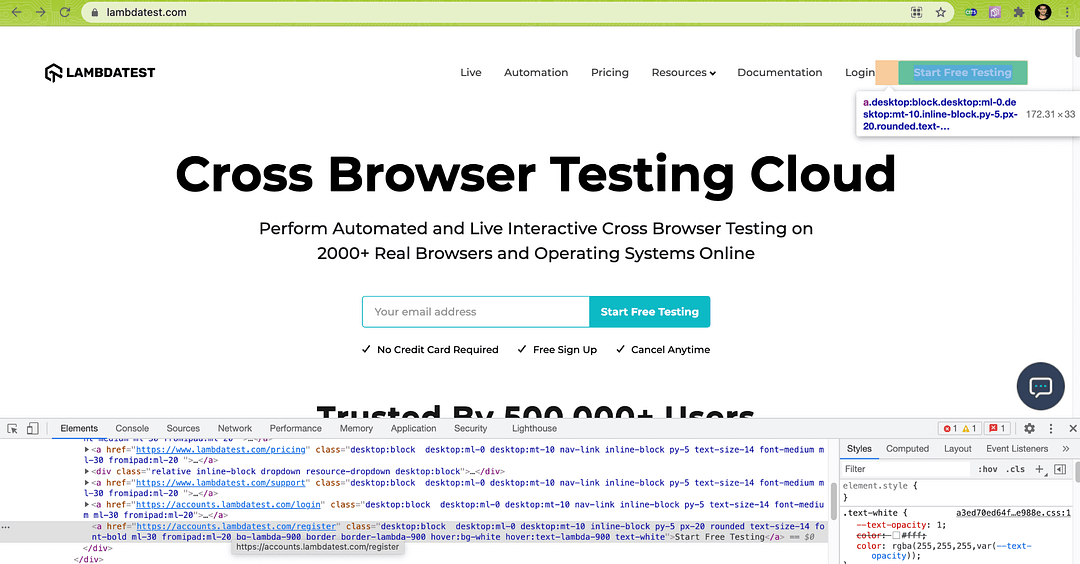
Below are the two ways through which @FindBy annotation is used to declare the web element that was located using the XPath property.
Example: Option 1
@FindBy(how = How.XPATH, using = "//a[.='Start Free Testing']")
Private WebElement SignUpButton;
Example: Option 2
@FindBy(xpath = "//a[.='Start Free Testing']")
private WebElement SignUpButton;
initElements method in Page Factory
Once the required web elements on the page are located using the appropriate web locators, the initElements method is used for declaring and initializing the requisite web element variables.
initElements is an overloaded function (or method) that can be used in multiple ways based on its arguments.
Here are some of the ways in which the web element variables can be initialized using the initElements method of Page Factory in Selenium:
Option 1: initElements
It creates an instance of the given class and sets a lazy proxy for each of the WebElements and List fields that have been declared earlier using the @FindBy annotation. An exception is thrown if the class cannot be instantiated.
Syntax
public static <T> T initElements(WebDriver driver,
java.lang.Class<T> pageClassToProxy)
Type Parameters
- T — Class of the PageObject
Input Parameters
driver — Selenium WebDriver used for locating the web elements
pageClassToProxy — Class that will be initialized
Returns
The method returns an instantiated instance of the class with WebElement and List<WebElement> fields that are proxied.
Example
SamplePage sample_page = PageFactory.initElements(web_driver, SamplePage.class);
Option 2: initElements
It is largely similar to the initElements(WebDriver, Class) method except that it will replace the fields of an already instantiated object.
Syntax
static void initElements(WebDriver driver, java.lang.Object page)
Input Parameters
driver — Selenium WebDriver used for locating the web elements
page — Object with WebElement and List<WebElement> fields that have to be proxied.
Example
SamplePage sample_page = new SamplePage(web_driver);
PageFactory.initElements(web_driver, sample_page);
Here we create an instance of the SamplePage class, and the created object is sample_page. The initElements method of the PageFactory class in Selenium initializes all the WebElements on the page SamplePage using @FindBy annotation.
The initialization of the web elements can also be done inside the web page class constructor:
public CreateAccountPage(WebDriver web_driver) {
this.driver = web_driver;
/* Initialize Elements */
PageFactory.initElements(web_driver, this);
}
Apart from the two above popular ways for initializing the web element variables when using Page Factory in Selenium, you can also use the following two approaches:
Stop worrying about data security. Our SHA512 hash calculator can help you protect your information from unauthorized access. Create secure hashes quickly and easily.
Option 3: initElements
static void initElements(ElementLocatorFactory factory, java.lang.Object page)
It is very similar to other initElements methods, the major difference is that it takes ElementLocatorFactory that provides the mechanism for finding the respective elements.
Option 4: initElements
static void initElements(FieldDecorator decorator, java.lang.Object page)
It is very much similar to other initElements methods, the major difference is that it takes a FieldDecorator used for decorating the fields.
How To Initialize Web Elements In Page Factory in Selenium
As seen in the previous section of this Selenium Page Factory tutorial, the web element variables need to be initialized before any interaction can be performed on them. The initElements method is used for initializing the web elements in the web page classes or Page Objects.
Let’s take a simple example where we locate the desired web element using the appropriate web locators and initialize the same using initElements method. In this example, we locate the ‘Start Free Testing’ link using XPath in Selenium.
@FindBy(how = How.XPATH, using = "//a[.='Start Free Testing']")
@CacheLookup
private WebElement StartTestingButton;
or
@FindBy(xpath = "//a[.='Start Free Testing']")
@CacheLookup
private WebElement StartTestingButton;
Here, the web element StartTestingButton is cached using the @CacheLookup annotation. This annotation instructs Selenium to cache the web element instead of locating the element each time the web page is loaded.
Though @CacheLookup offers a significant amount of performance gains, it should only be used for static web elements (i.e., elements that do not change after each page reload).
The initElements method is used for initializing the web elements on the page.
public HomePage(WebDriver driver) {
this.driver = driver;
PageFactory.initElements(driver, this);
}
We use the button click in Selenium to perform a click operation on the ‘Start Free Testing’ button using the XPath locator.
public void clickOnStartTestingButton()
{
StartTestingButton.click();
}
If you plan to use other web locators with Page Factory in Selenium, make sure to check out our detailed blog on using web locators with Page Factory.
Use our fast and reliable NTLM hash generator online tool to generate high-quality secured unique NTLM hashes and protect your sensitive data from unauthorized access.
What Is Lazy Initialization In Page Factory
So far in this Selenium Page factory tutorial, we have seen that the initElements method is used for initializing Page Objects of the Page Object class. However, does this necessarily mean that all the required WebElements on the page (or AUT) are located and stored at one shot?
Well, the elements are not located and stored beforehand. Selenium WebDriver will locate the respective WebElement only when that particular element (or Page Object) is in use or a relevant operation is performed on the said element.
In case the required Web Element is not available on the page, noSuchElementException Selenium exception is raised to indicate that the desired is not present in the DOM.
If you are intrigued to know about Selenium exceptions, check out our detailed blog on Exceptions in Selenium WebDriver.
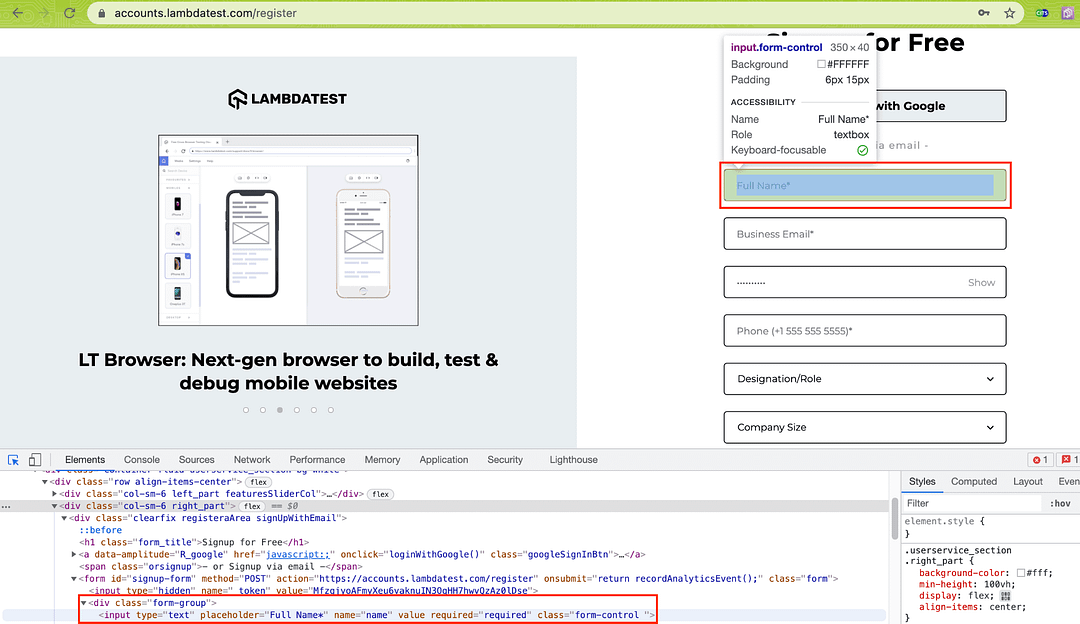
To demonstrate how Page Factory in Selenium WebDriver performs Lazy Initialization, we navigate to the LambdaTest SignUp Page and try entering a ‘First Name’ into the Name field. However, the catch is that we have used an incorrect web locator to locate that element.
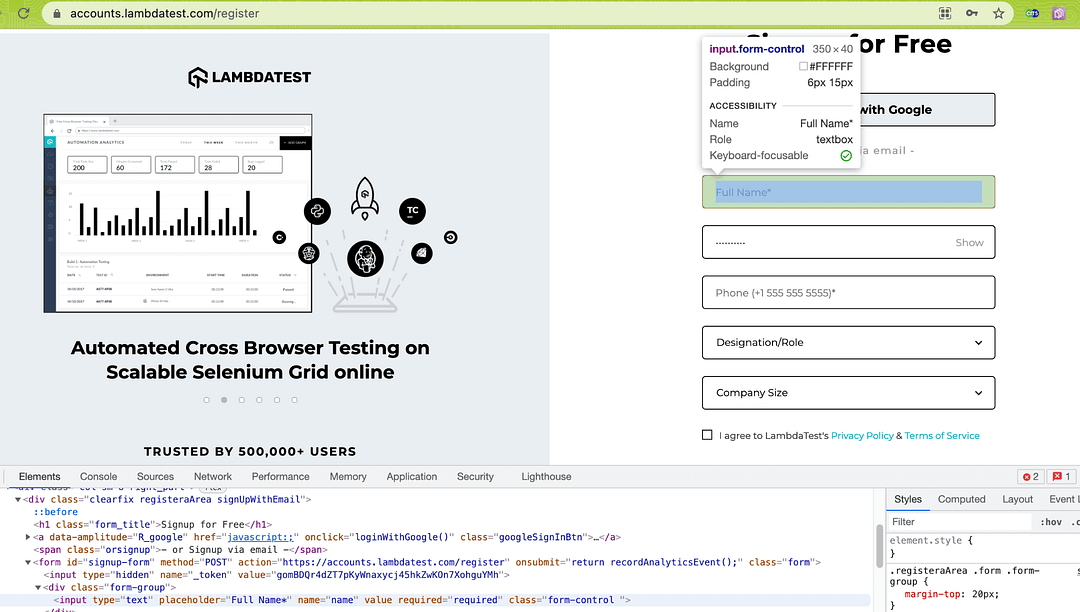
Instead of the right XPath — //input[@name=’name’], we would be using the wrong XPath value (i.e. //input[@name=’names’]).
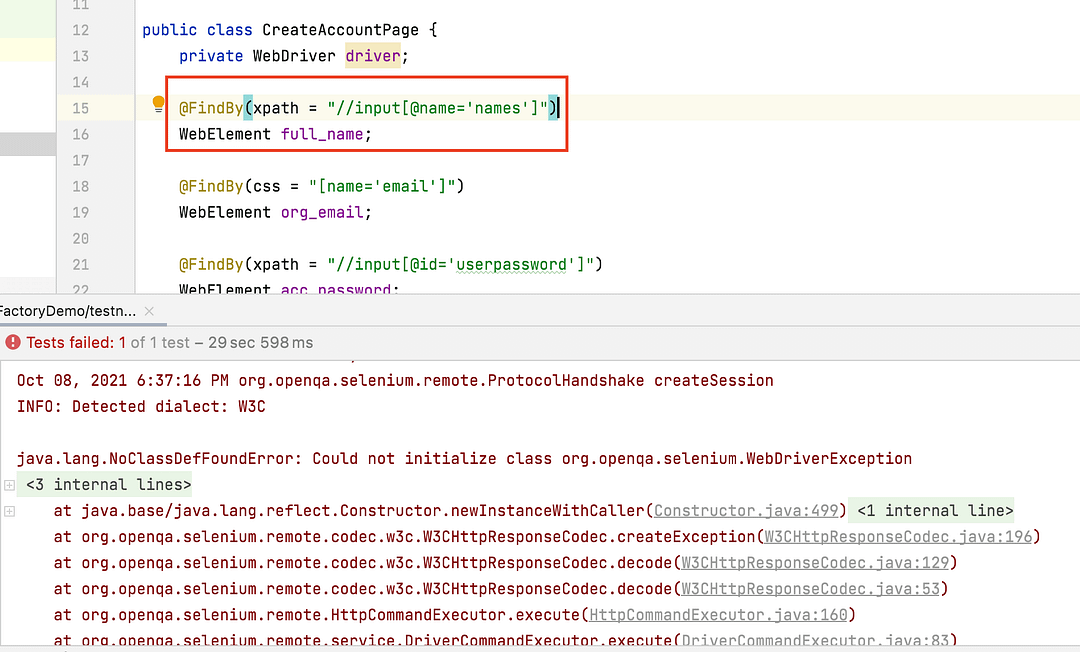
@FindBy(xpath = "//input[@name='names']")
WebElement full_name;
Hence, the desired element is not located on the page, resulting in a WebDriver exception.
Now that we have covered the essentials of Page Factory in Selenium, let’s get our hands dirty with a working test scenario. In this Selenium Page Factory example, the web pages are represented as Java classes.
The combination of @FindBy/@FindAll (or other annotations) and appropriate Selenium methods in the PageFactory class are used for locating web elements and initializing the same for Selenium automation testing.
With TestNG certification, you can challenge your skills in performing automated testing with TestNG and take your career to the next level.
Here’s a short glimpse of the TestNG certification from LambdaTest:
Keep your data secure with our online SHAKE-256 Hash Generator tool that generates unique cryptographic hash functions for your data in just a few clicks. Try it today!
Demonstration: Page Factory in Selenium For Java
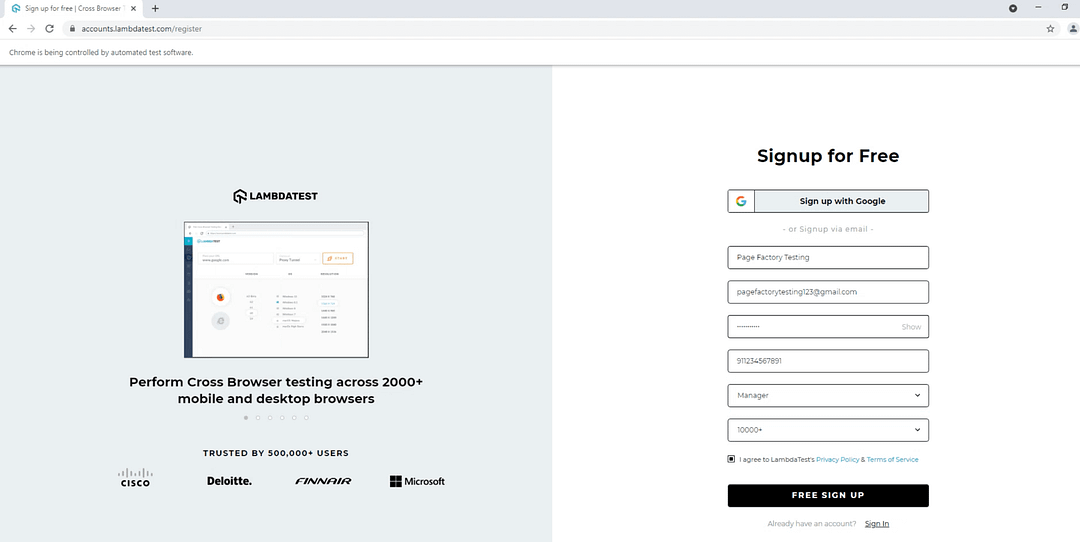
For this Selenium Page Factory Tutorial, we would be automating the LambdaTet signup process by navigating to the LambdaTest homepage and then entering the relevant details on the sign-up page.
The demonstration will be performed using the TestNG framework in Selenium. The execution is performed on the cloud-Selenium Grid provided by LambdaTest. Cloud testing with Selenium provides many benefits — improved test coverage (in terms of browser and OS combinations), accelerated time to market, and exceptional product quality. The demo for Page Factory in Selenium is performed on the Chrome (latest version) + Windows 10 combination for simplification.
The desired capabilities are generated using the desired capabilities generator on LambdaTest. A valid combination of user-name and access-key is required to access the LambdaTest cloud-grid, details of which are available in the LambdaTest profile section.
Test Scenario
Locate the ‘Start Free Testing’ button on the LambdaTest page
Click on the button
Enter the details required for new registration
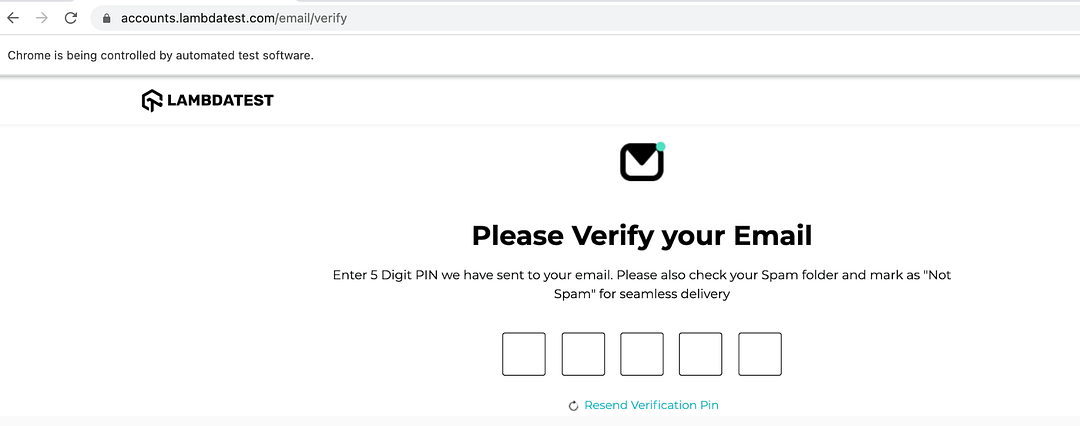
Assert if the ‘Verify Your Email’ link does not open
Project Setup
We would be creating a Maven project in IntelliJ IDEA for demoing Page Factory in Selenium. Though we are using IntelliJ IDEA, you can use an IDE of your choice (e.g., Eclipse). In case you are getting started with IntelliJ or Eclipse for Java development, make sure to check out our blogs that help you with the following:
Shown below is the directory structure:
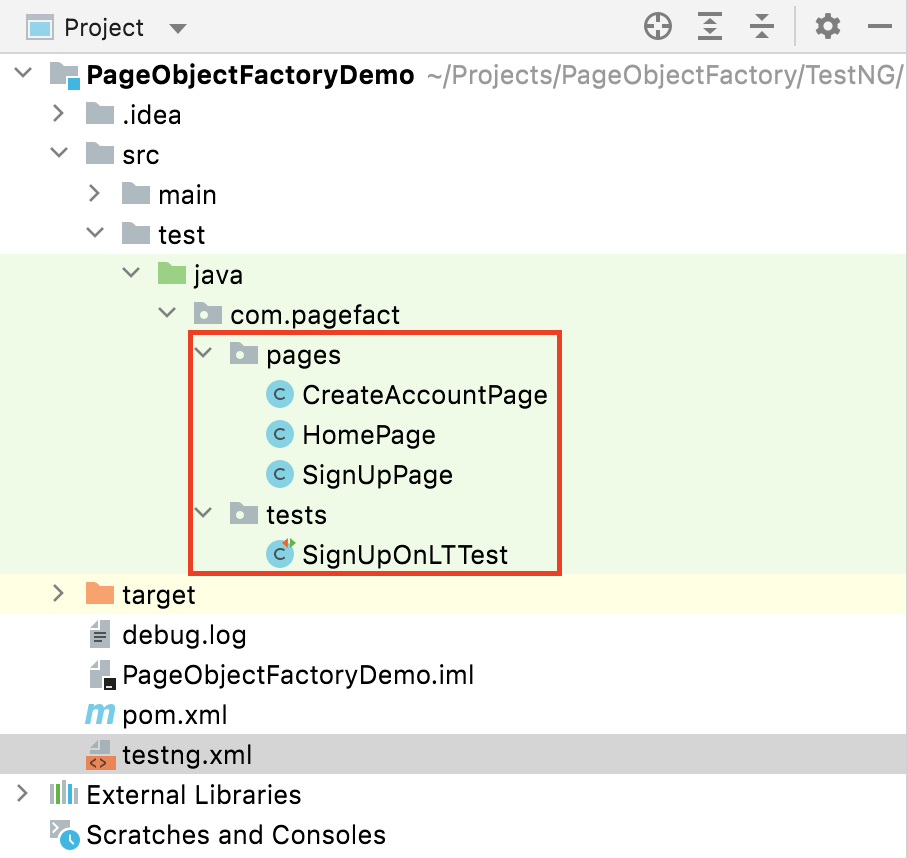
To get started, we have created a new package — com.pagefact under src/test/java folder. Under the newly created package, we have created two more packages:
com.pagefact.pages — Includes the Page Objects (or Page Classes) where the combination of @FindBy annotation and initElements method is used for preparing the backbone for the tests.
com.pagefact.tests — Includes the test implementation that will be using the respective page classes to perform relevant operations on the WebElements in the DOM.
With this, we are all set to create the required Page Object classes and the tests that would be using these page classes.
Tired of manual RGB to HEX conversions? Convert RGB colors to HEX values with ease using our fast and reliable online tool. It’s free and simple to use!
Implementation
Before we kick start the implementation, let’s add the required project dependencies in the project POM file.
<?xml version="1.0" encoding="UTF-8"?>
<project xmlns="http://maven.apache.org/POM/4.0.0"
        xmlns:xsi="http://www.w3.org/2001/XMLSchema-instance"
        xsi:schemaLocation="http://maven.apache.org/POM/4.0.0 http://maven.apache.org/xsd/maven-4.0.0.xsd">
   <modelVersion>4.0.0</modelVersion>
   <groupId>SeleniumTEST</groupId>
   <artifactId>PageObjectFactoryDemo</artifactId>
   <version>1.0-SNAPSHOT</version>
   <properties>
<project.build.sourceEncoding>UTF-8</project.build.sourceEncoding>
   </properties>
   <dependencies>
       <dependency>
           <groupId>org.testng</groupId>
           <artifactId>testng</artifactId>
           <version>6.9.10</version>
           <scope>test</scope>
       </dependency>
       <dependency>
           <groupId>org.seleniumhq.selenium</groupId>
           <artifactId>selenium-java</artifactId>
           <version>4.0.0-rc-2</version>
       </dependency>
       <dependency>
           <groupId>org.seleniumhq.selenium</groupId>
           <artifactId>selenium-chrome-driver</artifactId>
           <version>4.0.0-rc-2</version>
       </dependency>
       <dependency>
           <groupId>io.github.bonigarcia</groupId>
           <artifactId>webdrivermanager</artifactId>
           <version>4.1.0</version>
       </dependency>
       <dependency>
           <groupId>org.slf4j</groupId>
           <artifactId>slf4j-nop</artifactId>
           <version>1.7.28</version>
           <scope>test</scope>
       </dependency>
   </dependencies>

   <build>
       <defaultGoal>install</defaultGoal>
       <plugins>
           <plugin>
               <artifactId>maven-compiler-plugin</artifactId>
               <version>3.0</version>
               <configuration>
                   <source>1.8</source>
                   <target>1.8</target>
               </configuration>
           </plugin>
           <plugin>
               <groupId>org.apache.maven.plugins</groupId>
               <artifactId>maven-surefire-plugin</artifactId>
               <version>2.12.4</version>
               <configuration>
                   <suiteXmlFiles>
                       <!-- TestNG suite XML files -->
                       <suiteXmlFile>testng.xml</suiteXmlFile>
                   </suiteXmlFiles>
               </configuration>
           </plugin>
           <plugin>
               <groupId>org.apache.maven.plugins</groupId>
               <artifactId>maven-surefire-report-plugin</artifactId>
               <version>3.0.0-M5</version>
           </plugin>
       </plugins>
   </build>
</project>
We are using the Selenium 4 RC (i.e., 4.0.0-rc-2) version for testing. In case you have not tried out Selenium 4 yet, make sure to check our detailed Selenium 4 tutorial that covers all the essential aspects like relative locators in Selenium 4, mocking geolocation with Selenium 4, Selenium Grid 4, etc. that are considered to be game-changers in Selenium 4.
TestNG (v 7.4.0) is used to implement, group, and test the respective scenarios. If you are new to the TestNG framework (or more well-versed with the JUnit framework), you can refer to JUnit vs TestNG comparison to understand the major differences between the two test automation frameworks.
Page Objects (or Page Classes)
As mentioned earlier in this Selenium Page Factory tutorial, all the page classes are created under the package com.pagefact.pages
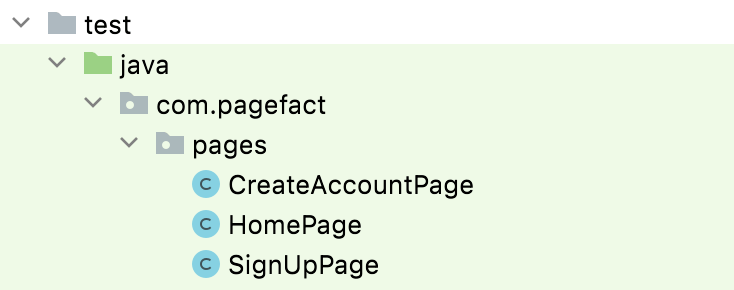
HomePage Page Object
The very first page that we need to create is that of LambdaTest Homepage. For this, we create a HomePage class under com.pagefact.pages
package com.pagefact.pages;

import org.openqa.selenium.WebDriver;
import org.openqa.selenium.WebElement;
import org.openqa.selenium.remote.RemoteWebDriver;
import org.openqa.selenium.support.FindBy;
import org.openqa.selenium.support.How;
import org.openqa.selenium.support.PageFactory;

public class HomePage {
   /* Local Selenium Grid */
   /* private WebDriver driver; */

   /* Remote Selenium Grid */
   private RemoteWebDriver driver;
   private static String PAGE_URL="https://www.lambdatest.com";

   @FindBy(how = How.XPATH, using = "//a[.='Start Free Testing']")
   private WebElement StartTestingButton;

   public HomePage(RemoteWebDriver driver)
   {
       this.driver = driver;
       driver.get(PAGE_URL);
       PageFactory.initElements(driver, this);
   }

   public void clickOnStartTestingButton()
   {
       StartTestingButton.click();
   }
}
Code Walkthrough
Since we are running the tests on the LambdaTest cloud grid, the required packages are imported at the beginning of the implementation.
import org.openqa.selenium.remote.RemoteWebDriver;
The required packages for using the Page Factory Selenium class and @FindBy annotation methods are also imported at the start.
import org.openqa.selenium.support.How;
import org.openqa.selenium.support.PageFactory;
Since we are running the tests on the LambdaTest cloud grid, we create an instance of RemoteWebDriver in place of the local WebDriver. You can check out the Selenium RemoteWebDriver tutorial to get more insights into the difference between local and remote web drivers.
public class HomePage {
private RemoteWebDriver driver;
Binary to Decimal Converter is a tool that converts binary numbers into their equivalent decimal form. Simply enter a binary number and let this converter do it for you.
As we need to perform a click operation on the button ‘Start Free Testing,’ we locate the web element using the @FindBy annotation with the element’s XPath locator. You can use the ‘Inspect Tool’ in Chrome or a plugin like POM Builder or SelectorsHub in Chrome to get the XPath of the desired WebElement.
A new web element variable (i.e. StartTestingButton) is created so that the applicable operations (i.e. click, sendKeys, etc.) can be performed on the element.
@FindBy(how = How.XPATH, using = "//a[.='Start Free Testing']")
private WebElement StartTestingButton;
As discussed in the earlier section of this Selenium Page Factory tutorial, we initialize the web element variables in the constructor. Next, the URL is set to the LambdaTest homepage so that further tests can be carried out on the web element variables of that page.
public HomePage(RemoteWebDriver driver)
{
       this.driver = driver;
       driver.get(PAGE_URL);
       PageFactory.initElements(driver, this);
}
Since the web element variable is a button, we create a method to provide a clicking mechanism on the web element variable (i.e., StartTestingButton).
public void clickOnStartTestingButton()
{
   StartTestingButton.click();
}
SignUpPage Page Object
The purpose of this page class is to check whether the click on the ‘Start Free Testing’ is successful and the page has navigated to the ‘Account Creation page’. For this, we create a SignUpPage class under com.pagefact.pages
package com.pagefact.pages;

import org.openqa.selenium.WebDriver;
import org.openqa.selenium.WebElement;
import org.openqa.selenium.remote.RemoteWebDriver;
import org.openqa.selenium.support.FindBy;
import org.openqa.selenium.support.PageFactory;

public class SignUpPage
{
   /* Local Selenium Grid */
   /* private WebDriver driver; */

   /* Remote Selenium Grid */
   private RemoteWebDriver driver;

   @FindBy(xpath = "//h1[@class='form_title']")
   private WebElement form_title;

   @FindBy(css = ".btn")
   private WebElement SignUpButton;

   public SignUpPage (RemoteWebDriver driver)
   {
       this.driver = driver;
       PageFactory.initElements(driver, this);
   }

   public boolean isLTPageOpen()
   {
       return form_title.getText().toString().contains("Signup for Free");
   }

}
Code Walkthrough
There is only one method in this page class whose purpose is to check the web page’s title. So, first, we create a web element variable that is located using the @FindBy annotation and XPath locator in Selenium.
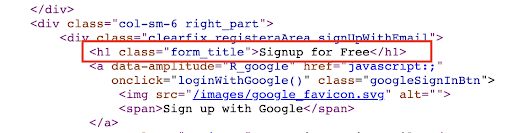
A new web element variable ‘form_title’ is created, and the same will be used for cross-checking the title of the web page.
@FindBy(xpath = "//h1[@class='form_title']")
private WebElement form_title;
A method named ‘isLTPageOpen’ is created that returns true if the page title contains the string ‘Signup for Free.’
public boolean isLTPageOpen()
{
return form_title.getText().toString().contains("Signup for Free");
}
CreateAccountPage Page Object
The purpose of this page class is to enter the requisite details in the ‘Account Creation page’ (where we are navigated after a click is performed on the ‘Start Free Testing’ button on the HomePage). For this, we create a CreateAccountPage class under com.pagefact.pages
package com.pagefact.pages;
import org.openqa.selenium.WebDriver;
import org.openqa.selenium.WebElement;
import org.openqa.selenium.remote.RemoteWebDriver;
import org.openqa.selenium.support.CacheLookup;
import org.openqa.selenium.support.FindBy;
import org.openqa.selenium.support.PageFactory;
import org.openqa.selenium.support.ui.Select;
import java.time.Duration;
import java.util.concurrent.TimeUnit;
public class CreateAccountPage
{
   /* Local Selenium Grid */
   /* private WebDriver driver; */

   /* Remote Selenium Grid */
   private RemoteWebDriver driver;

   @FindBy(xpath = "//input[@name='name']")
   WebElement full_name;

   @FindBy(css = "[name='email']")
   WebElement org_email;

   @FindBy(xpath = "//input[@id='userpassword']")
   WebElement acc_password;

   @FindBy(xpath = "//input[@name='phone']")
   WebElement phone_number;

   @FindBy(css = "[name='designation']")
   WebElement designation;

   @FindBy(css = "[name='org_size']")
   WebElement org_size;

   @FindBy(xpath = "//samp[@class='customcheckbox']")
   WebElement check_box;

   @FindBy(css = ".btn")
   WebElement create_account_button;

   @FindBy(css = "#recaptcha-verify-button")
   @CacheLookup
   WebElement recaptcha_button;
   public CreateAccountPage(RemoteWebDriver driver)
   {
       this.driver = driver;
       PageFactory.initElements(driver, this);
   }
   public void setName(String fullname)
   {
       full_name.clear();
       full_name.sendKeys(fullname);
   }
   public void setEmail(String email)
   {
       org_email.clear();
       org_email.sendKeys(email);
   }
   public void setAccount_password(String pwd)
   {
       acc_password.clear();
       acc_password.sendKeys(pwd);
   }
   public void setDesignation(String desig_name) {
       Select dropdown;
       dropdown = new Select(designation);
       dropdown.selectByValue(desig_name);
   }
   public void setCompanySize(String comp_size) {
       Select dropdown;
       dropdown = new Select(org_size);
       dropdown.selectByValue(comp_size);
   }
   public void setPhone_number (String phonenum)
   {
       phone_number.clear();
       phone_number.sendKeys(phonenum);
   }
   public void clickAcceptTCButton()
   {
       check_box.click();
       driver.manage().timeouts().implicitlyWait(Duration.ofSeconds(5));
       create_account_button.click();
       driver.manage().timeouts().implicitlyWait(Duration.ofSeconds(5));
   }
   public boolean isVerifyPageOpen()
   {
       String expected_title = "Verify Your Email Address";
       String win_title = driver.getTitle();
       boolean isWinFound = win_title.indexOf(expected_title) != -1? true: false;
       return isWinFound;
   }
}
Binary to Gray Code Converter is a free, easy-to-use online tool that converts a binary number into its equivalent Gray code representation in just one click.
Code Walkthrough
If the click operation on the ‘Start Free Testing’ button on the HomePage is successful, we will be navigated to the LambdaTest Account Creation page. The majority of the steps remain the same, as mentioned in the HomePage object creation section.
Since there are six fields on the ‘Account Creation’ page, the required web element variables are created by locating the WebElements using the appropriate web locator and @FindBy annotation.
Here is how the element ‘Name’ is located using the XPath locator in Selenium.
@FindBy(xpath = "//input[@name='name']")
WebElement full_name;
Since all the other web elements are text boxes, we use either CSS/XPath/any other relevant locator associated with @FindBy annotation. Once the element is located, corresponding web element variables (e.g., full_name, phone_number, acc_password, etc.) are created so that relevant actions can be performed on them.
@FindBy(xpath = "//input[@id='userpassword']")
WebElement acc_password;

@FindBy(xpath = "//input[@name='phone']")
WebElement phone_number;
Once the required web elements are located, and web element variables are created, the initElements method is used for initializing the elements. As mentioned earlier in this Selenium Page Factory tutorial, the element(s) would be initialized only when appropriate action (e.g., click, sendKeys, clear, etc.) is performed on the same.
public CreateAccountPage(RemoteWebDriver driver)
{
       this.driver = driver;
       PageFactory.initElements(driver, this);
}
Since the elements — Name, Business Email, Password, and Phone Number are text boxes, sendKeys in Selenium is used for entering the relevant information in those elements.
public void setName(String fullname)
 {
       full_name.clear();
       full_name.sendKeys(fullname);
}

public void setEmail(String email)
{
       org_email.clear();
       org_email.sendKeys(email);
}
Designation and Company Size elements are drop-down boxes. Hence, we use appropriate methods to handle dropdown in Selenium. For example, we can select the required value from the drop-down(s) using selectByIndex(int), selectByValue(String), or other available methods.
public void setDesignation(String desig_name)
{
       Select dropdown;
       dropdown = new Select(designation);
       dropdown.selectByValue(desig_name);
}

public void setCompanySize(String comp_size)
{
       Select dropdown;
       dropdown = new Select(org_size);
       dropdown.selectByValue(comp_size);
}
A method is created to select (or check) the ‘T&C Checkbox.’ Then, the element is located using the XPath selector.
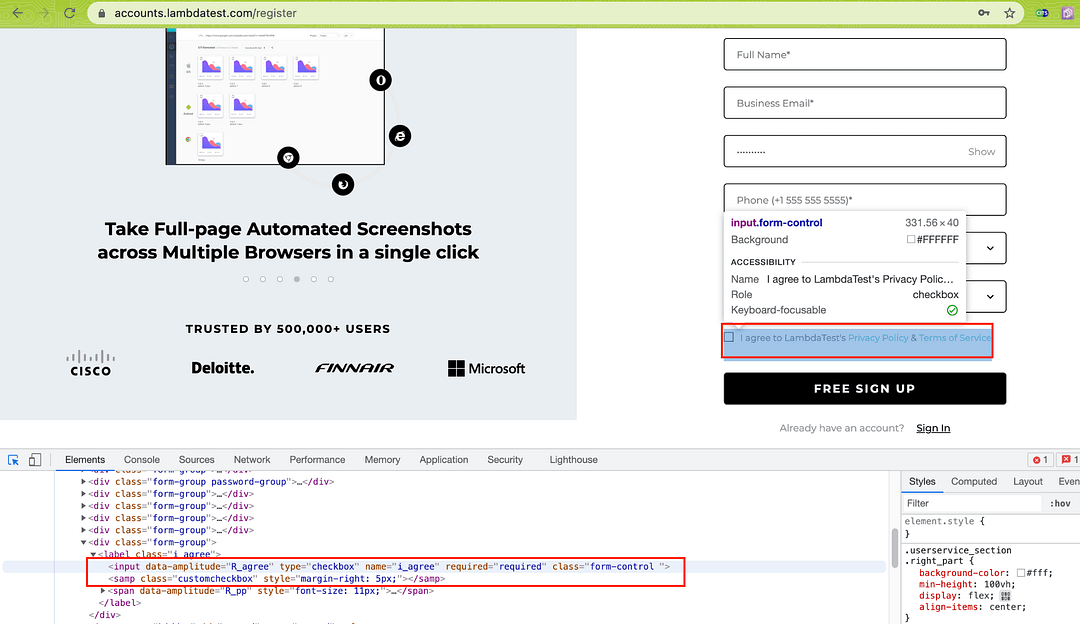
A blocking wait of 5 seconds is added to ensure the required operation is completed. Though it is not considered one of the Selenium best practices, we have used it only to demonstrate Page Factory’s usage in Selenium. You can also use explicit waits and fluent waits to add delays to handle dynamic web pages.
You can refer to our blog on waits in Selenium that deep dives into the integral aspects of handling dynamic web page content (with appropriate delays).
public void clickAcceptTCButton()
{
       check_box.click();
       driver.manage().timeouts().implicitlyWait(Duration.ofSeconds(5));
       create_account_button.click();
       driver.manage().timeouts().implicitlyWait(Duration.ofSeconds(5));
}
Watch this video to learn what are waits in Selenium and how to handle them using different methods like hard-coded pauses and by combining explicit waits with different design patterns.
Convert Octal numbers to binary format with ease using our free online Octal to Binary Converter tool. Perfect for developers, engineers, and students. Give it a try!
Simple Selenium Test that uses the Page Classes
Now that we have created the required Page Objects (or page classes) let’s assemble all the pieces to create a simple Selenium test. The test file (i.e. SignUpOnLTTest.java) is created under the page com.pagefact.tests.

Here is the implementation of the Selenium Test:
package com.pagefact.tests;

import com.pagefact.pages.*;

import org.openqa.selenium.WebDriver;
import org.openqa.selenium.chrome.ChromeDriver;
import java.net.MalformedURLException;
import java.net.URL;
import java.time.Duration;
import java.util.concurrent.TimeUnit;

/* TestNG framework is used instead of JUnit */
/* Tests triggered via testng.xml */
import org.openqa.selenium.chrome.ChromeOptions;
import org.openqa.selenium.remote.DesiredCapabilities;
import org.openqa.selenium.remote.RemoteWebDriver;
import org.testng.Assert;
import org.testng.annotations.AfterClass;
import org.testng.annotations.BeforeClass;
import org.testng.annotations.Test;

public class SignUpOnLTTest
{
   /* Local Selenium Grid */
   /* WebDriver driver; */
   /* Fetch details from https://accounts.lambdatest.com/detail/profile */
   public String username = "himanshu.sheth";
   public String accesskey = "IreQpTjhvTdZ9aFfouyQePZbOs4EPT3KpkqvUxxAWf4qGK9rvI";
   public String gridURL = "@hub.lambdatest.com/wd/hub";
   RemoteWebDriver driver = null;

   @BeforeClass
   public void testSetUp() throws MalformedURLException
   {
       /* Instantiate the Chrome instance */
       /* local Selenium Grid */
       /* driver = new ChromeDriver(); */
       /* Selenium 4 capabilities generated using https://www.lambdatest.com/capabilities-generator/ */
       ChromeOptions capabilities = new ChromeOptions();
       capabilities.setCapability("browserName", "chrome");
       capabilities.setCapability("version", "latest");
       capabilities.setCapability("platform", "Windows 10");
       capabilities.setCapability("build", "[Java] Page Factory Demo on LambdaTest");
       capabilities.setCapability("name", "[Java] Page Factory Demo on LambdaTest");
       capabilities.setCapability("geoLocation","IN");
       try
       {
           driver = new RemoteWebDriver(new URL("https://" + username + ":" + accesskey + gridURL), capabilities);
       }
       catch (MalformedURLException e)
       {
           System.out.println("Invalid grid URL");
       }
       catch (Exception e)
       {
           System.out.println(e.getMessage());
       }
       driver.manage().window().maximize();
       driver.manage().timeouts().implicitlyWait(Duration.ofSeconds(10));
   }

   @Test
   public void test_signupOnLambdaTest() throws InterruptedException
   {
       HomePage home = new HomePage(driver);
       home.clickOnStartTestingButton();

       SignUpPage signup = new SignUpPage(driver);

       /* Check if page is opened */
       Assert.assertTrue(signup.isLTPageOpen());

       /* Create object of CreateAccountPage */
       CreateAccountPage accountPage =new CreateAccountPage(driver);

       /* Fill up data */
       accountPage.setName("Page Factory Testing");
       accountPage.setEmail("pagefactorytesting123@gmail.com");
       accountPage.setAccount_password("password123");
       accountPage.setPhone_number("911234567891");
       accountPage.setDesignation("Manager");
       accountPage.setCompanySize("10000+");

       /* Click on Accept T&C and Create Account button */
       accountPage.clickAcceptTCButton();

       /* Wait for a few seconds */
       driver.manage().timeouts().implicitlyWait(Duration.ofSeconds(5));

       /* Check if page is opened */
       if (accountPage.isVerifyPageOpen())
       {
           System.out.println("Email address verification page is open\n");
       }

       /* Wait for a few seconds */
       driver.manage().timeouts().implicitlyWait(Duration.ofSeconds(10));

       System.out.println("Page Factory demo complete\n");
   }

   @AfterClass
   public void tearDown()
   {
       System.out.println("Close method of WebDriver Called");
       driver.close();
   }
}
Code Walkthrough
To get started with the Selenium test, we import all the Page Objects (or Page Classes) that are available in the com.pagefact.pages package.
import com.pagefact.pages.*;
The desired capabilities [i.e., Chrome (latest) on Windows 10] are generated using the Desired Capabilities Generator on LambdaTest. The geolocation is set to “IN” (i.e., the site will be tested with the desired location set to India). Geolocation testing in Selenium is a must for websites (or web apps) that target a global audience.
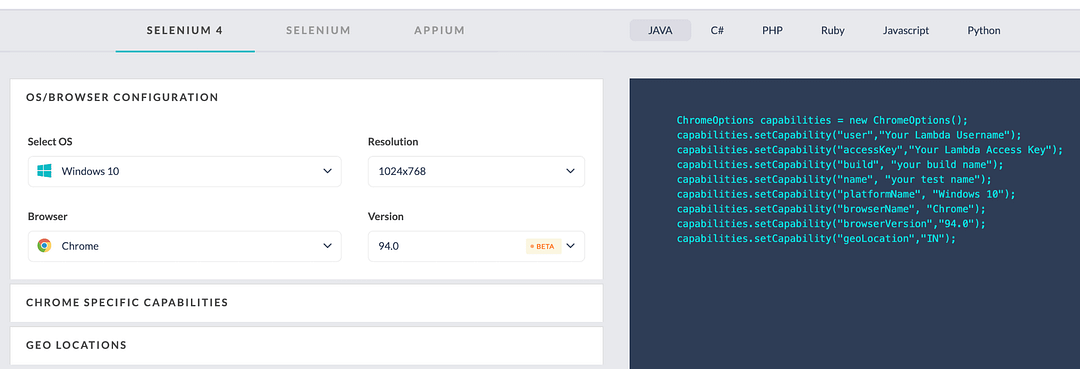
Since cross browser testing is performed on Selenium 4 Grid, hence relevant browser options (i.e., ChromeOptions) are used instead of Desired Capabilities (which is used in Selenium 3).
ChromeOptions capabilities = new ChromeOptions();
capabilities.setCapability("browserName", "chrome");
capabilities.setCapability("version", "latest");
capabilities.setCapability("platform", "Windows 10");
capabilities.setCapability("build", "[Java] Page Factory Demo on LambdaTest");
capabilities.setCapability("name", "[Java] Page Factory Demo on LambdaTest");
capabilities.setCapability("geoLocation","IN");
A new instance of Remote WebDriver is created with the browser & OS capabilities set in the earlier step. Then, the combination of user-name and access-key is used to access LambdaTest Selenium Grid (i.e., @hub.lambdatest.com/wd/hub).
driver = new RemoteWebDriver(new URL(“https://” + username + “:” + accesskey + gridURL), capabilities);
The newly created instance of Remote ChromeDriver instance is used across the Objects of the Page Classes (that were created in the com.pagefact.pages package). The Remote ChromeDriver initialization is a part of the testSetUp() method implemented under the @BeforeClass TestNG annotation. TestNG annotations in Selenium aid in building a more robust framework and provide additional information about the corresponding class or method.
@BeforeClass
public void testSetUp() throws MalformedURLException
{
In this Page Factory in Selenium demonstration, we have created a single test method (i.e., test_signupOnLambdaTest) implemented under the @Test annotation. You can also use the TestNG parameterized test to run the same test (or separate tests) across different input combinations (e.g., different browsers and platforms).
@Test
public void test_signupOnLambdaTest() throws InterruptedException
{
We first create an object of the HomePage page class. Then, the handle of the Remote WebDriver passes an argument to the instance of each Page Object, as the same WebDriver instance has to be used across all the test method(s).
The clickOnStartTestingButton() method of the HomePage class is invoked to perform a click on the ‘Start Free Testing’ button.
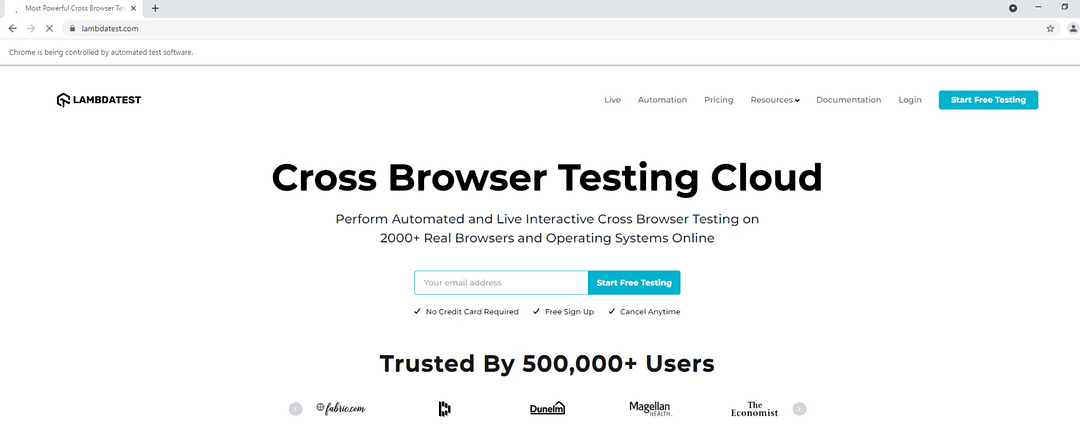
HomePage home = new HomePage(driver);
home.clickOnStartTestingButton();
If the previous step is successful, we will be navigated to the ‘Account SignUp’ page. Here we create an instance of the SignUpPage page class, post which we check if the page title contains ‘Signup for Free.’
SignUpPage signup = new SignUpPage(driver);
Assert.assertTrue(signup.isLTPageOpen());
The final step to account creation on LambdaTest involves creating an instance of the CreateAccountPage page object. Here, we pass the respective details (e.g., full name, email, phone number, etc.) to the account creation page.
The respective methods [i.e. setName(), setEmail(), setAccount_password(), etc.) are invoked to populate the data to the corresponding WebElements on the page.
CreateAccountPage accountPage = new CreateAccountPage(driver);
accountPage.setName("Page Factory Testing");
accountPage.setEmail("pagefactorytesting123@gmail.com");
accountPage.setAccount_password("password123");
accountPage.setPhone_number("911234567891");
accountPage.setDesignation("Manager");
accountPage.setCompanySize("10000+");
accountPage.clickAcceptTCButton();
The test is considered passed if the ‘Verify your email’ page appears on the screen.
if (accountPage.isVerifyPageOpen())
{
System.out.println("Email address verification page is open\n");
}
Looking for an easy way to convert your HTML files to JSON? Try our free online HTML to JSON converter tool to convert your HTML files to JSON format in seconds.
Running the Page Factory in Selenium demo test
Since we have not implemented a parameterized TestNG test, testng.xml contains the bare minimum information to invoke the tests under the com.pagefact.tests package.
<?xml version="1.0" encoding="UTF-8"?>
<!DOCTYPE suite SYSTEM "http://testng.org/testng-1.0.dtd">
<suite name="All Test Suite">
   <test verbose="2" preserve-order="true" name="Page Factory Demo">
       <classes>
           <class name="com.pagefact.tests.SignUpOnLTTest">
               <methods>
                   <include name="test_signupOnLambdaTest"/>
               </methods>
           </class>
       </classes>
   </test>
</suite>
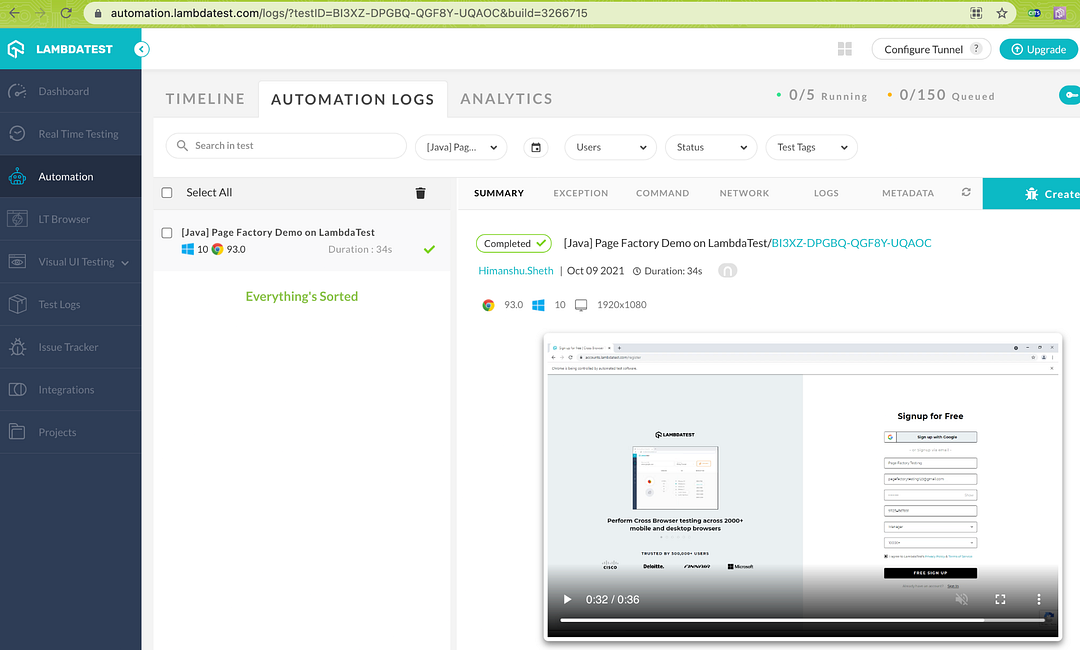
Since the tests are running on the cloud Selenium Grid on LambdaTest, hop on to the LambdaTest Automation Dashboard to check the test execution status. As shown below, the test execution was successful.
It’s A Wrap

Page Factory and Page Object Model (POM) are design patterns that make it easy for QA engineers to maintain and re-use code in a more effective manner. Page Factory in Selenium provides more firepower to POM due to the support of important annotations and methods that simplify locating and initializing the web element variables.
In this Selenium Page Factory tutorial, we have seen how Page Factory in Selenium can be used effectively for agile projects, as Page Object classes can be reused across relevant test suites by reducing maintenance and implementation efforts. Furthermore, akin to POM, the user interactions are abstracted from the core test implementation, making it easy to adapt to the changing project requirements.
Do let us know how you leveraged Page Factory in Selenium test suites for expediting test suite delivery.
Happy Testing!
Frequently Asked Questions
What is Page Factory in Selenium?
Page Factory is a class in Selenium WebDriver that supports Page Object patterns. It provides the @FindBy annotation that eases the process of locating Web Elements on the page.
Testers and QA engineers can use the initElements method in the Page Factory Selenium class to initialize the located web element variables in a few steps.
What is the difference between Page Factory and Page Object Model (POM) in Selenium?
Page Object Model (POM) can be used with and without Page Factory class in Selenium.
In simple terms, Page Factory is a more effective way of using Page Object Model (POM) in Selenium. When compared to POM, Page Factory makes the test suite more robust and maintainable.
Changes in the DOM tree require minimal changes in the test code, as the user interactions are abstracted from the test logic. This makes test suites more light, simple, and maintainable when compared to POM.
What are the advantages of Page Factory in Selenium?
Page Factory in Selenium makes the test code (i.e., test cases and test suites) easier to maintain, scale, and reuse across projects.
Since the core test logic is abstracted from the user interactions (or use actions), changes in the UI might lead to fewer changes in the test suite.
Page Factory is a more formidable way to make the test suites more maintainable and reusable — two key factors that are extremely important for Agile projects.
What is the initElements method in Selenium Page Factory class?
The initElements method in the Page Factory class lets you initialize the web element variables that are located using the @FindBy, @FindBys, @FindAll, and other supported annotations.
Does Page Factory load all the web elements at class load?
Though Page Factory provides the initElements method to initialize the web element variables, all the web elements are not loaded (and initialized) at class load.
Appropriate Selenium WebDriver Exception is raised if the required web element is not present in the DOM (Document Object Model).
The respective web element variable is initialized only when user interactions (e.g., click, sendKeys, clear, etc.) have to be performed on them using appropriate Selenium methods.
Simplify the process of converting CSV to HTML with our fast and accurate online CSV to HTML converter tool to convert your CSV files to HTML format. Try it now for free!