Table of contents
- How to Create A pytest Project To Run Multiple Test Cases From A Single File?
- Implementation
- Code Walkthrough
- How To Run Multiple Test Cases From Single & Multiple Files with Python in pytest?
- Running Subset Of A Particular Test With Python In pytest
- Using Custom Markers In Python pytest
- Grouping Tests By Complete Or Partial Matching Of Substring Expression With Python in pytest
- Wrapping It Up!
As the number of features in a web application increases, the Selenium automation tests also gradually increases! It is easy to be overwhelmed and get lost in the huge chunk of Selenium test automation scripts. But, not every test is created equal, some tests are more prone to an outage or at other times you need to focus on certain features.
These are a few Selenium test automation scenarios, where you might only run a few selective tests from a large test suite. In such cases, it is required that only those tests are triggered for execution. With pytest framework, you can support execution of all multiple test cases in a single file. You can also execute specific tests on the basis of custom markers or by grouping them on the basis of substring expression.
In this part of the Selenium Python tutorial series, I’ll take a look at the following areas related to automated browser testing with pytest framework:
Note: This should not be confused with parallel testing, a topic that would be covered later in the Python tutorial series.
How to Create A pytest Project To Run Multiple Test Cases From A Single File?
First thing first, while naming your test files in the Python pytest framework, you need to make sure that the file names start or end with _test. Even the test methods should start with test* else those test methods would be ignored while execution of the Selenium test automation script.
In case you want to learn more about how to get started with pytest, you can refer to our previous Selenium Python tutorial.
To start with the demonstration for this Selenium Python tutorial, I’ll create a simple folder structure that contains two subfolders (Test_1, Test_2) each containing a single Python pytest file (test_cross_browser_1.py, test_cross_browser_2.py).
Shown below is the detailed directory structure to run multiple test cases in python with pytest:
Get started with this complete Selenium automation testing tutorial. Learn what Selenium is, its architecture, advantages and more for automated cross browser testing .
Root Folder (Test)

Sub-folders containing tests


The test implementation in both the test files for this Selenium Python tutorial is almost the same, except the method name and additional markers that have been before the start of each test method. We would touch upon pytest markers in subsequent sections. The test cases for Selenium test automation are below:
Test Case 1
Navigate to the URL https://lambdatest.github.io/sample-todo-app/
Select the first two checkboxes
Send ‘Happy Testing at LambdaTest’ to the textbox with id = sampletodotext
Click the Add Button and verify whether the text has been added or not
Test Case 2
Navigate to the URL https://www.google.com
Search for “LambdaTest”
Click on the first test result
Raise an Assert if the Page Title does not match the expected title
Implementation
Test Case 1:
#Sample_to_do_app for Selenium test automation with Python in pytest for multiple test cases in python with pytest
import pytest
from selenium import webdriver
import sys
from selenium.webdriver.chrome.options import Options
from selenium.webdriver.common.keys import Keys
import time
from time import sleep

@pytest.mark.lambdatest1_1
def test_lambdatest1_1():
    chrome_driver = webdriver.Chrome()

    chrome_driver.get('https://lambdatest.github.io/sample-todo-app/')
    chrome_driver.maximize_window()

    chrome_driver.find_element_by_name("li1").click()
    chrome_driver.find_element_by_name("li2").click()

    title = "Sample page - lambdatest.com"
    assert title == chrome_driver.title

    sample_text = "Happy Testing at LambdaTest"
    email_text_field = chrome_driver.find_element_by_id("sampletodotext")
    email_text_field.send_keys(sample_text)
    time.sleep(5)

    chrome_driver.find_element_by_id("addbutton").click()
    time.sleep(5)

    output_str = chrome_driver.find_element_by_name("li6").text
    sys.stderr.write(output_str)

    time.sleep(2)
    chrome_driver.close()

@pytest.mark.lambdatest1_2
def test_lambdatest1_2():
    chrome_driver = webdriver.Chrome()

    chrome_driver.get('https://www.google.com/')
    chrome_driver.maximize_window()

    title = "Google"
    assert title == chrome_driver.title

    search_text = "LambdaTest"
    search_box = chrome_driver.find_element_by_xpath("//input[@name='q']")
    search_box.send_keys(search_text)

    time.sleep(5)

    # Option 1 - To Submit the search
    # search_box.submit()

    # Option 2 - To Submit the search
    search_box.send_keys(Keys.ARROW_DOWN)
    search_box.send_keys(Keys.ARROW_UP)
    time.sleep(2)
    search_box.send_keys(Keys.RETURN)

    time.sleep(5)

    # Click on the LambdaTest HomePage Link
    title = "Cross Browser Testing Tools | Free Automated Website Testing | LambdaTest"
    lt_link = chrome_driver.find_element_by_xpath("//h3[.='LambdaTest: Cross Browser Testing Tools | Free Automated ...']")
    lt_link.click()

    time.sleep(10)
    assert title == chrome_driver.title

    chrome_driver.close()
Test Case 2:
#Automated browser testing for Selenium test automation with Python in pytest multiple test cases in python with pytest
import pytest
from selenium import webdriver
import sys
from selenium.webdriver.chrome.options import Options
from selenium.webdriver.common.keys import Keys
import time
from time import sleep

@pytest.mark.lambdatest2_1
def test_lambdatest2_1():
    .........................
@pytest.mark.lambdatest2_2
def test_lambdatest2_2():
    .........................
    .........................
    chrome_driver.close()
Code Walkthrough
Step 1 — To get started, we import all the required Python packages.
import pytest
from selenium import webdriver
import sys
from selenium.webdriver.chrome.options import Options
from selenium.webdriver.common.keys import Keys
import time
from time import sleep
Step 2 — A proper test name is given to the method depending on whether it is present in the test_cross_browser_1.py or test_cross_browser_2.py. Below are the test methods for test_cross_browser_1.py and test_cross_browser_2.py for this Selenium Python tutorial respectively.
@pytest.mark.lambdatest1_1
def test_lambdatest1_1()
...........................
...........................
@pytest.mark.lambdatest1_2
def test_lambdatest1_2()
...........................
...........................
@pytest.mark.lambdatest2_1
def test_lambdatest2_1()
...........................
...........................
@pytest.mark.lambdatest2_2
def test_lambdatest2_2()
...........................
...........................
Step 3 — The actual test implementation is added to the respective methods. We would not divulge into minute details of the test implementation as this Selenium Python tutorial focuses on the execution aspects.
For both the Selenium test automation scripts, an instance of Chrome WebDriver is instantiated at the start. Details of the respective web elements are obtained using the Inspect feature available in the Chrome browser.
Once the web elements are located, the appropriate Selenium methods [find_element_by_name(), find_element_by_id()] and necessary operations [i.e. click(), submit(), send_keys(), etc.] are performed on those elements.
#Run multiple test cases in python with pytest
@pytest.mark.lambdatest1_1
def test_lambdatest1_1():
    chrome_driver = webdriver.Chrome()

    chrome_driver.get('https://lambdatest.github.io/sample-todo-app/')
    chrome_driver.maximize_window()

    chrome_driver.find_element_by_name("li1").click()
    chrome_driver.find_element_by_name("li2").click()
    .........................
    .........................
    chrome_driver.find_element_by_id("addbutton").click()
    sleep(5)

    output_str = chrome_driver.find_element_by_name("li6").text
    .........................
    chrome_driver.close()

@pytest.mark.lambdatest1_2
def test_lambdatest1_2()
    chrome_driver = webdriver.Chrome()

    .........................
    search_box = chrome_driver.find_element_by_xpath("//input[@name='q']")
    search_box.send_keys(search_text)

    .........................
    search_box.send_keys(Keys.ARROW_DOWN)
    search_box.send_keys(Keys.ARROW_UP)
    time.sleep(2)
    search_box.send_keys(Keys.RETURN)

    .........................
    lt_link.click()

    .........................
    chrome_driver.close()
Step 4 — The Chrome WebDriver instance is closed after every Selenium test automation case so that the resources used during the testing phase are released.
chrome_driver.close()
This PyTest Tutorial for beginners and professionals will help you learn how to use PyTest framework with Selenium and Python for performing Selenium automation testing.
How To Run Multiple Test Cases From Single & Multiple Files with Python in pytest?
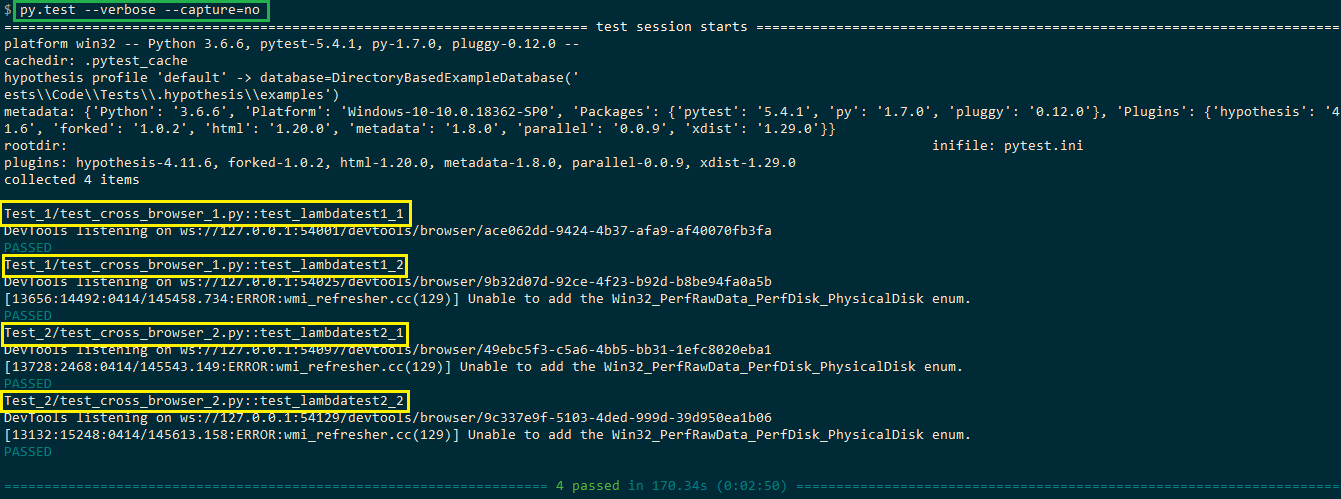
To execute the test implementation from all the files in the folder & sub-folders, we first switch to the root folder (i.e. Test), post which we simply execute the following command on the terminal:
pytest — verbose — capture=no
This command will navigate to every subfolder and execute tests in the files that start with test_ or end with test. In the Selenium test automation scenario mentioned above, the command will execute totally of four tests collectively located in testcross_browser_1.py and test_cross_browser_2.py
Here is the execution snapshot where we can see that all the four tests have executed and passed.

To execute the tests located in a particular file (e.g Test_1\ test_cross_browser_1.py), the command py.test is executed from the terminal.
You can refer to LambdaTest documentation, to run pytest scripts using the LambdaTest platform. In case you want to explore other Python frameworks for Selenium, you can check out our blog on top python testing frameworks for Selenium test automation in 2020.
You can watch this video to learn how to run multiple tests in pytest.
A comprehensive end to end Testing tutorial that covers what E2E Testing is, its importance, benefits, and how to perform it with real-time example.
Running Subset Of A Particular Test With Python In pytest
While performing Selenium test automation with pytest, you might come across cases where you do not want to execute all the tests present in the test folder i.e. only a subset of tests needs to be executed. The feature is particularly useful when the test file contains a number of tests and only a few tests have to be executed.
There are two ways in which a subset of tests can be executed in pytest.
Using Custom Markers In Python pytest
In pytest, pytest.mark helper is used to set metadata on the test functions. Some of the in-built markers in pytest are skip, xfail, skipif, and parameterize. Apart from these built-in markers, pytest also enables creation of custom markers that can be applied to test classes or modules.
Custom markers can be added to the test names using:
@pytest.mark.<marker_name>
In the current example, we define four markers on the test methods and the same markers have to be registered in the pytest.ini which is present in the root (i.e. Test) directory.
@pytest.mark.lambdatest1_1
def test_lambdatest1_1()
...........................
...........................
@pytest.mark.lambdatest1_2
def test_lambdatest1_2()
...........................
...........................
@pytest.mark.lambdatest2_1
def test_lambdatest2_1()
...........................
...........................
@pytest.mark.lambdatest2_2
def test_lambdatest2_2()
...........................
Custom markers have to be registered in the pytest.ini file. If the registration is not done, the error (You can register custom marks to avoid this warning — for details, see (https://docs.pytest.org/en/latest/mark.html) is displayed and execution does not go through.

To avoid the above error, custom markers have to be registered in pytest.ini which should be present in the folder from where you plan to perform the execution i.e. Test folder in our case. More details about Custom markers in pytest are available in the official documentation of pytest.
Below are the contents of pytest.ini where markers are added under the markers field. Everything after the colon (:) is an optional description.
# content of pytest.ini
[pytest]
markers =
   lambdatest1_1: test_1 for ToDoApp
   lambdatest1_2: test_1 for Google Search
   lambdatest2_1: test_2 for ToDoApp
   lambdatest2_2: test_2 for Google Search
Custom markers can also be used by plugins. These markers are also used to selectively choose tests for execution via the command-line option –m (along with py.test command).
py.test -m <marker_name>
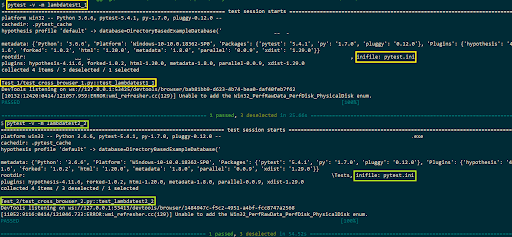
For executing the methods defined under the custom markers lambdatest1_1 and lambdatest2_2, the following commands are executed on the terminal (in different terminals as tests are executed serially).
py.test -v -m lambdatest1_1
py.test -v -m lambdatest2_2
Shown below is the snapshot of the Selenium test automation script execution.

A comprehensive end to end Testing tutorial that covers what E2E Testing is, its importance, benefits, and how to perform it with real-time examples.
Grouping Tests By Complete Or Partial Matching Of Substring Expression With Python in pytest
pytest enables selective execution of test methods by executing tests via matching substring expression. An expression is a Python evaluable expression where all names are substring matched against test names and parent classes.
The string to be matched (i.e. substring) is passed via the -k option available with the py.test command.
py.test -v -k <test_method>
The -k ‘not test_method’ matches those test methods that do not contain test_method in their names.
py.test -v -k not <test_method>
Shown below in this Selenium Python tutorial is the detailed description available with the py.test –help command.

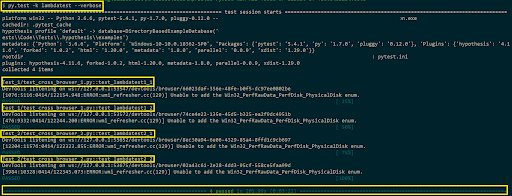
To execute test methods, to run multiple test cases in python with pytest, that contains LambdaTest in the method-name, we execute the following command on the terminal.
py.test -k lambdatest — verbose
Test methods test_lambdatest1_1(), test_lambdatest1_2(), test_lambdatest2_1(), and test_lambdatest2_2() present in Test_1\ test_cross_browser_1.py and Test_2\ test_cross_browser_2.py contain the required substring. Hence, all the four test methods run multiple test cases in python with pytest in a serial manner. Shown below is the execution snapshot:

This certification is for professionals looking to develop advanced, hands-on expertise in Selenium automation testing with Python and take their career to the next level.
Here’s a short glimpse on how you can group tests in pytest:
New Selenium IDE supports cross browser testing and parallel tests for automation along with record and replay function. Here’s why you shouldn’t miss out on it.
Wrapping It Up!
In this article of the ongoing Selenium Python tutorial series, I had a look at different execution scenarios where you can run multiple test cases in python with pytest from a single file. The py.test command, when executed on a folder, executes the valid test methods present in the folder (and its subfolders).
The Python pytest scripts were used to perform Selenium test automation on LambdaTest ToDoApp and Google search, using the Selenium ChromeDriver. Selective execution of test methods in python pytest can be achieved by substring matching and using custom markers. Custom markers have to be registered in pytest.ini else the markers would not be recognized during execution.
This brings an end to this Selenium Python tutorial! Do share this article with your peers who’d like to know how to run multiple test cases in python with pytest. A retweet is always welcome! That’s all folks. Happy Testing!!!?
