


Selenium 4 has been gaining significant traction since the release of its first Alpha version in April 2019. However, no official announcement has been made around the release date of the ‘final release’ of Selenium 4. But, developers and Selenium framework enthusiasts can still get their hands dirty with Selenium 4 by downloading the latest Alpha release of Selenium 4. Selenium Python developers can rejoice as Selenium-4.0.0a7 offers several cool features with Selenium 4 for Python.

The Alpha Release-7 of Selenium for Python is touted to be the last Alpha release, post which developers can expect only Beta releases. In this blog, we walk you through the Python Selenium 4 features and how you can use those features in your Python Selenium tests.
Quick Recap Of Selenium 4
Selenium 4, in general, is driving a lot of curiosity as it follows a different architecture in comparison to its predecessor (i.e., Selenium 3). Before we look at Selenium 4 for Python, let’s have a quick recap of Selenium 4 (in totality).
WebDriver W3C Protocol
The JSON Wire Protocol used for communication between Selenium Client Libraries and the corresponding web browser will retire with Selenium 4.
The introduction of WebDriver W3C Protocol is the major highlight of Selenium 4. Increased stability and less flakiness in Selenium tests are the main reasons to shift to Selenium 4.
Renewed Grid architecture
The Selenium Grid 4 supports an improved architecture with the inclusion of Router, Distributor, Session Map, and Node in a single jar file.
As the Selenium Server Jar file also contains all the necessary dependencies required for running the Grid, Selenium Grid users no longer have to start Hub and Node separately.
Rich set of Action APIs
Action APIs in Selenium 4 let you perform actions like zoom-in/zoom-out, multi-touch actions, pinch and zoom, and more.
With this new set of Action APIs, developers have the flexibility of performing certain actions in a few (or single) step(s), which might have taken more steps in versions before Selenium 4.
‘Much useful’ Selenium IDE
There have been significant improvements in Selenium IDE with Selenium 4. It has a much better user interface. Apart from Chrome, the IDE is also available for Firefox and is also expected to arrive on Microsoft Edge.
The CLI runner called Selenium IDE Runner (or SIDE Runner) lets users execute recorded cross browser tests in parallel. Introduction of control-flow mechanisms and code export with official language bindings like Java, Python, Ruby, etc., are some of the other features available with the improved Selenium IDE.
Now that we have touched upon the core essentials of Selenium 4, let’s deep dive into Selenium 4 for Python and explore the features that stand out in Selenium 4 for Python developers.
Python In Selenium 4
The Alpha release 7 (Selenium-4.0.0.a7) for Selenium 4 Python was released in the second week of November 2020. As per the tweet by David Burns (Selenium Committer and Co-member of the WebDriver specification), Alpha release 7 of Selenium 4 Python has many cool API offerings, including the provision of CDP (Chrome Debug Protocol).
Selenium 4 (Alpha 7) for Python is also expected to be the last Alpha, post which Selenium users can expect the Beta release from the Selenium community.
While working on the implementation for demonstrating relative locators in Python with Selenium 4, we came across certain discrepancies in the sample code (of relative locators on the Selenium website) and the corresponding changes in Core WebDriver (i.e., selenium/webdriver/remote/webdriver.py)for handling relative locators in Selenium 4.
How To Install Selenium 4 For Python
At the time of writing this article, the latest Alpha release of Selenium 4 was Alpha 7. For installing Selenium 4.0.0.a7, run the following command on the terminal:
pip install selenium==4.0.0.a7
On my machine, which contains Python 3.9, I witnessed the following error on triggering the installation command:
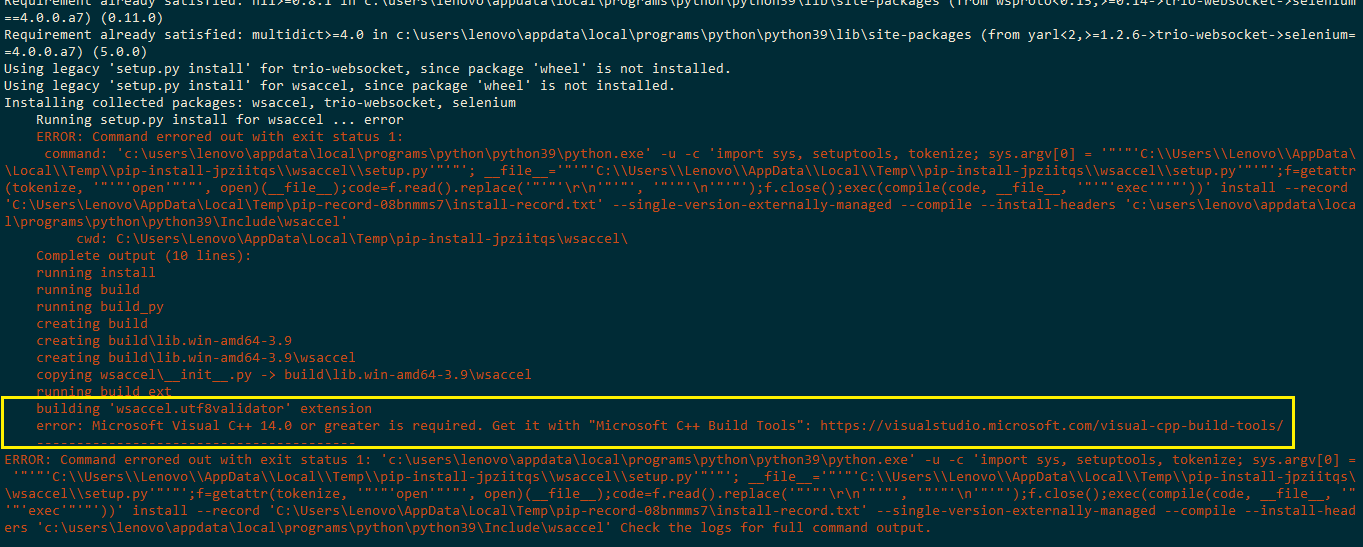
I witnessed this error only with Selenium 4.0.0.a7 release as the earlier releases (i.e. Selenium 4.0.0.a6.post2, Selenium 4.0.0.a6.post1, etc.) installed without any issues. The installation of Selenium 4.0.0.a7 on Windows is dependent on MS C++ Build Tools.
I upgraded the setuptools package by running the following command on the terminal:
pip install --upgrade setuptools
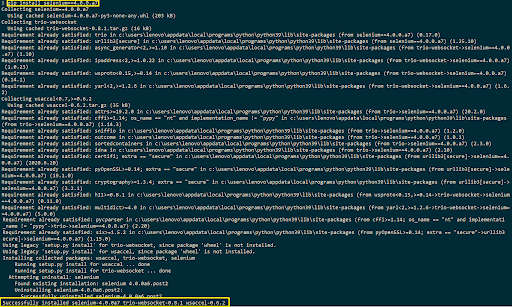
Even after upgrading the setuptools package, the installation persisted. I installed the C++ Build Tools for Visual Studio 2019, post which I could install Selenium 4.0.0.a7 on my machine. Shown below is the screenshot that indicates the installation of Selenium 4 Python was successful:
The ChangeLog of Selenium Python is an excellent start to have an introductory look at the changes that have been pushed in each Selenium Python release. Now that Selenium 4 Python is installed let’s get our hands dirty with the standout (or new) features in the Alpha release of Selenium 4.
Features Of Python In Selenium 4
Here is the shortlist of features available in Selenium Python 4.0.0.a7:
‘Relative Locators’ for locating web elements
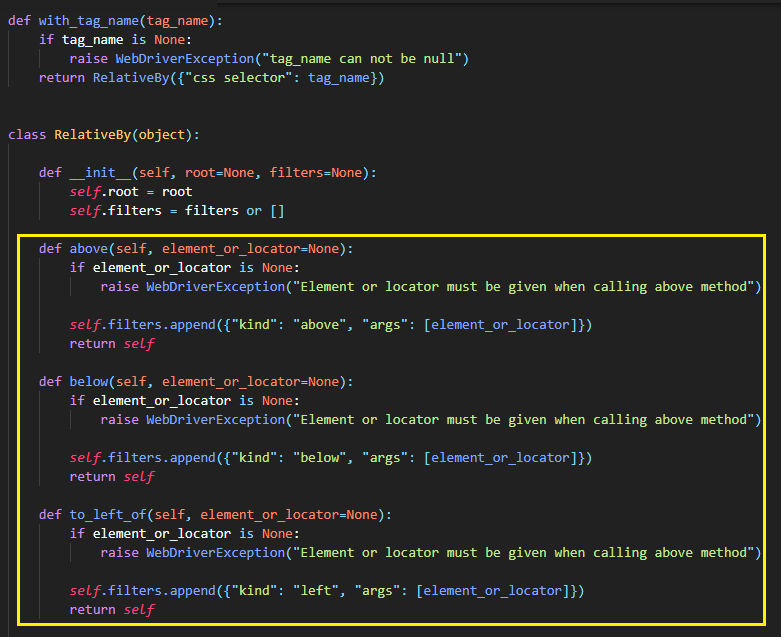
Python in Selenium 4 or Python language bindings for WebDriver supports relative locator methods that can be used with the with_tag_name attribute. Relative locators are also referred to as ‘Friendly locators.’
The relative locator implementation in Python indicates the following relative locator options that help locate web elements that are either near to, above, below, etc., a specified web element.
| Relative Locator | Description |
| above | WebElement to be located is ‘above’ a specified (or particular) element. |
| below | WebElement to be located is ‘below’ a specified (or particular) element. |
| to_left_of | WebElement to be located is ‘to the left of’ a specified (or particular) element. |
| to_right_of | WebElement to be located is ‘to the right of’ a specified (or particular) element. |
| near | WebElement to be located is ‘at most 50 pixels’ away from the specified (or particular) element. |
Shown below is the screenshot of the implementation of the newly introduced ‘relative locators’ that use the RelativeBy method ():
For locating WebElement(s) using Relative Locators, Selenium makes use of the getBoundingClientRect() function that aids in finding the relative elements. The getBoundingClientRect() function returns the web elements’ properties such as left, right, top, near, and more.
Issue with using find_element method for Relative Locators
In Selenium 4 Relative Locator, the find_element method was used to return the WebElement’ relative’ (i.e., left, right, near, etc.) to the corresponding element. Though the official Selenium documentation for Selenium 4 Python states that the find_element method should also be used in Python for finding relative locators; using the find_element results in the following error:
TypeError: Object of type RelativeBy is not JSON serializable
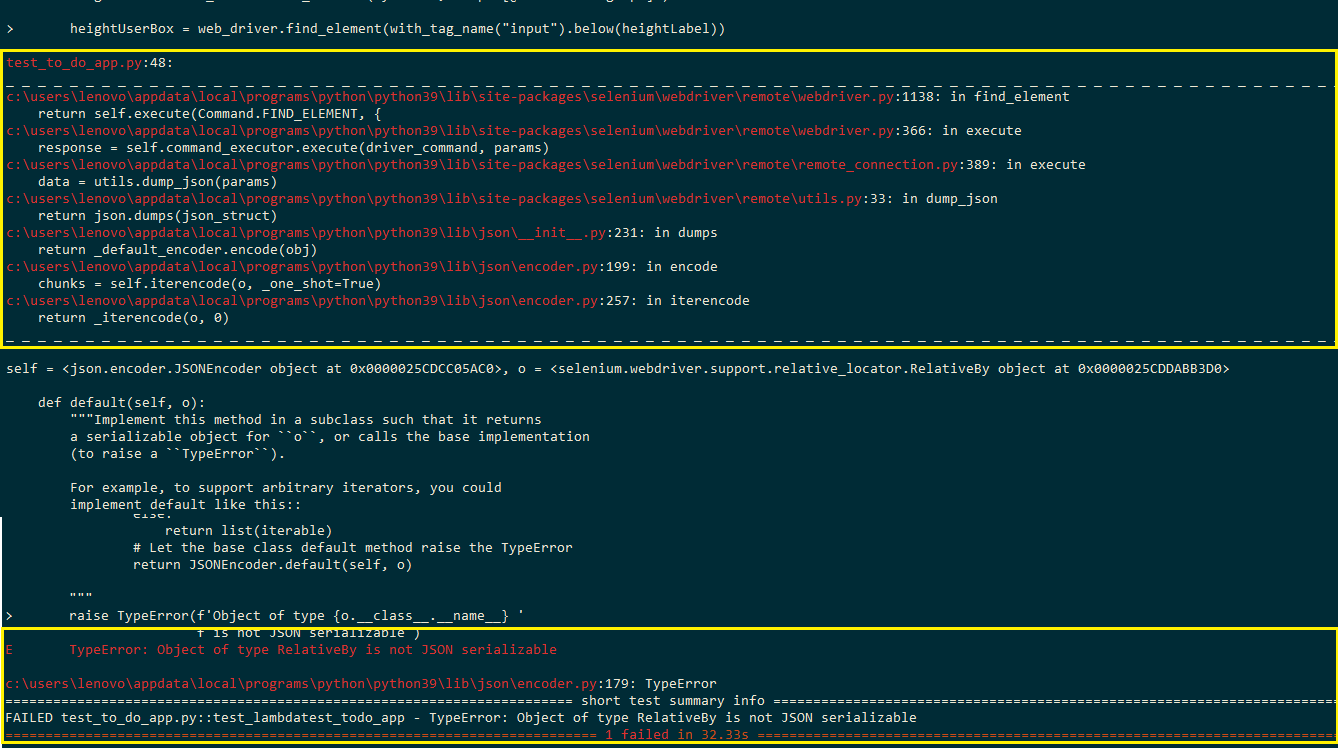
After digging through the implementation of find_element in WebDriver, I realized that no changes were made in the find_element method (in Selenium 4 Python) for returning a relative locator.
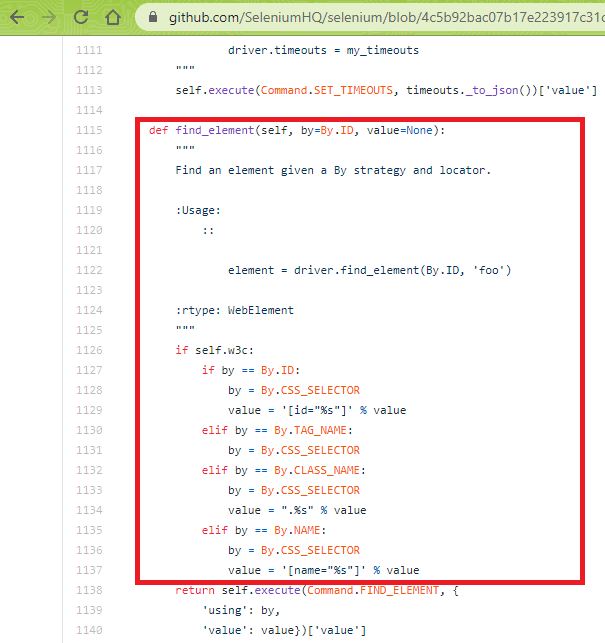
I hope that using relative locator(s) with the find_element method is fixed in future releases of Selenium 4 for Python.
How to use find_elements method for Relative Locators in Selenium 4 Python
The find_elements method in WebDriver has the corresponding implementation changes required for returning relative locators. The changes are marked in ‘Blue’ color:
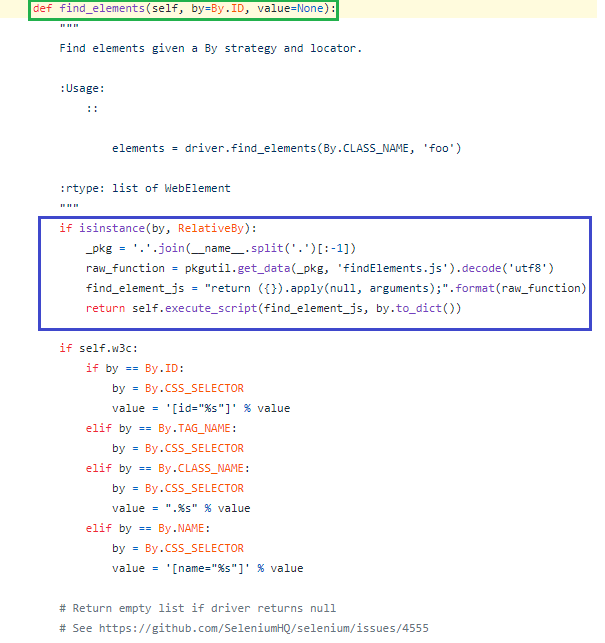
As mentioned above, we have to use the find_elements method instead of the find_element method for using Relative Locators in Selenium 4 (with Python). Since the find_elements method returns a list of the WebElement(s) that match the given web locator strategy, we need to parse through the list to perform relevant actions on the required ‘relative’ web element.
Selenium 4 relative locator methods (i.e., findElements in Python) support the usage with the with_tag_name attribute. For using relative locators in Selenium 4 Python, perform the following steps:
- Locate the web element ‘relative’ (i.e., near, right, left, above, below, etc.) to which the corresponding elements have to be tracked. Use the
find_elementmethod with web locators like ID, XPATH, NAME, LINK_TEXT, CSS_SELECTOR, etc., to locate the web element. - Use the
find_elementsmethod that accepts the methodwith_tag_name(e.g. tag name – “input”) along with the relevant relative locator (e.g. above/below/to_left_of/to_right_of/near). The result is a list of web elements that match the required criterion. - Parse through the web element list obtained from step(b) and perform relevant actions on the required web element(s).
The advantage of locating elements that are nearby other elements with the find_element method is you can perform relevant actions on many web elements that match the relative locator strategy. This would not have been possible with the find_element method capable of returning only a single web element matching the web locator strategy.
How to use Relative Locators in Selenium 4 for Python
With the current Alpha release, the find_element method cannot be used with relative locators to find a specific WebElement. Whether you have to use a single relative locator or multiple relative locators to locate ‘a’ specific WebElement, you still need to use the find_elements method.
The execution of the tests demonstrating relative locators is executed on LambdaTest’s cloud-based Selenium Grid. Browser capabilities are generated using LambdaTest Capabilities Generator. After creating an account on LambdaTest, it is recommended to note the username & access-key available in the Profile section on LambdaTest.
Demonstration 1: Relative Locators in Selenium 4 for Python
Test Scenario
- Go to https://4dvanceboy.github.io/lambdatest/lambdasampleapp.html.
- Click on the elements li2, li3, and li4.
- Add a new item, ‘Happy Testing at LambdaTest,’ to the list (using
to_right_of relativelocator). - Add another item, ‘Cross Browser Testing at LambdaTest,’ to the list (using near relative locator).
Implementation
# https://github.com/SeleniumHQ/selenium/blob/trunk/py/selenium/webdriver/support/relative_locator.py
# https://github.com/SeleniumHQ/selenium/blob/4c5b92bac07b17e223917c31caddf7035c120ea7/py/selenium/webdriver/remote/webdriver.py
from selenium import webdriver
import sys
from selenium.webdriver.common.keys import Keys
from selenium.webdriver.common.by import By
from time import sleep
import urllib3
import warnings
from selenium.webdriver.support.relative_locator import with_tag_name
import json
browser_capabilities = {
        "user" : "user-name",
        "accessKey" : "access-key",
        "build" : "[Python] - Relative Locators in Selenium 4",
        "name" : "[Python] - Relative Locators in Selenium 4",
        "platformName" : "Windows 10",
        "browserName" : "Chrome",
        "browserVersion" : "86.0",
        "headless" : False
}
user_name = "himanshu.sheth"
app_key = "fbI6kxucn5iRzwt5GWYiNvaPb4Olu9R8lwBsXWTSaIOebXn4x9"
def test_lambdatest_todo_app():
    sample_text = "Happy Testing at LambdaTest"
    new_item = "Cross Browser Testing at LambdaTest"
    urllib3.disable_warnings(urllib3.exceptions.InsecureRequestWarning)
    remote_url = "https://" + user_name + ":" + app_key + "@hub.lambdatest.com/wd/hub"
    web_driver = webdriver.Remote(command_executor = remote_url, desired_capabilities = browser_capabilities)
    # web_driver = webdriver.Chrome()
    web_driver.get('https://4dvanceboy.github.io/lambdatest/lambdasampleapp.html')
    web_driver.maximize_window()
     # Locate the web element li1
    elem_li1 = web_driver.find_element(By.XPATH,"//li[1]/input[@class='ng-pristine ng-untouched ng-valid']")
    # Locate the web element li5
    elem_li5 = web_driver.find_element(By.XPATH, "//li[5]/input[@class='ng-pristine ng-untouched ng-valid']")
    # Test 1 - Using the relative locators (above & below)
    # https://github.com/SeleniumHQ/selenium/blob/941dc9c6b2e2aa4f701c1b72be8de03d4b7e996a/py/selenium/webdriver/support/relative_locator.py#L41
    # https://github.com/SeleniumHQ/selenium/blob/941dc9c6b2e2aa4f701c1b72be8de03d4b7e996a/py/selenium/webdriver/support/relative_locator.py#L34
    # Use tag name and relative locators to find the web elements between them
    elementBox = web_driver.find_elements(with_tag_name("input").above(elem_li5).below(elem_li1))
    for items in elementBox:
        print()
        print(items.get_attribute('name'))
        # Use the Attribute Name to get the details of the web element
        elem_name = items.get_attribute('name')
        # Perform a click operation on the web element
        web_driver.find_element(By.NAME, elem_name).click()
    elem_add = web_driver.find_element(By.CSS_SELECTOR,"[ng-model='sampleList.sampletodoText']")
    elem_add.send_keys(sample_text)
    # Test 2 - Using the relative locator (to_right_of)
    # https://github.com/SeleniumHQ/selenium/blob/941dc9c6b2e2aa4f701c1b72be8de03d4b7e996a/py/selenium/webdriver/support/relative_locator.py#L55
    elem_submit = web_driver.find_elements(with_tag_name("input").to_right_of(elem_add))
    for items in elem_submit:
        print()
        print(items.get_attribute('id'))
        # Use the Attribute Name to get the details of the web element
        elem_name = items.get_attribute('id')
        # Add a new element in the list
        web_driver.find_element(By.ID, elem_name).click()
        break
    print()
    # Test 3 - Using the relative locator (near)
    # https://github.com/SeleniumHQ/selenium/blob/941dc9c6b2e2aa4f701c1b72be8de03d4b7e996a/py/selenium/webdriver/support/relative_locator.py#L62
    elem_add_button = web_driver.find_element(By.XPATH,"//input[@id='addbutton']")
    elem_txtbox = web_driver.find_elements(with_tag_name("input").near(elem_add_button))
    for items in elem_txtbox:
        print()
        print(items.get_attribute('id'))
        # Use the Attribute Name to get the details of the web element
        elem_name = items.get_attribute('id')
        # Add a new element in the list
        web_driver.find_element(By.ID, elem_name).send_keys(new_item + Keys.ENTER)
        break
    print()
    # Release resources held by the Selenium WebDriver
    web_driver.quit()
Code WalkThrough
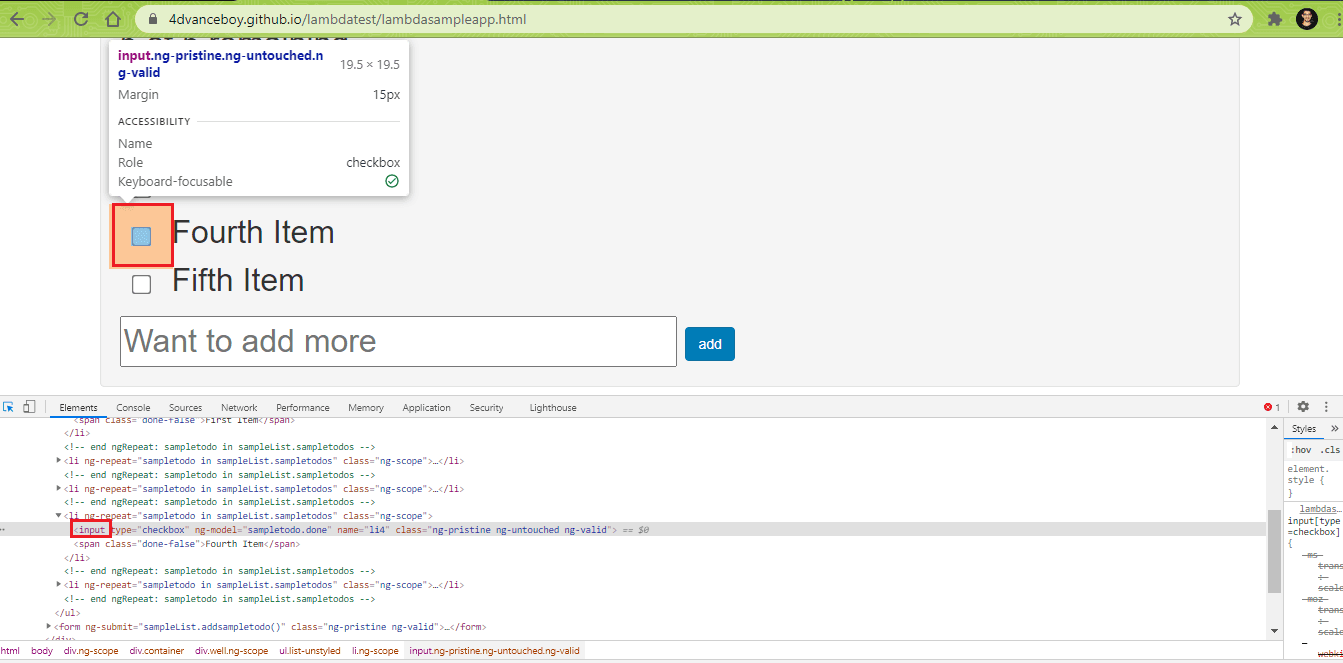
Step 1: As the web elements li2 through li4 have to be marked as Read, the relative locator below is applied on WebElement li1. On similar lines, the relative locator above is applied on WebElement li5.
First, we locate the element li1 using the XPath locator:

# Locate the web element li1
elem_li1 = web_driver.find_element(By.XPATH,"//li[1]/input[@class='ng-pristine ng-untouched ng-valid']")
The next step is locating the element li5 using the XPath locator:
# Locate the web element li5
elem_li5 = web_driver.find_element(By.XPATH, "//li[5]/input[@class='ng-pristine ng-untouched ng-valid']")
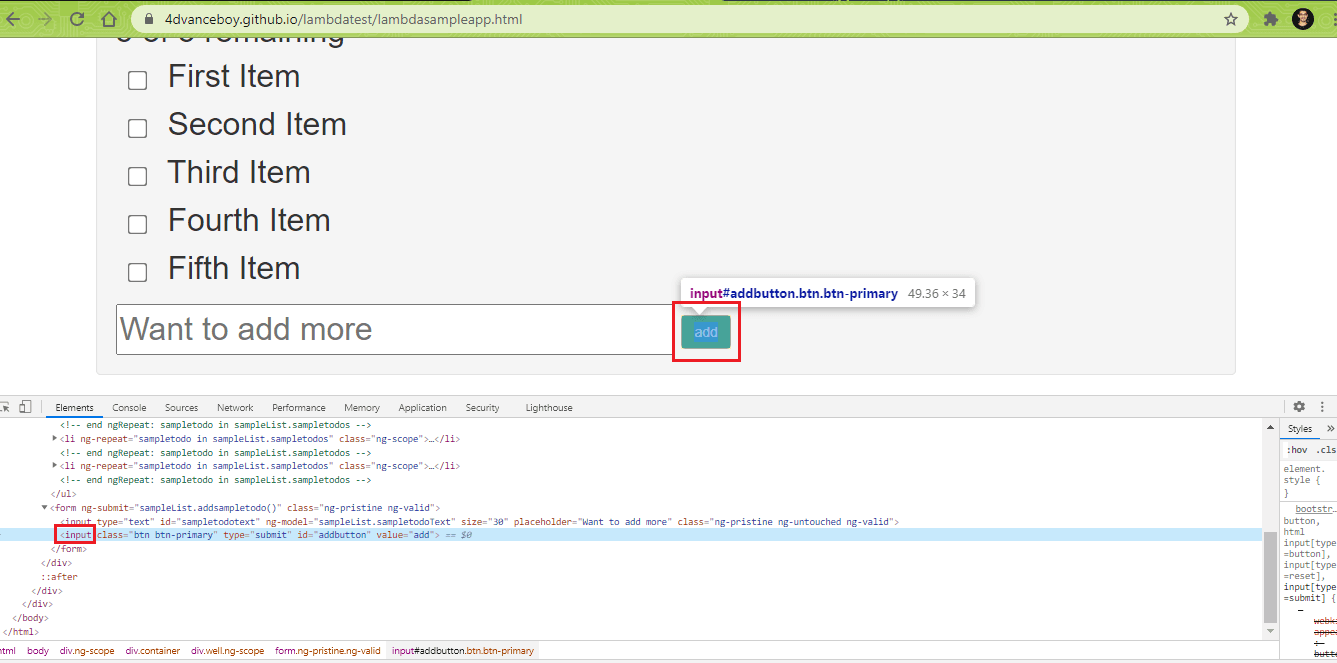
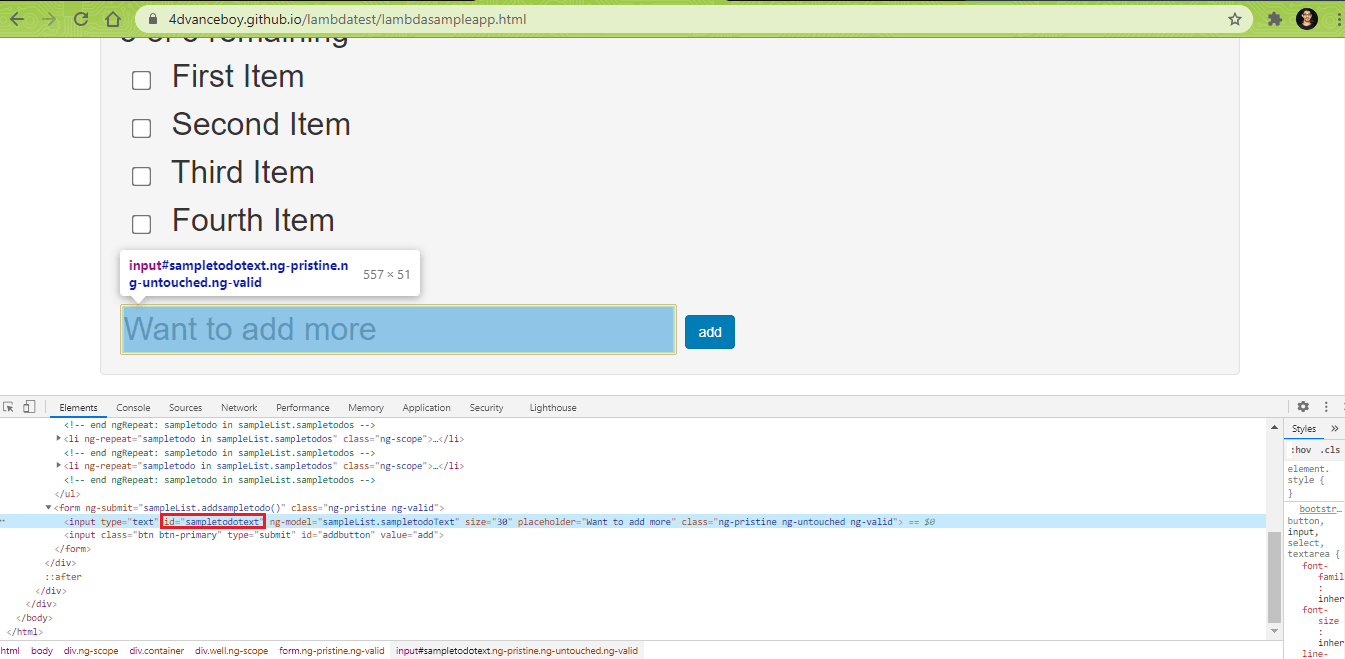
Step 2: The find_elements method is used with the tag name set to “input”. The relative locator ‘above’ is applied on WebElement elem_li5 and ‘below’ is applied on WebElement elem_li1.
Shown below is the snapshot which indicates why we have chosen the tag name as “input”:
elementBox = web_driver.find_elements(with_tag_name("input").above(elem_li5).below(elem_li1))
Post execution, elementBox consists of a list of WebElements based on the relative locators passed to the find_elements method. Hence, the elements (when located using NAME property) in elementBox will be li1, li2, and li3.
Step 3: The next step is parsing (or navigating) through the list of WebElements and performing the required operation (i.e., click()).
The get_attribute method in Selenium Python is used for getting the attributes of the WebElement. In our case, we use the name attribute on each WebElement (from the list) to return the ‘name’ property of the element.
for items in elementBox:
        print()
        print(items.get_attribute('name'))
        # Use the Attribute Name to get the details of the web element
        elem_name = items.get_attribute('name')

        # Perform a click operation on the web element
        web_driver.find_element(By.NAME, elem_name).click()
For example – the first WebElement in the list elementBox is li1 (when ‘name’ attribute is used on the element). The next step is locating the element’ li1′ in the DOM. For this, the find_element method is used for locating the element using the NAME locator. Once the element is located, the click method is used for performing a click on the element.
# Perform a click operation on the web element
web_driver.find_element(By.NAME, elem_name).click()
The same steps are repeated till all the WebElements in the list (i.e. elementBox) are exhausted.
Step 4: Using the send_keys method in Selenium, enter ‘Happy Testing at LambdaTest’ in the text box located using the CSS_SELECTOR property.
elem_add = web_driver.find_element(By.CSS_SELECTOR,"[ng-model='sampleList.sampletodoText']")
elem_add.send_keys(sample_text)
Step 5: The to_right_of relative locator is used to find the ‘Submit’ button located to the right of the text box ‘sampletodoText.’
elem_submit = web_driver.find_elements(with_tag_name("input").to_right_of(elem_add))
Step 6: The WebElement list – elem_submit consists of only one element. We parse through the WebElement list and use theget_attribute method to get the element’s ID (or id) attribute.
The find_element method is used for locating the element using the ID attribute, which we obtained using the get_attribute method. A click is performed on the obtained element (which is the add button) to add the item ‘Happy Testing at LambdaTest’ to the ToDo list.
for items in elem_submit:
        print()
        print(items.get_attribute('id'))
        # Use the Attribute Name to get the details of the web element
        elem_name = items.get_attribute('id')
        # Add a new element in the list
        web_driver.find_element(By.ID, elem_name).click()
        break
Step 7: For adding the item ‘Cross Browser Testing at LambdaTest’, we first locate the element with the XPath ‘//input[@id=’addbutton’]’. As the element sampletodoText is less than 50 pixels away from the ‘add’ button, we use the relative locator ‘near’ to locate that element.
elem_add_button = web_driver.find_element(By.XPATH,"//input[@id='addbutton']")
elem_txtbox = web_driver.find_elements(with_tag_name("input").near(elem_add_button))
Like the earlier step, we parse through the WebElement list (i.e., elem_txtbox) and use the get_attribute method for getting the ID attribute of the web elements. The first element in the list is txtsampletodoText, new item is added by using the send_keys method in Selenium
for items in elem_txtbox:
        print()
        print(items.get_attribute('id'))
        # Use the Attribute Name to get the details of the web element
        elem_name = items.get_attribute('id')
        # Add a new element in the list
        web_driver.find_element(By.ID, elem_name).send_keys(new_item + Keys.ENTER)
        break
We break after the first WebElement in the list, as the necessary operations are completed.
Execution
Execute the tests by running the following command on the terminal:
pytest --verbose --capture=no filename.py
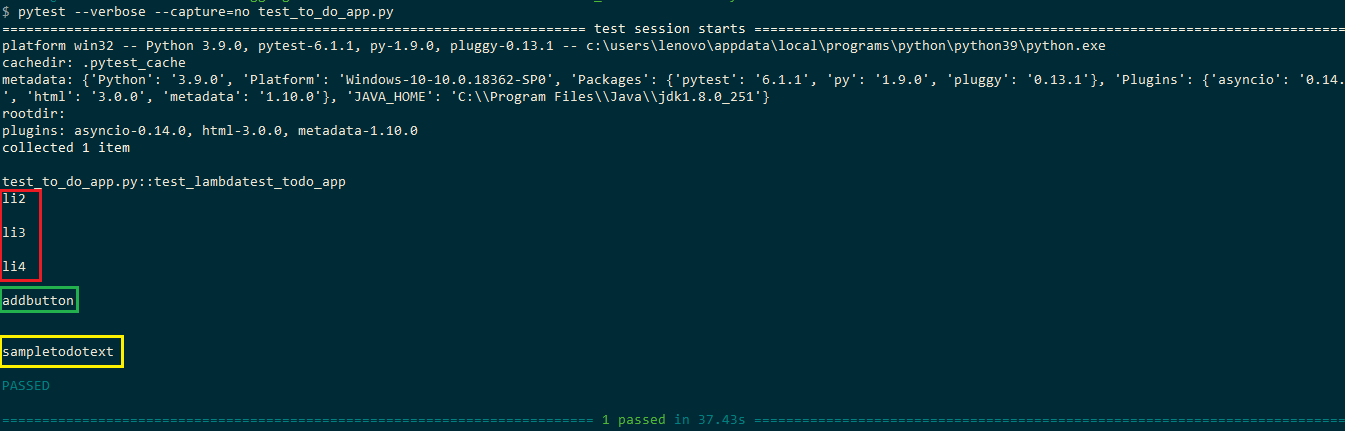
Shown below is the execution snapshot, which indicates that the required web elements were located correctly using the appropriate web locators:
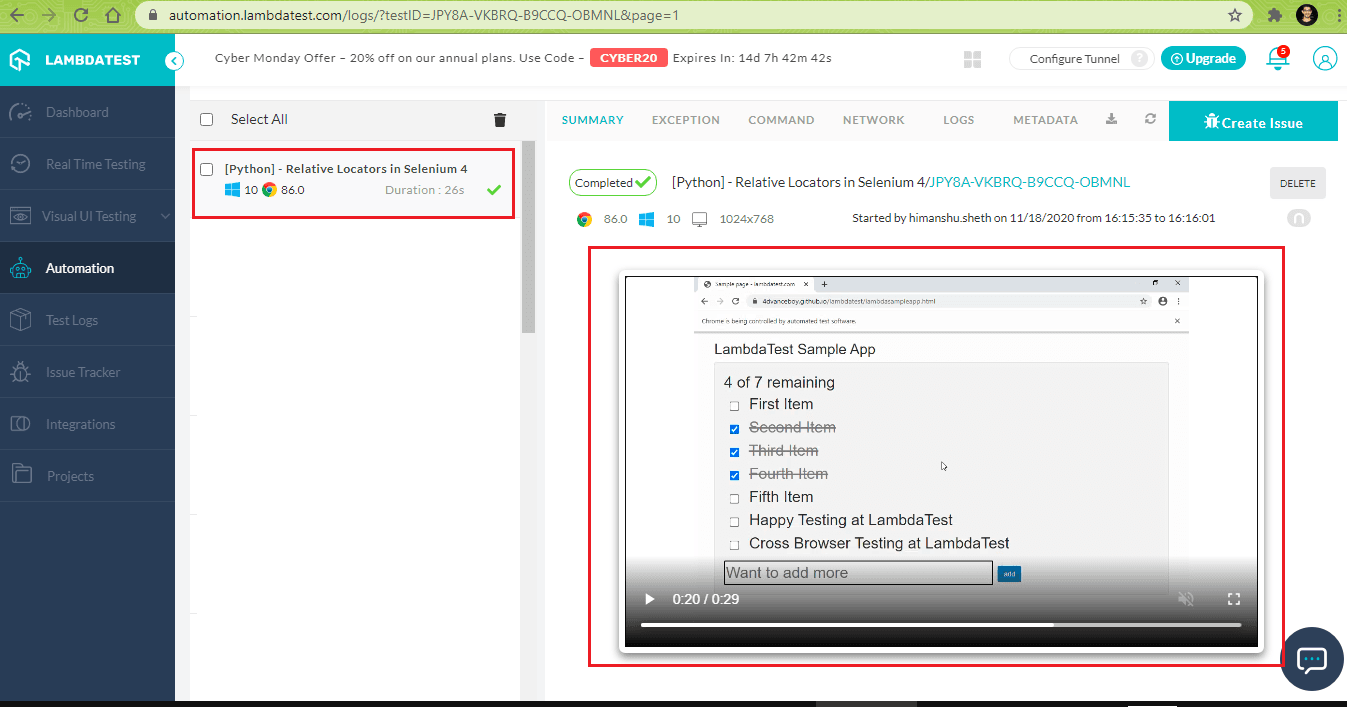
Here is the snapshot of the tests executed on LambdaTest’s cloud-based Selenium Grid:
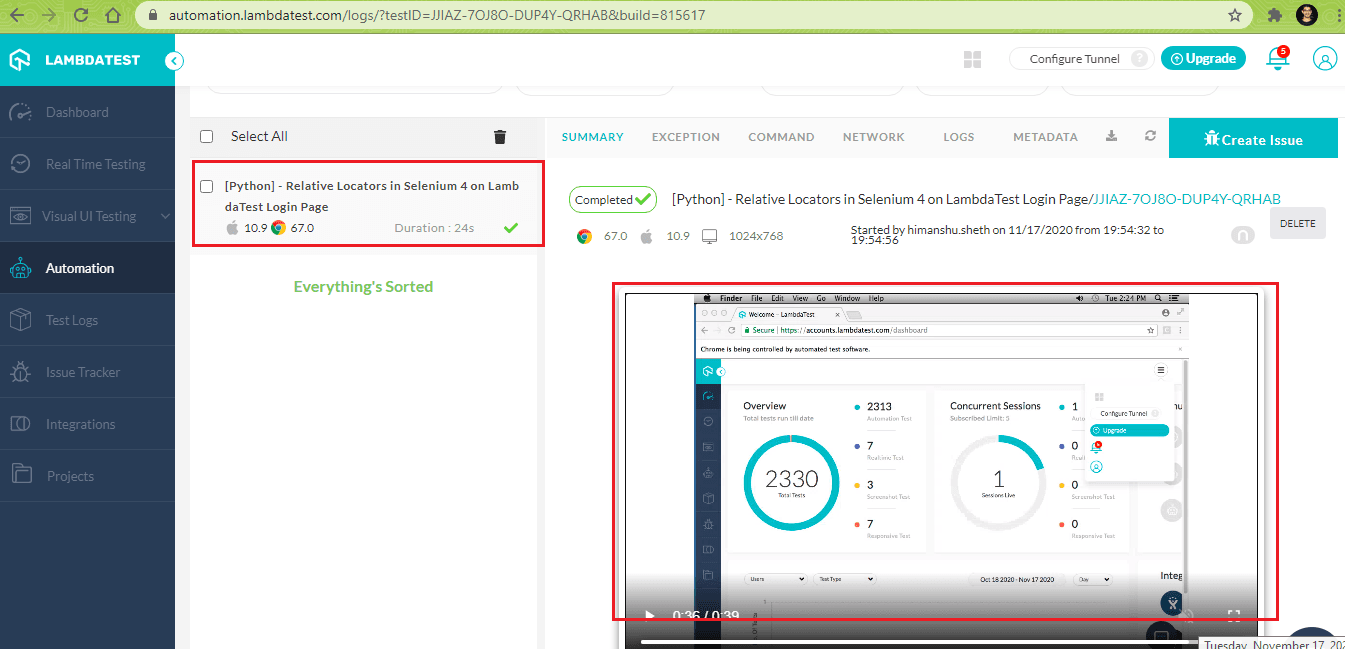
Demonstration 2: Relative Locators in Selenium 4 for Python
Test Scenario
- Go to accounts.lambdatest.com/login on Chrome 67.0 with the platform as ‘OS X Mavericks.’
- Locate the web elements for entering user-name and password.
- Enter the registered user-name and password.
- Print if the Login on LambdaTest was successful.
Implementation
# https://github.com/SeleniumHQ/selenium/blob/trunk/py/selenium/webdriver/support/relative_locator.py
# https://github.com/SeleniumHQ/selenium/blob/4c5b92bac07b17e223917c31caddf7035c120ea7/py/selenium/webdriver/remote/webdriver.py
import pytest
from selenium import webdriver
import sys
from selenium.webdriver.common.keys import Keys
from selenium.webdriver.common.by import By
import time
from time import sleep
import urllib3
import warnings
from selenium.webdriver.support.relative_locator import with_tag_name
import json
browser_capabilities = {
        "user" : "himanshu.sheth",
        "accessKey" : "fbI6kxucn5iRzwt5GWYiNvaPb4Olu9R8lwBsXWTSaIOebXn4x9",
        "build" : "[Python] - Relative Locators in Selenium 4 on LambdaTest Login Page",
        "name" : "[Python] - Relative Locators in Selenium 4 on LambdaTest Login Page",
        "platformName" : "OS X Mavericks",
        "browserName" : "Chrome",
        "browserVersion" : "67.0"
}
user_name = "user-name"
app_key = "access-key"
def test_lambdatest_todo_app():
    urllib3.disable_warnings(urllib3.exceptions.InsecureRequestWarning)
    remote_url = "https://" + user_name + ":" + app_key + "@hub.lambdatest.com/wd/hub"
    web_driver = webdriver.Remote(command_executor = remote_url, desired_capabilities = browser_capabilities)
    web_driver.get('https://accounts.lambdatest.com/login')
    web_driver.maximize_window()
     # Locate the web element li1
    elem_label = web_driver.find_element(By.CSS_SELECTOR,".orsignup")
    # Use tag name and relative locators to find the web elements between them
    elementBox = web_driver.find_elements(with_tag_name("input").below(elem_label))
    for items in elementBox:
        print(items.get_attribute('name'))
        # Use the Attribute Name to get the details of the web element
        elem_name = items.get_attribute('name')
        if (elem_name == "email"):
            # Perform a click operation on the web element
            print("Inside Email Address")
            web_driver.find_element(By.NAME, elem_name).send_keys("himanshu.sheth@gmail.com")

        if (elem_name == "password"):
            # Perform a click operation on the web element
            print("Inside Password")
            web_driver.find_element(By.NAME, elem_name).send_keys("Himanshu1!")
            # Click on Show password to ensure that the Password was entered correctly
            web_driver.find_element(By.XPATH, "//span[@class='input-group-text password-group-text']").click()
            # We do not want to process elements after the Login button so break, else
            # it would result in an Error
            break
    # We do not perform a click operation
    # The same operation can also be performed in the for loop as well
    # In that case, we have to use the Attribute Name - Class
    sleep(2)
    # Click on the Login Button since we have entered user-name and password
    web_driver.find_element(By.CSS_SELECTOR, ".btn").click()
    sleep(2)
    # New open is open, check the title. Assert if titles do not match
    window_title = web_driver.title
    print(window_title)
    expected_title = "Welcome"
    if expected_title in window_title:
        print("Login successful")
    else:
        print("Login not successful")
    print("Relative Locators in Selenium 4 on LambdaTest Login Page complete")
    # Release resources held by the Selenium WebDriver
    web_driver.quit()
Code WalkThrough
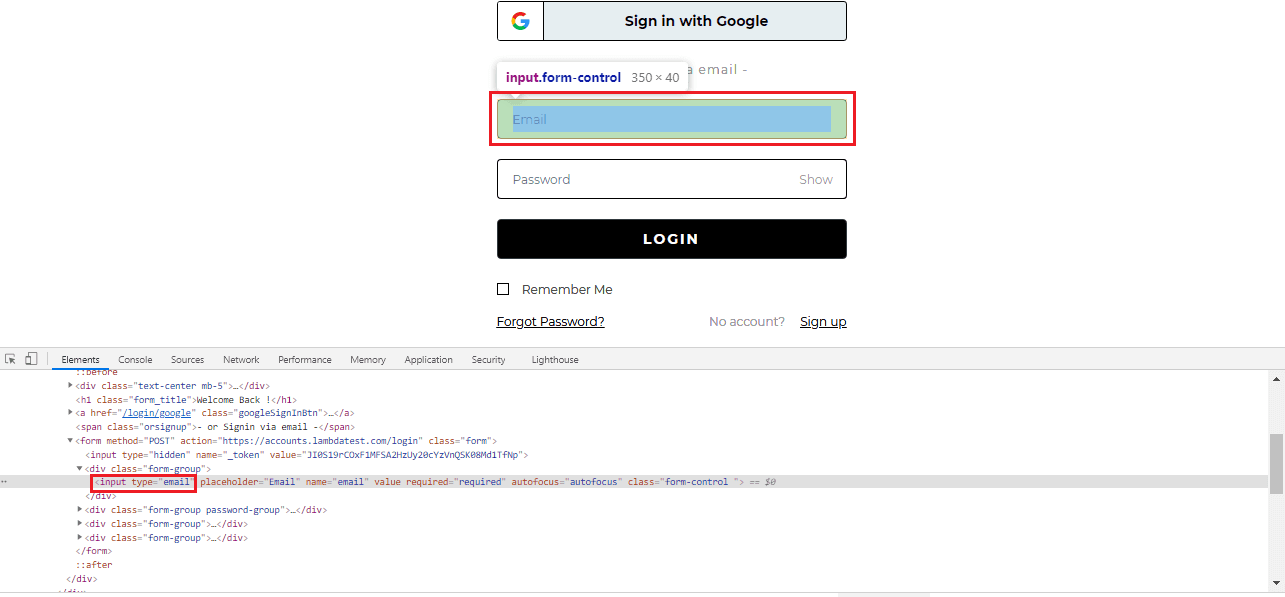
Step 1: Locate the web element with the label ‘-or Signin via email-‘ using the CSS_SELECTOR property.
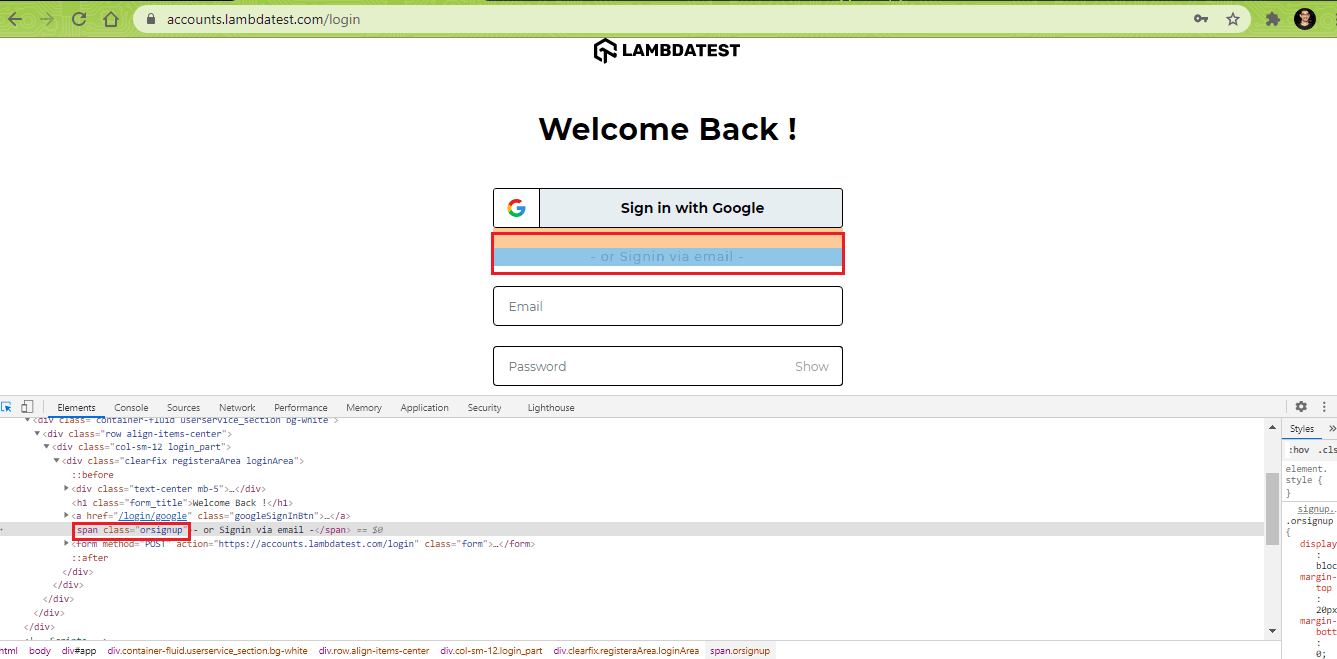
# Locate the web element li1
elem_label = web_driver.find_element(By.CSS_SELECTOR,".orsignup")
Step 2: We use the find_elements method with relative locator ‘below’ and tag name ‘input’ to locate the web elements below the WebElement elem_label.
# Use tag name and relative locators to find the web elements between them
elementBox = web_driver.find_elements(with_tag_name("input").below(elem_label))
Shown below are the elements below elem_label:
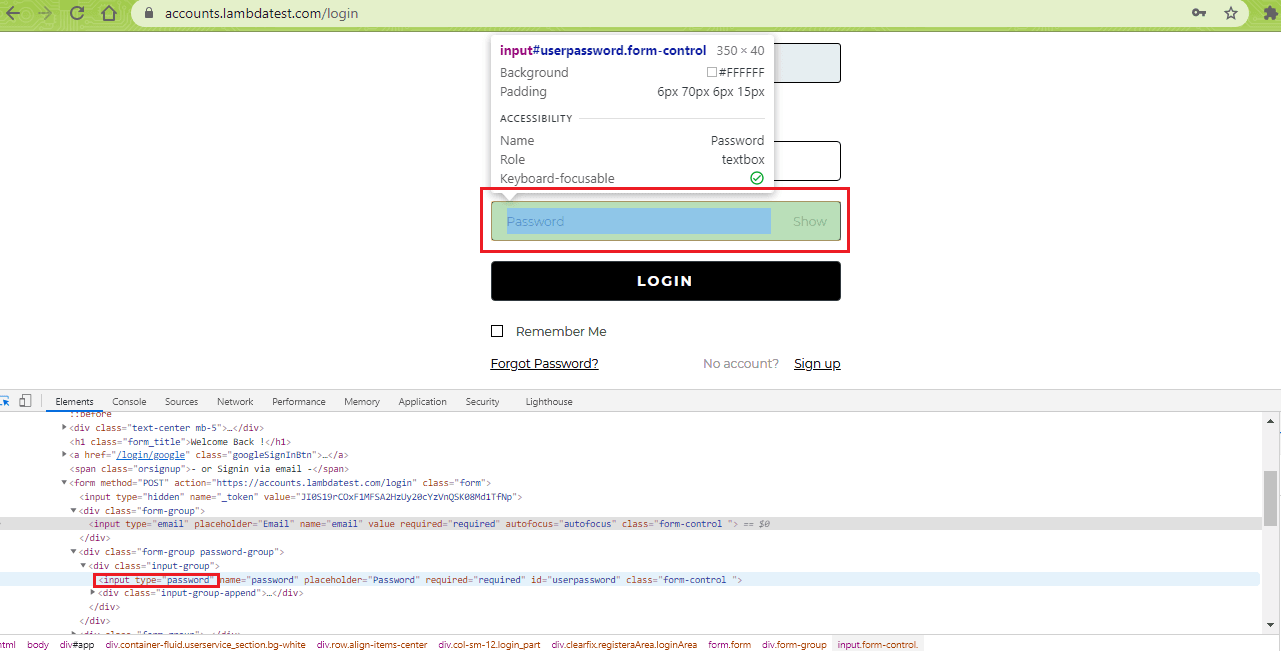
Step 3: Parse through the list of WebElements (i.e., elementBox) and use the get_attribute method to get the ‘name’ attribute of each web element.
The first element has the ‘name’ attribute as ’email.’ Hence, enter the email address used for registering on LambdaTest by using the send_keys method on the web element located using the find_element method NAME property.
for items in elementBox:
        print(items.get_attribute('name'))
        # Use the Attribute Name to get the details of the web element
        elem_name = items.get_attribute('name')
        if (elem_name == "email"):
            # Perform a click operation on the web element
            print("Inside Email Address")
            web_driver.find_element(By.NAME, elem_name).send_keys("email@email.com")
Step 4: The next element in the WebElement list has the ‘name’ attribute as ‘password.’ The find_element method and the NAME locator are used to locate the required web element. The send_keys method is used for entering the password in the element with the name ‘password.’
for items in elementBox:
        print(items.get_attribute('name'))
        # Use the Attribute Name to get the details of the web element
        elem_name = items.get_attribute('name')
        ...........................
      ...........................
        if (elem_name == "password"):
            # Perform a click operation on the web element
            print("Inside Password")
            web_driver.find_element(By.NAME, elem_name).send_keys("password")
Since we have processed the required web elements, we break from the for loop and skip processing the other web elements in the list (i.e., elementBox).
Step 5: The Login button is located using the find_element method with CSS_SELECTOR property. A click action is performed on that web element.
web_driver.find_element(By.CSS_SELECTOR, ".btn").click()
Step 6: Read the window title of the new window (i.e., the LambdaTest automation dashboard page). Check if the Window title contains the substring ‘Welcome’ and print the appropriate message based on the result.
window_title = web_driver.title
    print(window_title)
    expected_title = "Welcome"
    if expected_title in window_title:
        print("Login successful")
    .......................
    .......................
Execution
We were able to retrieve the required elements from the WebElement list returned by the find_elements method (in conjunction with the appropriate relative locators). As seen below, the test was executed successfully, and we were able to login to LambdaTest using the correct credentials:
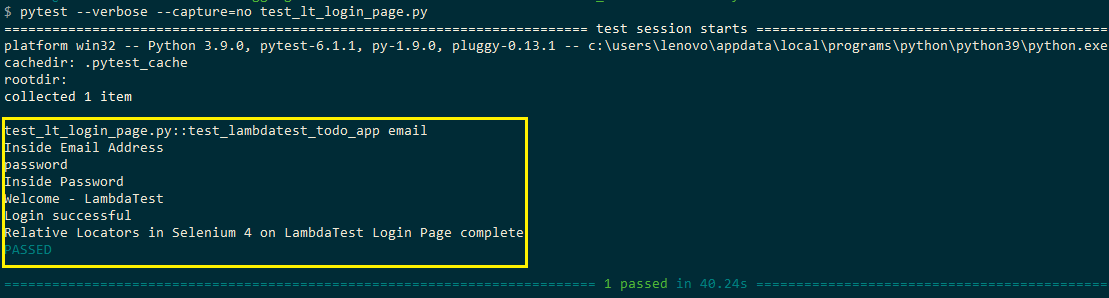
Shown below is the execution snapshot obtained from the LambdaTest automation dashboard:
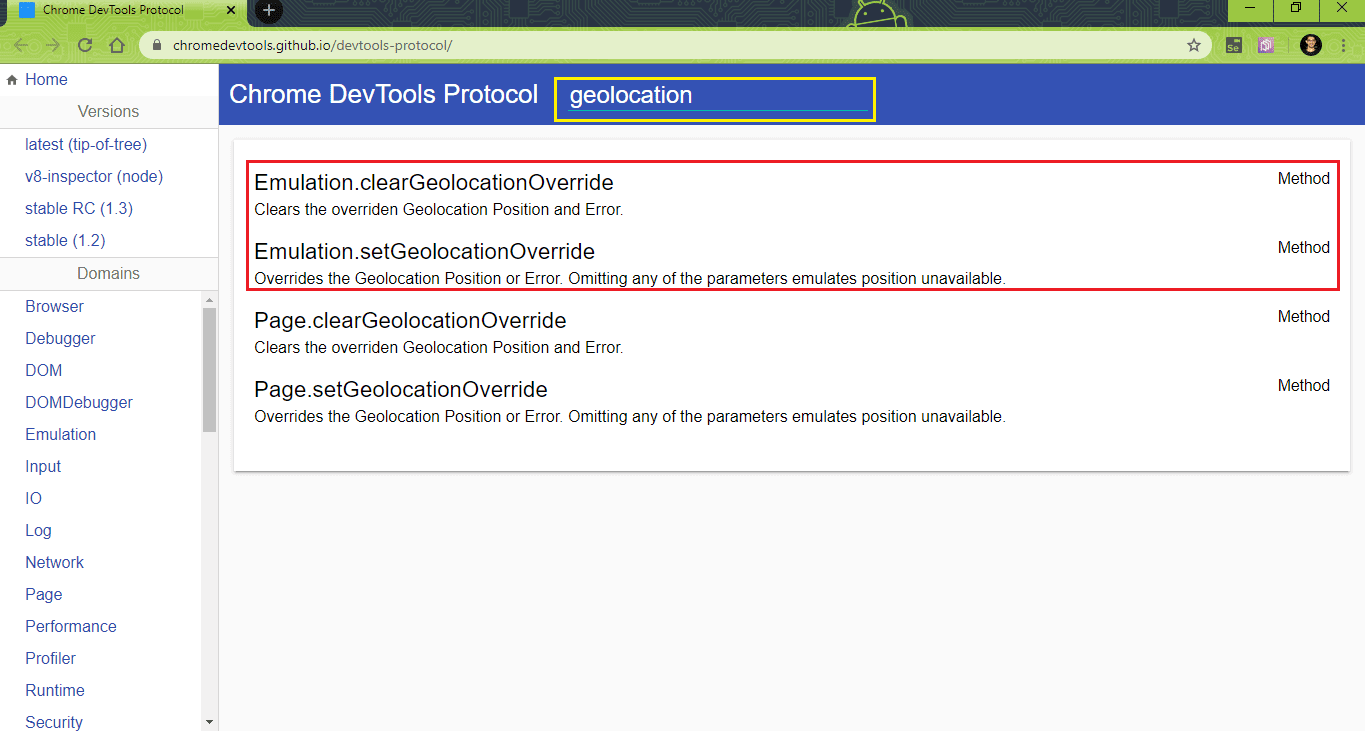
Support for Chrome DevTools Protocol
The other useful feature available with Selenium 4 Alpha 7 (Selenium-4.0.0a7) is the support for Chrome DevTools APIs. Chrome DevTools is a set of web developer tools that is built directly in the Chrome browser. The support is provided through the DevTools interface. Chrome DevTools is instrumental in offering several capabilities for controlling the browser and web traffic.
With Chrome DevTools API, developers and QA engineers will have the flexibility to edit pages on-the-fly and diagnose issues faster. This will help in making better and faster websites.
Shown below is the list of things that can be achieved using Chrome DevTools API in Selenium Python (Source):
- Emulate Geolocation
- Emulate network conditions
Currently, Chrome DevTools API in Java (Selenium 4) can perform many more tasks such as conducting security operations, retrieving Cookies information, URL filtering, getting performance-related metrics of browser/network, and more.
Some tasks like Ignoring Certificate Errors, getting cookie information, and more can be performed in Selenium Python using dedicated methods [e.g., get_cookies()] or exploiting browser options & capabilities (e.g., acceptInsecureCerts). We expect future releases of Selenium 4 Python with more Chrome DevTools APIs (especially for those things that are not possible with available methods in Selenium).
You can go through the complete API guide of Chrome DevTools API for your reference. Since the support for Chrome DevTools API is built directly in the Chrome web browser, it can only be tested with local Chrome WebDriver (and not the Remote WebDriver).
Let’s look at how to use Chrome DevTools API with ChromeDriver in Selenium 4 Python.
a. Emulate Geolocation
Applications or websites serving a global audience may offer different functionalities (and content) depending on the geolocation or geographic location from where the request is raised. Feature and content localization based on the user’s location and demographics significantly impact the user experience. It is also an important feature to consider when evaluating SERP (Search Engine Result Pages).
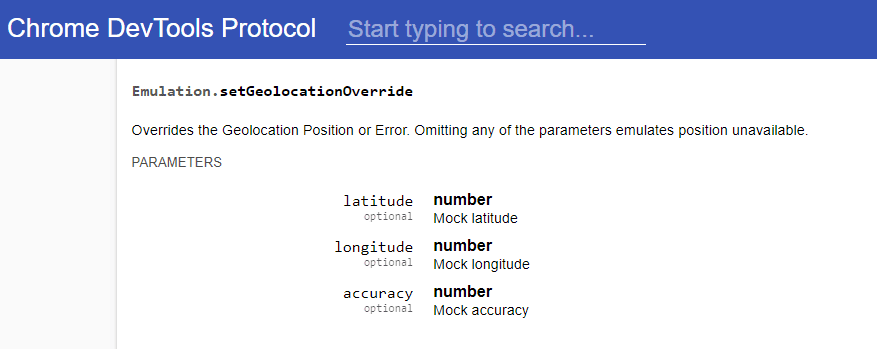
Emulating geolocation with Selenium testing is now possible with Chrome DevTools API. For mocking the geolocation, Selenium 4 Python offers the execute_cdp_cmd method. Command and command arguments should follow the Chrome DevTools protocol domains/commands. Further details are available here.
The current geolocation can be overridden with the Emulation.setGeolocationOverride command.
Let’s look at how to perform geolocation testing with Selenium 4 Python.
Test Scenario – 1
- Go to https://locations.dennys.com/search.html/ in native Chrome browser.
- Override the geolocation parameters (i.e., latitude, longitude, and measurement accuracy) using the Chrome DevTools API.
- Perform a ‘restaurant search’ using that location.
Implementation
# Support for Chrome DevTools
# https://www.selenium.dev/documentation/en/support_packages/chrome_devtools/
# WebDriver implementation for CDP in Selenium 4
# https://github.com/SeleniumHQ/selenium/blob/4c5b92bac07b17e223917c31caddf7035c120ea7/py/selenium/webdriver/chromium/webdriver.py#L133
# Emulating GeoLocation with Python in Selenium 4
# CDP is only available for local WebDriver (on Chrome/Chromium)
# https://github.com/SeleniumHQ/selenium/blob/474d11671452ffc6830e3b9603d6e438c9cce8fd/py/selenium/webdriver/chromium/webdriver.py
import pytest
from selenium import webdriver
import sys
from selenium.webdriver.common.keys import Keys
from selenium.webdriver.common.by import By
import time
from time import sleep
import urllib3
import warnings
from selenium.webdriver.support.relative_locator import with_tag_name
from selenium.webdriver.common.desired_capabilities import DesiredCapabilities
import json
def test_cdp_command():
        web_driver = webdriver.Chrome()
        web_driver.maximize_window()
                time.sleep(2)
        map_coord = {
                "latitude": 42.1408845,
                "longitude": -72.5033907,
                "accuracy": 100
        }
        web_driver.execute_cdp_cmd('Emulation.setGeolocationOverride', {
                "latitude": map_coord['latitude'],
                "longitude": map_coord['longitude'],
                "accuracy": map_coord['accuracy']
        })
        web_driver.get('https://locations.dennys.com/search.html/')
        time.sleep(2)
        location_icon = web_driver.find_element(By.CSS_SELECTOR, ".icon-geolocate")
        time.sleep(2)
        location_icon.click()
        time.sleep(5)
        # Release resources held by the Selenium WebDriver
        web_driver.quit()
        print("Geolocation testing with Selenium is complete")
Code WalkThrough
Step 1: Create an instance of the Chrome WebDriver and maximize the browser window.
web_driver = webdriver.Chrome()
web_driver.maximize_window()
Step 2: Pass the parameters – latitude (42.1408845), longitude (-72.5033907), and accuracy (100) for mocking the geolocation to the execute_cdp_cmd() method. The first parameter to execute_cdp_cmd is Emulation.setGeolocationOverride (the option for overriding the geolocation position). The second parameter is the geolocation coordinates.
map_coord = {
                "latitude": 42.1408845,
                "longitude": -72.5033907,
                "accuracy": 100
        }
        web_driver.execute_cdp_cmd('Emulation.setGeolocationOverride', {
                "latitude": map_coord['latitude'],
                "longitude": map_coord['longitude'],
                "accuracy": map_coord['accuracy']
        })
Step 3: Go to the target URL and locate the search (or geolocate) button on the page using the find_element method. Perform a click action on the geolocate button to initiate a restaurant search using the ‘mocked geolocation’ coordinates.
web_driver.get('https://locations.dennys.com/search.html/')
time.sleep(2)
location_icon = web_driver.find_element(By.CSS_SELECTOR, ".icon-geolocate")
time.sleep(2)
location_icon.click()
Execution
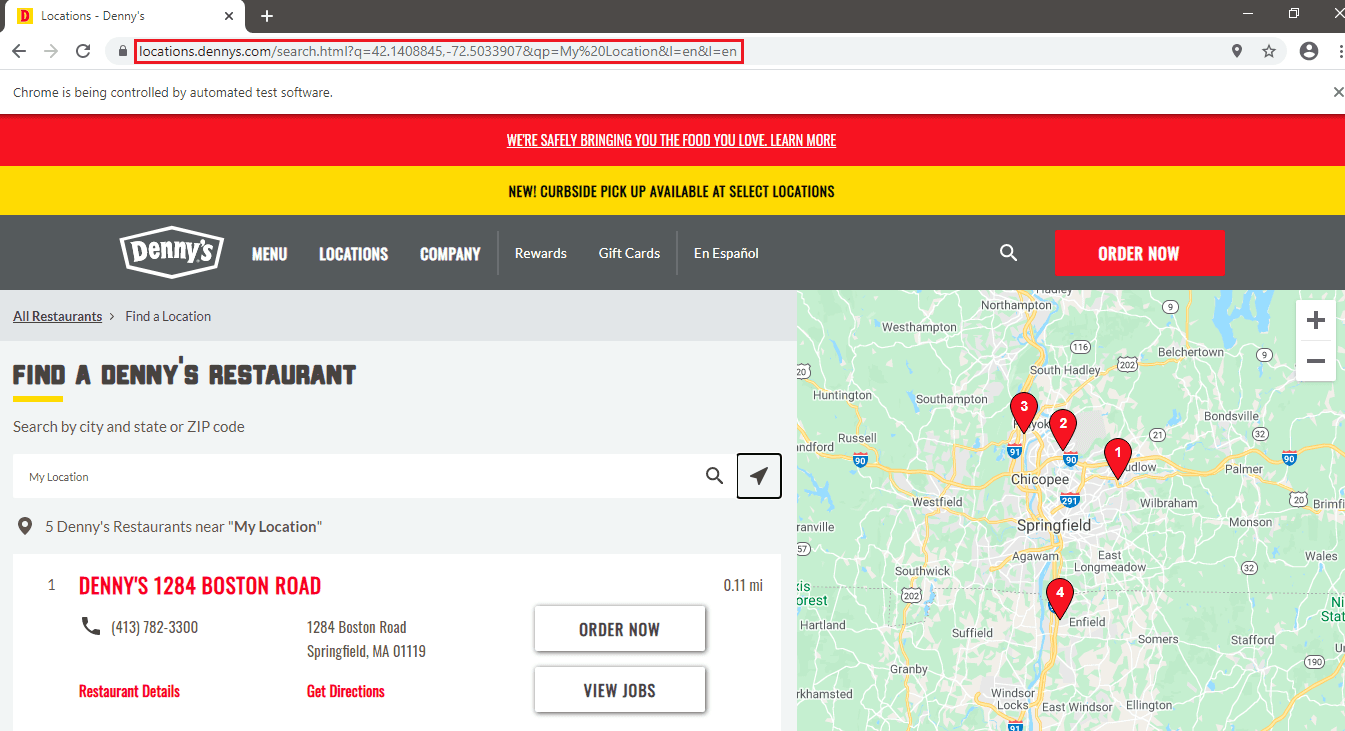
Shown below is the execution snapshot, which indicates that the execute_cdp_cmd was executed successfully.
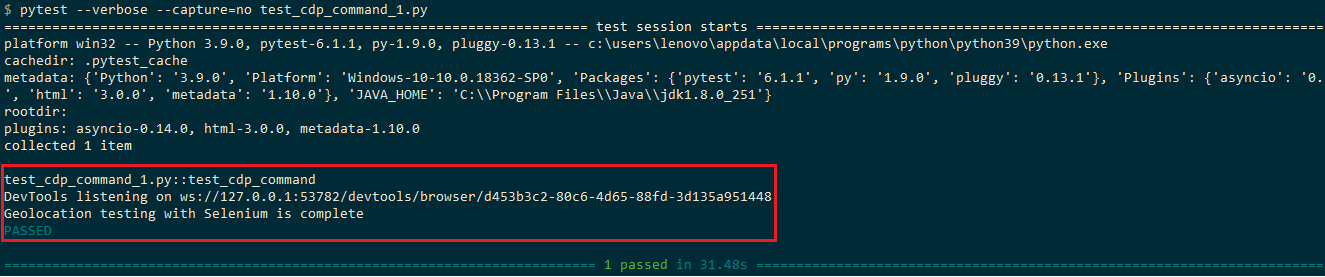
As seen in the Chrome browser snapshot, the search was performed using the mocked geolocation coordinates (i.e., latitude – 42.1408845 and Longitude -72.5033907).
Test Scenario – 2
- Go to https://maps.google.com in native Chrome browser
- Override the geolocation parameters (i.e. latitude, longitude, and measurement accuracy) using the Chrome DevTools API
- Trigger a location ‘search’ using the coordinates supplied in step(2)
Implementation
from selenium import webdriver
import time
from time import sleep
from selenium.webdriver.common.by import By
from selenium.webdriver.support.ui import WebDriverWait
from selenium.webdriver.support import expected_conditions as EC
def test_cdp_command():
    web_driver = webdriver.Chrome()
    web_driver.maximize_window()
    map_coord = {
        "latitude": 42.1408845,
        "longitude": -72.5033907,
        "accuracy": 100
    }
    web_driver.execute_cdp_cmd("Emulation.setGeolocationOverride", map_coord)
    #time.sleep(2)
    web_driver.get("https://maps.google.com")
    search_elem = WebDriverWait(web_driver, 20).until(
            EC.presence_of_element_located((By.ID, "widget-mylocation")))
    search_elem.click()
    time.sleep(10)
    # Release resources held by the Selenium WebDriver
    web_driver.quit()
    print("Geolocation testing with Selenium is complete")
Code WalkThrough
Step 1: After starting an instance of Chrome, Emulation.setGeolocationOverride for overriding geolocation position and ‘geolocation coordinates’ (used in Test – 1) are passed to the execute_cdp_cmd method.
map_coord = {
        "latitude": 42.1408845,
        "longitude": -72.5033907,
        "accuracy": 100
    }
web_driver.execute_cdp_cmd("Emulation.setGeolocationOverride", map_coord)
Step 2: Go to Google Maps. Wait using the WebDriverWait method in Selenium until the WebElement search widget is located. Perform a click to execute a search on Google Maps using the specified coordinates.
web_driver.get("https://maps.google.com")
search_elem = WebDriverWait(web_driver, 20).until(
            EC.presence_of_element_located((By.ID, "widget-mylocation")))
search_elem.click()
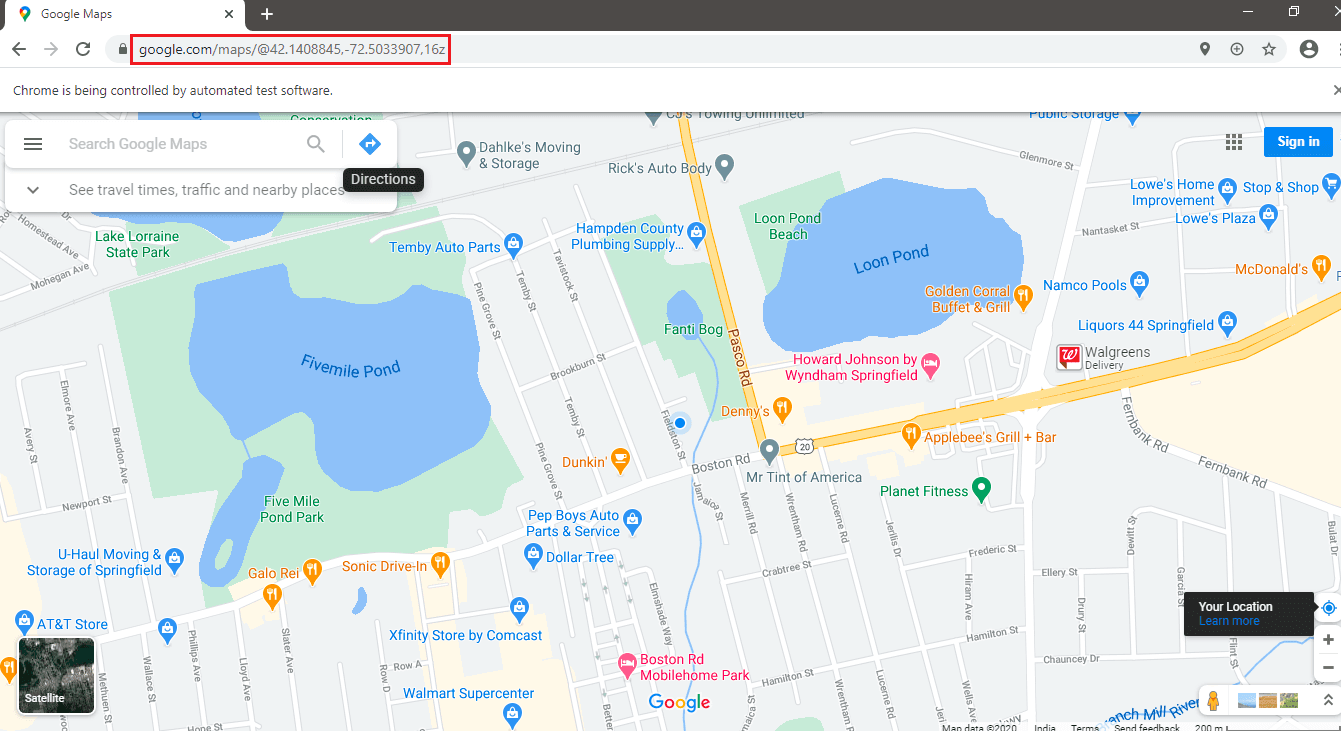
Execution
Location search on Google maps was performed successfully using the mocked coordinates:

b. Emulate Network Conditions
Selenium 4 for Python also lets you emulate different network types (or connection types). Depending on the connection type (i.e., Cellular 2G, Cellular 3G., etc.), the latency and upload/download throughput will vary.
Emulating network conditions using the set_network_conditions method in Selenium 4 Python lets you configure the latency and throughput, enabling you to test your application (or website) under different network conditions.
Since we perform get and set operations on the network conditions, the test can be performed in the headless mode.
Test Scenario
- Open the Chrome browser in the headless mode. Go to https://www.lambdatest.com.
- Set the network conditions to be emulated in the test. Latency – 10 ms, Download Throughput – (500 * 1024), and Upload Throughput – (500 * 1024).
- Print the network conditions to check whether they were set properly or not.
Implementation
# Emulate Network Conditions
# https://github.com/SeleniumHQ/selenium/blob/474d11671452ffc6830e3b9603d6e438c9cce8fd/py/selenium/webdriver/chromium/webdriver.py
import pytest
from selenium import webdriver
import sys
from selenium.webdriver.common.keys import Keys
from selenium.webdriver.common.by import By
import time
from time import sleep
import urllib3
import warnings
from selenium.webdriver.support.relative_locator import with_tag_name
from selenium.webdriver.common.desired_capabilities import DesiredCapabilities
from selenium.webdriver.chrome.options import Options
import json
def test_emulate_network_settings():
        chrome_options = Options()
        chrome_options.add_argument("--headless")
        web_driver = webdriver.Chrome(options=chrome_options)
        web_driver.maximize_window()
                time.sleep(2)
        web_driver.set_network_conditions(
                    offline = False,
                    latency = 10,
                    download_throughput = 500 * 1024,
                    upload_throughput = 500 * 1024)
        web_driver.get('https://www.lambdatest.com')
        net_con = web_driver.get_network_conditions()
        print()
        print(net_con)
        time.sleep(5)
        print("Latency: " + str(net_con["latency"]))
        print("Download Throughput: " + str(net_con['download_throughput']))
        print("Upload Throughput: " + str(net_con['upload_throughput']))
        print()
        # Release resources held by the Selenium WebDriver
        web_driver.quit()
        print("Emulation of Network Settings Test is complete")
Code WalkThrough
Step 1: Open the Chrome browser in headless mode.
chrome_options = Options()
chrome_options.add_argument("--headless")
web_driver = webdriver.Chrome(options=chrome_options)
Step 2: The fields latency, download_throughput, and upload_throughput are set using the set_network_conditions method offered in Selenium 4 Python.
web_driver.set_network_conditions(
    offline = False,
      latency = 10,
      download_throughput = 500 * 1024,
      upload_throughput = 500 * 1024)
Step 3: Verify whether the network conditions have been set properly using the get_network_conditions method. The method returns a ‘dictionary’ that contains the details about the network conditions in a key:values pair.
net_con = web_driver.get_network_conditions()
time.sleep(5)
print("Latency: " + str(net_con["latency"]))
......................
......................
Execution
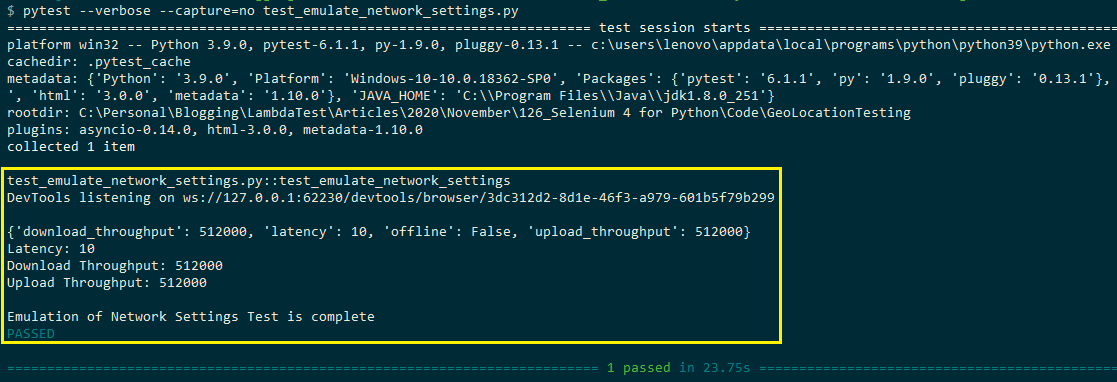
As seen in the execution snapshot, the required network conditions were set as required by the set_network_conditions method.
Browser Manipulation – Switching between Windows or Tabs
Handling multiple browser windows in Selenium and tabs is one of the typical test scenarios for automated browser testing. For switching to a new window/tab, you have to use the ‘correct’ Window Handle so that the intended browser window/tab is brought to focus.
The process of switching to new window/tabs involves looping through the list of windows or tabs that the Selenium WebDriver can see, post which you switch to the required window/tab.
The tedious process of switching to new windows or tabs in Selenium Python is all set to change with Selenium 4. The new_window API in Selenium 4 Python aids in creating a new window or new tab. Post new window/tab creation, the control automatically switches to it.
- Open a new Tab and Switch to the same
driver.switch_to.new_window('tab')
- Open a new Window and Switch to the same
driver.switch_to.new_window('window')
Let’s look at a simple test scenario for demonstrating the usage of the new_window method:
Test Scenario 1.Open the Chrome browser and visit lambdatest.com
- Create a new Tab
- Create a new Window and set the URL to lambdatest.com/blog
- Print the number of Window Handles (i.e., it should be 3 in total)
Implementation
 import pytest
from selenium import webdriver
import sys
from selenium.webdriver.common.keys import Keys
from selenium.webdriver.common.by import By
import time
from time import sleep
import urllib3
import warnings
from selenium.webdriver.support.relative_locator import with_tag_name
import json
def test_new_window_tab():
    web_driver = webdriver.Chrome()
    web_driver.get('https://www.lambdatest.com')
    web_driver.maximize_window()
     # Opens a new tab and switches to new tab
    web_driver.switch_to.new_window('tab')
    time.sleep(5)
    # Opens a new window and switches to new window
    web_driver.switch_to.new_window('window')
    time.sleep(5)
    web_driver.get('https://www.lambdatest.com/blog')
    time.sleep(10)
    print("Number of open windows are: " + str(len(web_driver.window_handles)))
    print("Selenium 4: Switching to a new Tab or Window Test complete")
    # Release resources held by the Selenium WebDriver
    web_driver.quit()
Code WalkThrough
Step 1: Open Chrome browser and visit the LambdaTest homepage.
web_driver = webdriver.Chrome()
web_driver.get('https://www.lambdatest.com')
Step 2: Open a new Tab using new_window method (with the argument set to ‘tab’).
web_driver.switch_to.new_window('tab')
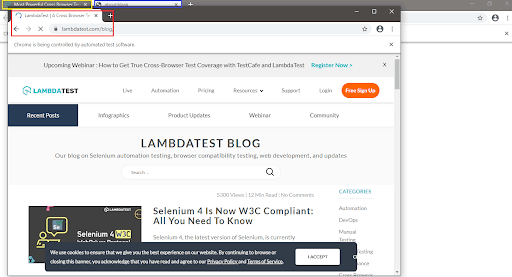
Step 3: Open a new Window using new_window method (with the argument set to ‘window). Open LambdaTest blog in the newly opened browser window.
web_driver.switch_to.new_window('window')
time.sleep(5)
web_driver.get('https://www.lambdatest.com/blog')
Step 4: Print the number of window handles on the terminal. The number of window handles should be three.
print("Number of open windows are: " + str(len(web_driver.window_handles))
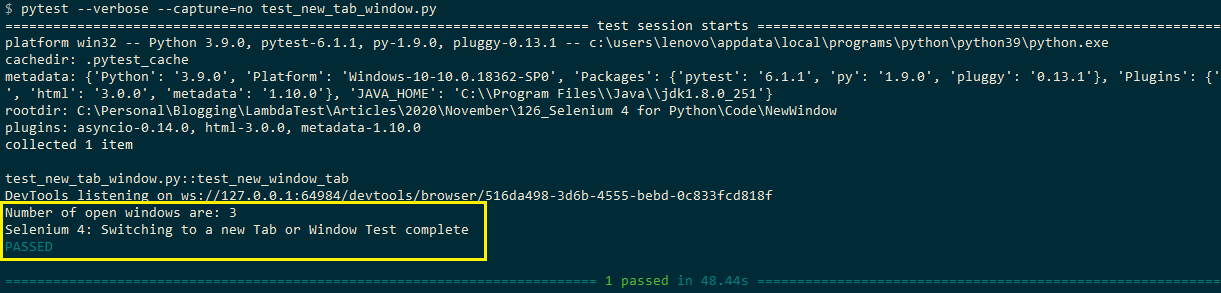
Execution
As shown below, two browser windows and one tab is open. The number of window handles is three.
Wrapping Up!

Though Selenium 4 Python is still in the Alpha stage (i.e., Selenium-4.0.0a7), it offers many benefits like relative locators, new browser manipulation techniques, and support for CDP (Chrome DevTools Protocol). It would be beneficial if a feature like CDP is available for remote ChromeDriver to exploit CDP and cloud-based Selenium testing benefits.
The next release is expected to be a Beta release, and it would be intriguing to verify the stability of features like Relative Locators in the subsequent releases. Till then, we would keep exploring the Selenium-4.0.0a7 release of Selenium 4 Python.
Have you checked out Selenium 4 Alpha for Python? If so, we’d love to hear from you in the comments below.
Happy Testing ☺