The entire cycle of software design, development, and testing is pretty complicated. Each team works towards a common goal i.e. success of the rollout, which totally depends on the quality of work done. Irrespective of the project’s complexity, the end goal will always be to submit a piece of software that is of exceptional quality, i.e., fewer bugs and less friction between different teams.

Wouldn’t it be great if developers could sit alongside testers to improve the test scenarios? With that thought in mind, software development processes have evolved a lot and this is where Behavior Driven Development (BDD) comes in. BDD plays an instrumental role as it minimizes the communication gap between the key stakeholders of any software project i.e. product owners, developers, testers, etc. This SpecFlow tutorial will help you understand how BDD can be leveraged by integrating SpecFlow Selenium C# files with end-to-end automation testing with Selenium.
These are the broad sub-topics covered as a part of this SpecFlow tutorial:
Introduction To Behavior Driven Development (BDD)
Behavior Driven Development (BDD) is sort of an extension of TDD (Test Driven Development). TDD is a programming practice where developers write code only if the automation tests have failed. BDD is about having conversations and discussions between the different teams in the project so that all of them share an understanding of the feature requirements. This eventually helps them to work towards a common goal of identifying user stories once the development starts.
‘Conversation’ is the heart & soul of the BDD process and everything after that is optional. BDD is a variation of ATDD (Acceptance Test Driven Development), the major difference being the focus is now on ‘behavior’ rather than ‘test’. That is what we will try to understand better in this SpecFlow tutorial.
Outside-In Development
BDD uses an outside-in approach where the acceptance tests are designed based on business behavior rather than technical implementation. The advantage of this development approach is that the language being used is ubiquitous in nature and can be easily understood by technical, as well as non-technical personnel. Outside-in development combines the best of both worlds i.e. TDD and ATDD into one approach.
The core of the BDD process is the ‘User Stories’ and the developers have to first write the user story. These user stories are used for documentation of the feature, triggering, and automating acceptance tests. This makes BDD extremely useful for Acceptance Tests.
In BDD, examples are termed as ‘Scenarios’. A scenario outlines how a particular feature should behave with different types/values of input parameters. Scenarios are written in a format called Gherkin. Gherkin is a domain-specific language using which you can come up with scenarios that describe business behavior, without getting into the technical implementation. We will get into detail in the later sections of this SpecFlow tutorial for SpecFlow Selenium C#.
Advantages of BDD
Since BDD is an important part of this SpecFlow tutorial, you must be aware of the advantages it offers. Listed down are some of the major advantages of using BDD:
1. BDD acts as a communication and collaboration tool as it bridges the boundaries between the key stakeholders of a product i.e. product owners, developers, and testers. This ensures that all of them are on the same page as far as the project requirements and expectations are concerned.
2. Tests are written in a simple English-like language that does not require any development or coding skills. This enables team members from different teams i.e. business analysis, development, product management, etc. to actively participate in the test creation & updation process.
- In most scenarios, BDD tests have a longer shelf-life when compared to TDD tests as the major focus is on business behavior rather than the actual test implementation. Outside-In approach comes very handy in such situations.
4. Reusable, modular, and maintainable automated tests can be created using BDD. This is because features & scenarios are very easy to understand and anyone i.e. analyst, technical manager, developer, tester, etc. can modify the order of the flow or extend the BDD test.
How To Write BDD Scenarios?
The first step in this SpecFlow tutorial is to understand BDD scenarios. TDD is based on the principles of 3A’s i.e. ‘Arrange, Act, and Assert’, and in BDD these are replaced by ‘Given, When, Then’.
The syntax of Gherkin is below:
Scenario: Title/Short Description
    Given [A Precondition]
    When [Some Event]
    Then [Some Outcome]
An example demonstrating a BDD scenario based on a User Story – Suppose you visit DuckDuckGo website and search for ‘LambdaTest’ by entering the search term. It should load the relevant search results.
The specification for the above User Story is below:
Scenario: Search for LambdaTest on DuckDuckGo
    Given I am on the DuckDuckGo homepage
    When I enter search term as LambdaTest
    Then Search results for LambdaTest should appear
The above example makes use of the most frequently used keywords in Gherkin i.e. Given, When, and Then. The other keywords used in Gherkin feature files are – Feature, Scenario, And, and But.
Given – Given in Gherkin is akin to Arrange in a unit test. It describes a set of pre-conditions for the scenario. In the above example, the precondition is that the user should be on the DuckDuckGo home page.
When – When is akin to Act in a unit test. This is where the execution takes place. In the above example, the user should enter the search term – LambdaTest in the search box.
Then – Then describes the outcome of the scenario. It is comparable to Assert in a unit test. Here, the validation also takes place. In the above example, the results for the LambdaTest search should appear in the current window.
More conditions can be added to the above feature file by using other Gherkin keywords like And, But, etc.
Feature Files In Gherkin
As I promised above in this SpecFlow tutorial, time to dive into Gherkin. Feature files in Gherkin are plain simple txt files (with .feature extension) that can contain one or many scenarios depending on the test being performed. A feature file should only have only one feature but can have ‘N’ number of scenarios.
You can also add relevant tags (@Tag) in the feature file to differentiate between multiple scenarios. Shown below is a sample feature file that consists of two features: Search for LambdaTest on DuckDuckGo b. Search for LambdaTest on Google.
Feature: Search using Google and DuckDuckGo
    Search for LambdaTest on Google
    Search for LambdaTest on DuckDuckGo
    Compare the results

@LambdaTestSearch
Scenario: Search for LambdaTest on DuckDuckGo
    Given I am on the DuckDuckGo homepage
    When I enter search term as LambdaTest
    Then Search results for LambdaTest should appear

Scenario: Search for LambdaTest on Google
    Given I am on the Google homepage
    When I enter search term as LambdaTest
    Then Search results for LambdaTest should appear
Tools For BDD Testing
As we pointed out earlier in this SpecFlow tutorial, BDD is not a tool but a process that is an extension of TDD. It also brings the best practices of Agile software development and can be used even if your team is making use of the Waterfall model.
For writing BDD tests, you would require a tool stack that comprises of the following items
- IDE (Integrated Development Environment) – For building and test the BDD tests
- BDD Interpreter – Understands & interprets the Gherkin language
- Automation API – Used for communication with the web browser
- Testing Framework – Guidelines for designing relevant test suites/test cases.
In this SpecFlow tutorial that focuses on using SpecFlow Selenium C# for automation testing with Selenium, we would be using the following combination for BDD testing:
| IDE | Visual Studio 2019 |
| BDD Interpreter | SpecFlow |
| Automation API | WebDriver |
| Testing Framework | NUnit |
Getting Started With SpecFlow
In this SpecFlow tutorial for automation testing with Selenium, we will demonstrate the usage of SpecFlow Selenium C# particularly for cross browser testing related scenarios.
What Is SpecFlow?
SpecFlow is an open-source tool that aids BDD in the .net framework. It is hosted on GitHub and the source-code of SpecFlow can be found here. Along with BDD, it also supports ATDD (Acceptance Test Driven Development). You can make use of SpecFlow for defining, managing, and executing human-readable acceptance tests in .Net projects.
It is provided under the BSD license. As it is a part of the Cucumber family, it makes use of the Gherkin language for the creation of features & scenarios.
SpecFlow supports the following frameworks:
- .Net framework
- Xamarin
- Mono
It integrates with the VS IDE and can also be used from the command line. While writing this SpecFlow tutorial, the latest version of SpecFlow is SpecFlow 3 i.e. 3.0.225. Apart from the NUnit test framework, SpecFlow supports other popular test frameworks like MSTest v2, xUnit 2, etc. For detailed information on the NUnit framework, we recommend you to refer to the NUnit test automation tutorial for more information.
If you are a first-time user of SpecFlow with Selenium, C#, you should definitely check out the detailed section where we will look into setting up SpecFlow with Visual Studio 2019 below. In this SpecFlow tutorial for automation testing with Selenium, we will also have a look at the issues that developers face when migrating to Selenium 3.
Overview Of BDD With SpecFlow
Moving on with the SpecFlow tutorial for SpecFlow Selenium C#, shown below is a simplistic overflow of a BDD test with SpecFlow-
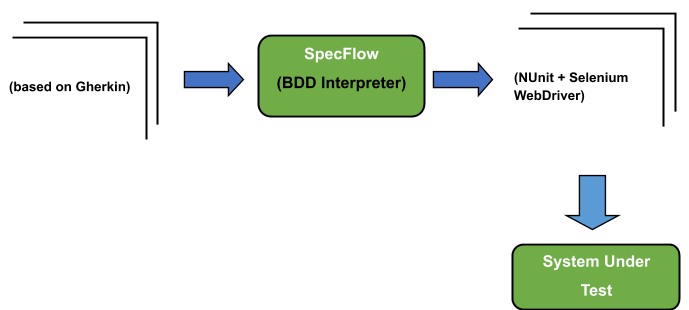
Feature Files – As the basic premise of BDD is to come up with easily understandable tests without focusing on the technical aspects, the feature files are written in the Gherkin language. A single Feature file consists of a feature and ‘N’ number of scenarios i.e. single Feature is broken down into multiple Scenarios.
SpecFlow (BDD Interpreter) – Once the feature file (*.feature) is ready, the contents have to be parsed by a BDD interpreter that can understand the format followed in feature files. Some of the popular BDD interpreters are:
- Gwen
- JBehave
- Serenity
- Cucumber
- SpecFlow
In this SpecFlow tutorial for using SpecFlow Selenium C#, we will be using SpecFlow as the BDD interpreter. Once the feature file is parsed, the automation code corresponding to that particular Scenario is called.
Automation Tests (NUnit framework + Selenium WebDriver) – This contains the test implementation corresponding to every Scenario. Each scenario step will have the corresponding Step definition in the file where the automation tests are implemented. In turn, each Step definition will have a corresponding method/code implementation to which it is bound.
Hence, it is also called Code Binding since there is a binding between the Scenario Steps -> Step Definition -> Methods.
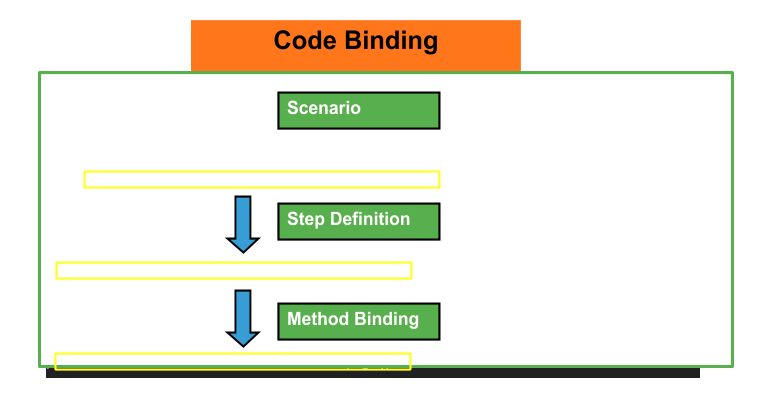
For this SpecFlow tutorial, we will make use of NUnit test framework with Selenium test-suite which uses the Selenium WebDriver for interfacing with the underlying elements of a web-page.
Installing SpecFlow In Visual Studio 2019
For the demonstration of SpecFlow Selenium C#, and NUnit framework in this SpecFlow tutorial, we use the IDE as Visual Studio 2019 (Community Edition). You can download that from here.
Selenium uses the Selenium WebDriver for performing actions on the corresponding web elements displayed on the web page. For local Selenium testing, you should have the corresponding Selenium WebDriver installed in the machine.
Selenium WebDriver for popular browsers like Opera, Firefox, Chrome, Internet Explorer, Microsoft Edge, etc. can be downloaded from the links mentioned below.
Note – In case you are still using some older versions i.e. Visual Studio 2015/Visual Studio 2017, there might be minimal changes in the installation steps for SpecFlow Selenium C# in it.
Below is the step-by-step process for installing SpecFlow on Visual Studio 2019:
1. Installation Of Necessary Plugins In Visual Studio
Before you can start with the SpecFlow tutorial; you have to install SpecFlow integration for Visual Studio 2019. You can install this plugin in two different ways:
- Visual Studio Marketplace – You can download the SpecFlow integration for VS 2019 from the Marketplace. Once it is downloaded, you can install it by double-clicking on the downloaded .vsix file. Before the installation, you have to close the Visual Studio IDE.
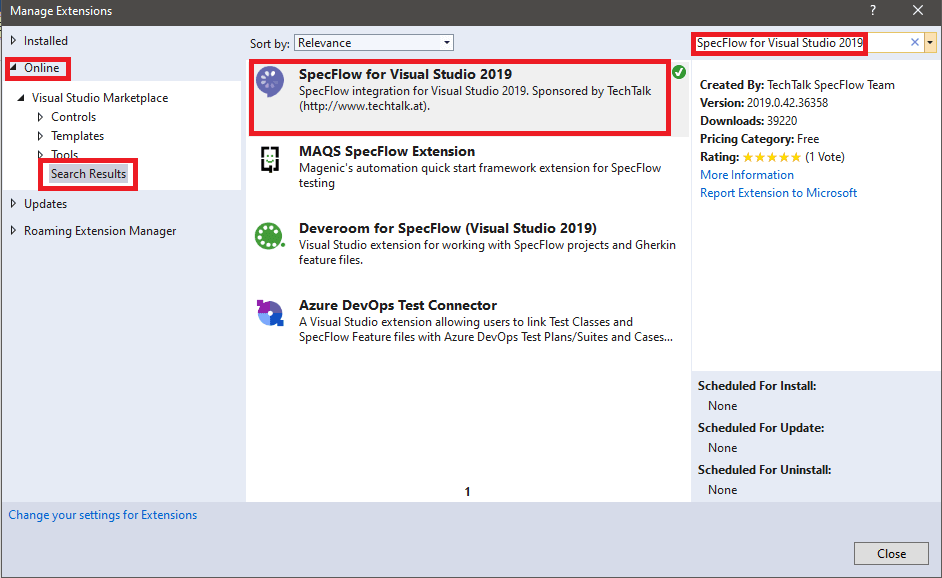
- Manage Extensions – The second option to install SpecFlow integration for Visual Studio 2019 is via the Manage Extensions option in the IDE.
To install the plugin, perform the following steps:
- Go to Extensions -> Manage Extensions
- Select “Online” on the left panel
- Search for “ SpecFlow for Visual Studio 2019 ” in the Online Extensions and install the same
2. Installation of SpecFlow & Other Required Packages
For demonstrating usage of SpecFlow with NUnit framework, we will create a “Class Library” project with .Net Framework 4.5.2.
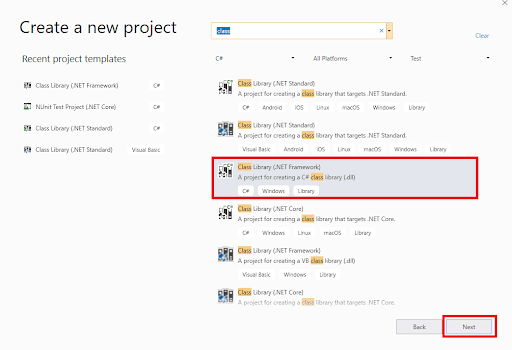
Once the project is set up, we install the SpecFlow, SpecFlow.NUnit, and SpecFlow.Tools.MsBuild.Generation packages. Since we are using NUnit test framework with SpecFlow Selenium C#, hence we need to install SpecFlow.NUnit package. SpecFlow.Tools.MsBuild.Generation package is required in SpecFlow 3 to generate code-behind the files.
You can download these packages by either of these two methods:
- PM (Package Manager) commands from the ‘Package Manager Console – For executing commands from the PM console, go to ‘Tools’ -> ‘NuGet Package Manager’ -> ‘Package Manager Console’
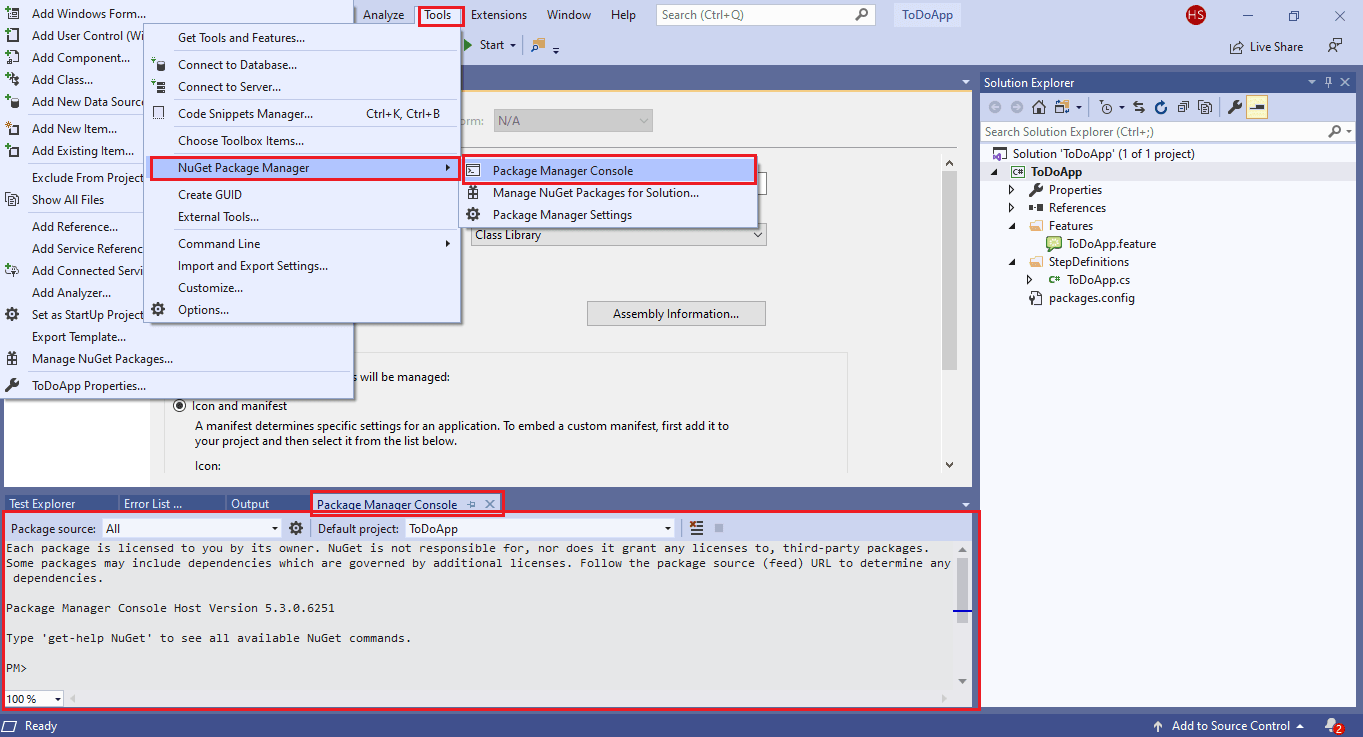
Execute the commands on the Package Manager (PM) Console
Install-Package Specflow
Install-Package Specflow.NUnit
Install-Package SpecFlow.Tools.MsBuild.Generation
Install-Package NUnit3TestAdapter
The installation screenshots are shown below:


To confirm whether the packages are installed or not, you can execute the command Get-Package on Package Manager Console. It also shows the version of the installed package. Shown below is the command execution output:
PM> Get-Package

Id                                  Versions
--                                  --------
SpecFlow                            {3.0.225}
SpecFlow.NUnit                      {3.0.225}
SpecFlow.Tools.MsBuild.Generation   {3.0.225}
Install-Package NUnit3TestAdapter   {3.15.1}
............................................
............................................
- NuGet Package Manager – To open the NuGet Package Manager, go to ‘Tools’ -> ‘NuGet Package Manager’ -> ‘Manage NuGet Packages for Solution’
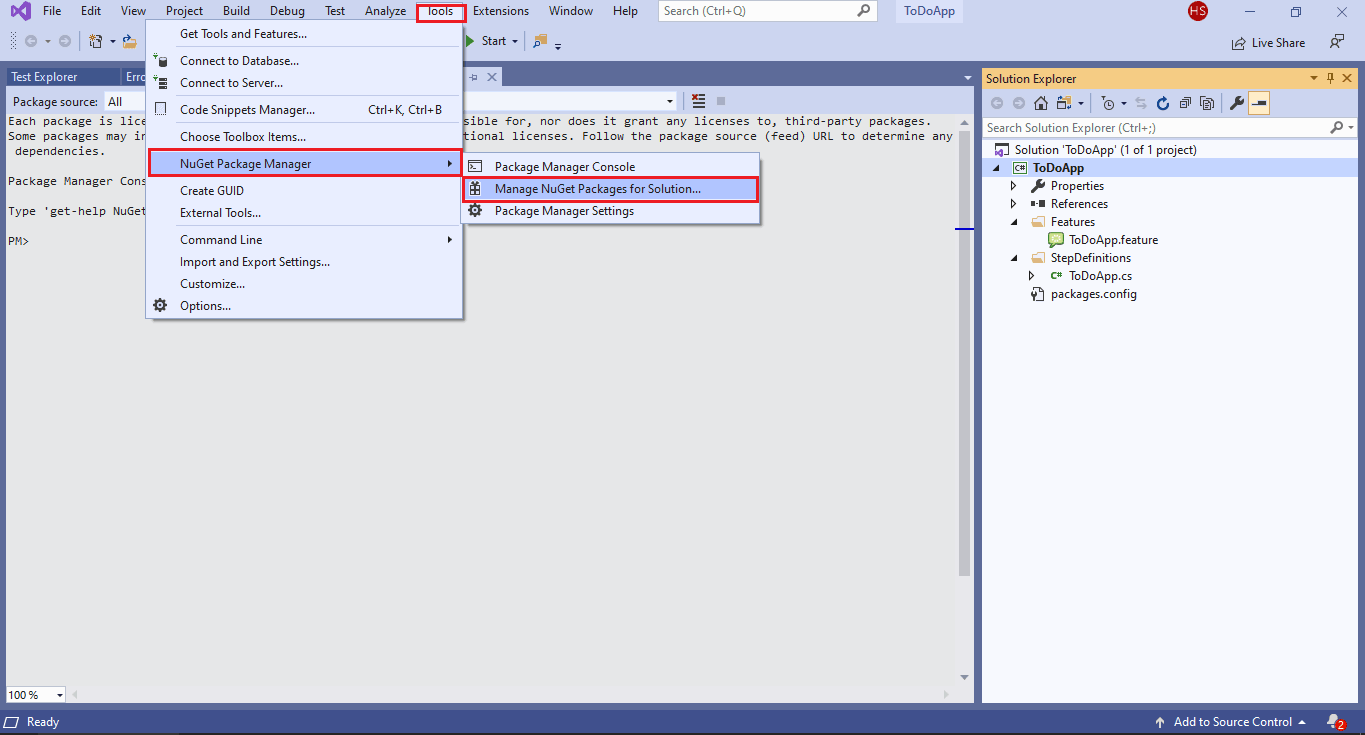
In the Browse section, search for the SpecFlow package and click Install. Next, search for SpecFlow.NUnit package and click Install. While writing this SpecFlow tutorial, the latest stable version of SpecFlow, SpecFlow.NUnit, and SpecFlow.Tools.MsBuild.Generation packages was 3.0.225. The version of NUnit3TestAdapter was 3.15.1.

SpecFlow and SpecFlow.NUnit are the base packages that are required for any type of C# project on SpecFlow and NUnit test framework. Next, it is necessary to install a few more packages, the details of which are shown in the subsequent section of this SpecFlow tutorial for automation testing with Selenium focusing on SpecFlow 3 with NUnit framework.
Updating From SpecFlow 2.x To SpecFlow 3
In case you already have a project that uses the older version of SpecFlow e.g. SpecFlow 2.x, you have to update the project to SpecFlow 3. This will be best suited for this SpecFlow tutorial for using SpecFlow Selenium C#. Before updating to the latest version of SpecFlow, it is recommended that you take a back-up of the project as you may encounter build/compilation errors after the update.
Integration With Visual Studio
In case your projects are making use of an earlier version of SpecFlow (earlier than 2.3.2), the previous versions of the extension (VS 2015/VS 2017) can be downloaded from the SpecFlow GitHub Link. The ‘auto-updates’ for the extension should be disabled else it would download & install the updates to the package in the background.
As the latest version of SpecFlow is only compatible with versions 2.3.2 or above, hence you have to ensure that automatic updates are only enabled if all your projects are migrated to SpecFlow 2.3.2. That is the best way to go ahead with this SpecFlow tutorial.
To disable automatic updates to Visual Studio integration, perform the following steps:
- Go to ‘Tools’ -> ‘NuGet Package Manager’ -> ‘Package Manager Settings’.
- Search for ‘update’ in the search box.
- In Extensions option, uncheck ‘Automatically check for updates’ and Press OK

Configure SpecFlow Using specflow.json
From SpecFlow 3 onwards, app.config file is deprecated instead specflow.json will be used to configure SpecFlow. Though using the specflow.json is optional for full framework projects, migration is recommended.
Updating SpecFlow To Version 3
To update the solution from SpecFlow 2.x to SpecFlow 3 for this SpecFlow tutorial, you need to perform the following steps:
- Open the project and verify if there are no code files/feature files that are missing. Since we have not yet updated to the latest version of SpecFlow, hence the project should still compile and build.
- To update the SpecFlow package, go to Tools -> NuGet Package Manager. Go to ‘Updates’ section and search for ‘SpecFlow’. Update the SpecFlow related packages in sequence as there could be inter-dependency between the packages (as far as the versioning is concerned). Hence, update the base SpecFlow package first before updating any other packages like SpecFlow.NUnit, etc.
Instead of using the interface, I prefer to use the Package Manager console for this SpecFlow tutorial since it eases the SpecFlow updation job. The syntax of the Install-Package command is:
Install-Package [package name] -Version [package version]
Since the latest version of SpecFlow is 3.0.225, you can execute the following command to update the SpecFlow package from the PM console:
Install-Package Specflow -Version 3.0.225
- You have to install SpecFlow.NUnit package to the project (in case it is not yet added) as we are making use of the NUnit Test framework in this Selenium C# tutorial.
Install-Package SpecFlow.NUnit -Version 3.0.225
You will witness an error if you try adding more than one of the packages that are used for executing your tests e.g. SpecFlow.Runner, SpecFlow.MsTest, etc.
- Install SpecFlow.Tools.MsBuild.Generation package for your project using the PM command Install-Package.
Install-Package SpecFlow.Tools.MsBuild.Generation -Version 3.0.225

- Remove SpecFlowSingleFileGenerator from the ‘Custom Tool’ field in the Properties section for each feature file.

SpecFlow & Selenium WebDriver
In this section of the SpecFlow tutorial for automated testing with Selenium, we will look into using SpecFlow 3 with Selenium WebDriver for various scenarios of automated browser testing. The tests are described using SpecFlow, Step definitions make use of the Selenium WebDriver and NUnit is used as a test/assertion framework.
| IDE | Visual Studio 2019 |
| BDD Interpreter | SpecFlow (3.0.225) |
| Automation API | WebDriver |
| Testing Framework | NUnit 3 |
To-Do App: Test with SpecFlow & Selenium WebDriver
To demonstrate the usage of SpecFlow Selenium C# with Local Selenium WebDriver, we take the example of a simple to-do app.
Below are more details about the overall test:
- Navigate to ‘to-do app’ using the Firefox WebDriver- https://lambdatest.github.io/sample-todo-app/.
- Check the first two items or mark them as Done.
- Go to the section below and add a new item to the list.
- Click ‘Add’ to add that new item to the list.
Implementation
The overall implementation process is subdivided into simple steps
- Project creation
- Package installation
- Feature file creation
- Creating Step Definitions for each Scenario Step
- Binding methods to Step Definitions
- Compilation and Execution
Let’s have a look at the steps closely.
1. Project Creation
To get started, we have to create a new project named ToDoApp of type “Class Library” with the .Net Framework 4.5.2 support. In case, .Net Framework 4.5.2 is not installed in your machine, you can download the same for Windows 10 from here.


2. Package Installation
Once the project is set up, we install the necessary packages required for executing the code. Along with the mandatory packages – SpecFlow, SpecFlow.NUnit, and SpecFlow.Tools.MsBuild.Generation which we discussed in the ‘Installation of SpecFlow on Visual Studio 2019’ section, we also have to install the following packages.
NUnit – The test framework to be used
Install-Package NUnit
NUnit.Console – Executing the tests on the console
Install-Package NUnit.Console
Selenium WebDriver
Install-Package Selenium.WebDriver
Selenium.FirefoxDriver
Install-Package Selenium.Firefox.WebDriver
When the prerequisite packages are installed based on the steps mentioned in this SpecFlow tutorial, you can verify the status and also check if there are any package updates required.
Shown below is the snapshot of the Get-Package command on my project-
PM> Get-Package

Id                                  Versions                      ProjectName
--                                  --------                      -----------
BoDi                                {1.4.1}                       ToDoApp
Gherkin                             {6.0.0}                       ToDoApp
NUnit                               {3.12.0}                      ToDoApp
NUnit.Console                       {3.10.0}                      ToDoApp
NUnit.ConsoleRunner                 {3.10.0}                      ToDoApp
NUnit.Extension.NUnitProjectLoader  {3.6.0}                       ToDoApp
NUnit.Extension.NUnitV2Driver       {3.7.0}                       ToDoApp
NUnit.Extension.NUnitV2ResultWriter {3.6.0}                       ToDoApp
NUnit.Extension.TeamCityEventLis... {1.0.6}                       ToDoApp
NUnit.Extension.VSProjectLoader     {3.8.0}                       ToDoApp

NUnit3TestAdapter                   {3.15.1}                      ToDoApp

Selenium.Firefox.WebDriver          {0.26.0}                      ToDoApp
Selenium.WebDriver                  {3.141.0}                     ToDoApp
Selenium.WebDriver.ChromeDriver     {78.0.3904.7000}              ToDoApp
SpecFlow                            {3.0.225}                     ToDoApp
SpecFlow.NUnit                      {3.0.225}                     ToDoApp
SpecFlow.Tools.MsBuild.Generation   {3.0.225}                     ToDoApp
System.Reflection.Emit              {4.3.0}                       ToDoApp
System.Reflection.Emit.Lightweight  {4.3.0}                       ToDoApp
System.Threading.Tasks.Extensions   {4.4.0}                       ToDoApp
System.ValueTuple                   {4.4.0}                       ToDoApp
Utf8Json                            {1.3.7}                       ToDoApp
3. Feature File Creation
For better organization of the code, we create two folders – Features (where feature files are created) and StepDefinitions (where Step Definitions for each Scenario Step will be located).
Once the folders are created, we create a new Feature file – ToDoApp.feature by right-clicking on the folder to add a new item. Select the SpecFlow option on the left side of the panel and select the “SpecFlow Feature File” option.
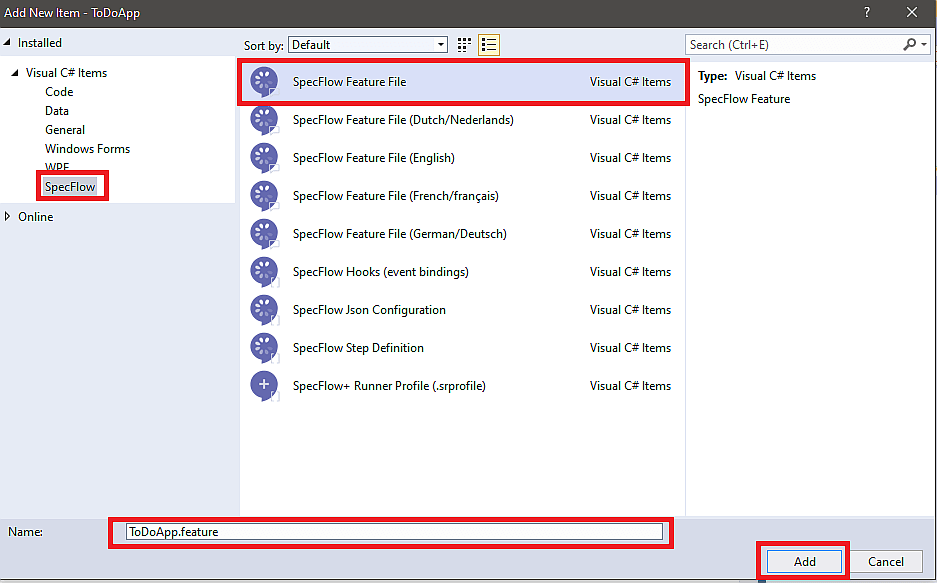
Now that the Feature file is created, we add the Feature & Scenario information in it. Scenario is broken-down into multiple scenario steps by making use of the Gherkin keywords i.e. Given, Then, And, etc.
The prerequisite states that the user has to be present on the To-Do app hence, the Scenario step starts with Given keyword
Given that I am on the LambdaTest Sample app
I have shown below the Feature file for the To-Do app – Scenario steps are created based on all the tasks that need to be performed in the test i.e. Mark item 1 as done, Mark item 2 as done, etc.
Feature: ToDoApp
    Select first two items in the ToDoApp
    Enter a new item in the ToDoApp
    Add the new item to the list

@ToDoApp
Scenario: Add items to the ToDoApp
    Given that I am on the LambdaTest Sample app
    Then select the first item
    Then select the second item
    Then find the text box to enter the new value
    Then click the Submit button
    And  verify whether the item is added to the list
    Then close the browser instance
4. Creating Step Definitions For Each Scenario Step
The next important step in this SpecFlow tutorial is to create Step Definitions for each Scenario Step that is present in the Feature file. For generating the Step Definitions, just Right Click on the Scenario Steps and select ‘Generate Step Definitions’.
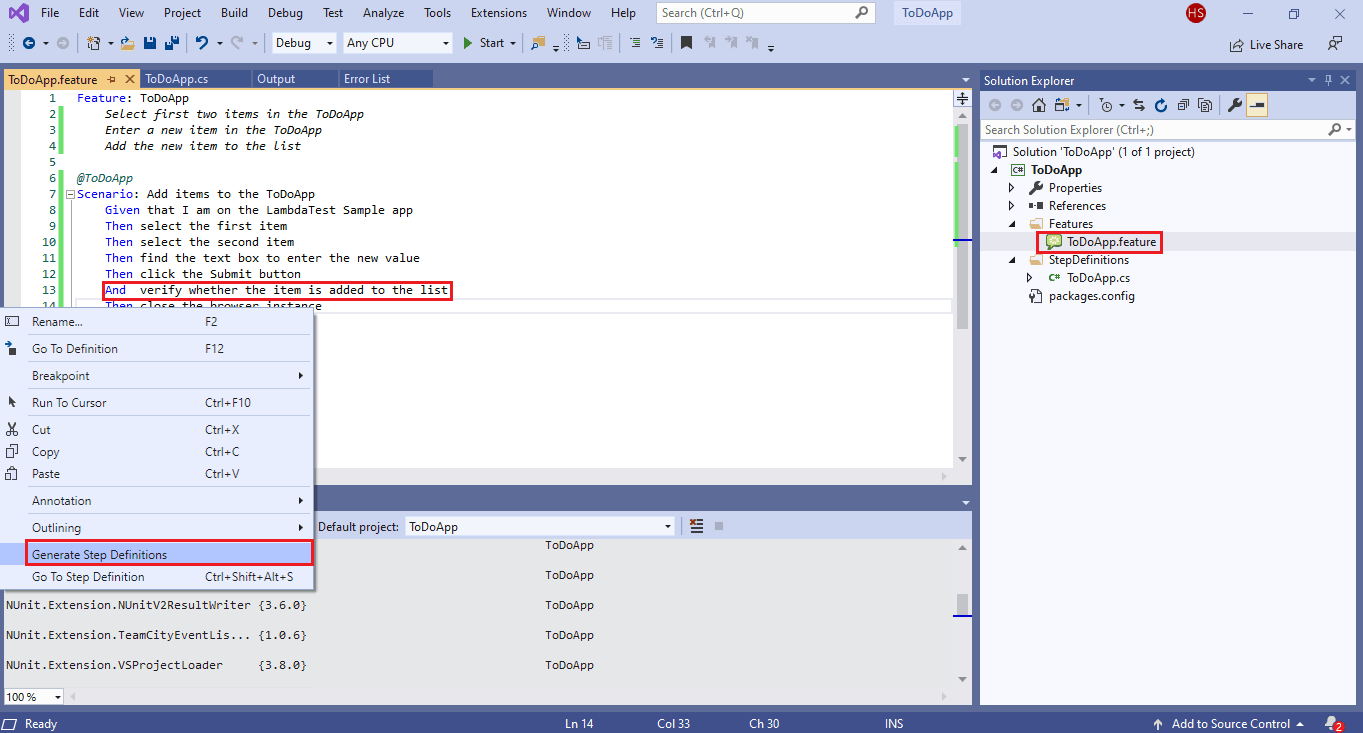
A new file named ToDoApp.cs is created inside the StepDefinitions folder as it contains the implementation for each Scenario Step.
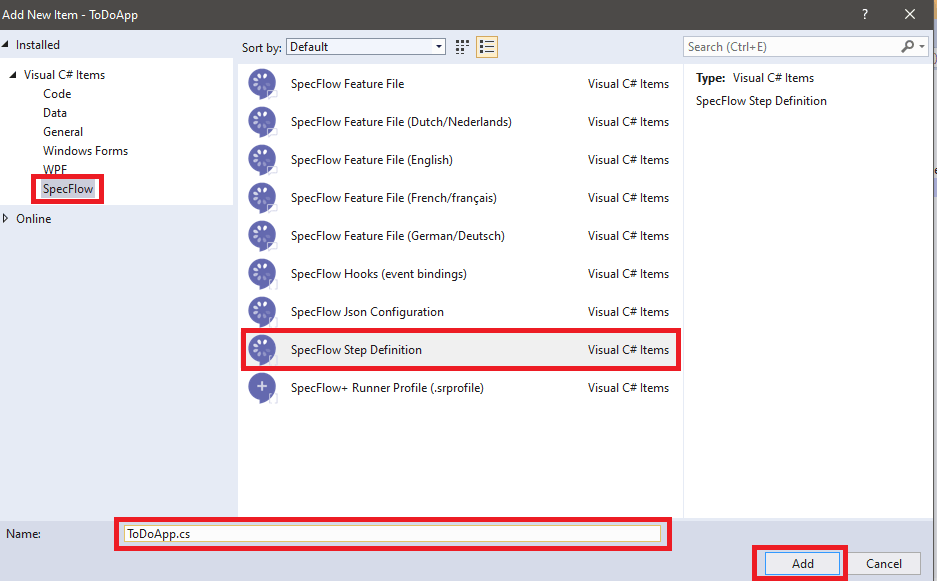
5. Binding Methods To Step Definitions
Once the file has been created, we have to make sure that each Scenario step has a corresponding Step Definition else that particular Scenario step will be unbound. To go to a Step Definition, just right click on the Scenario Step and select “Go To Step Definition”.
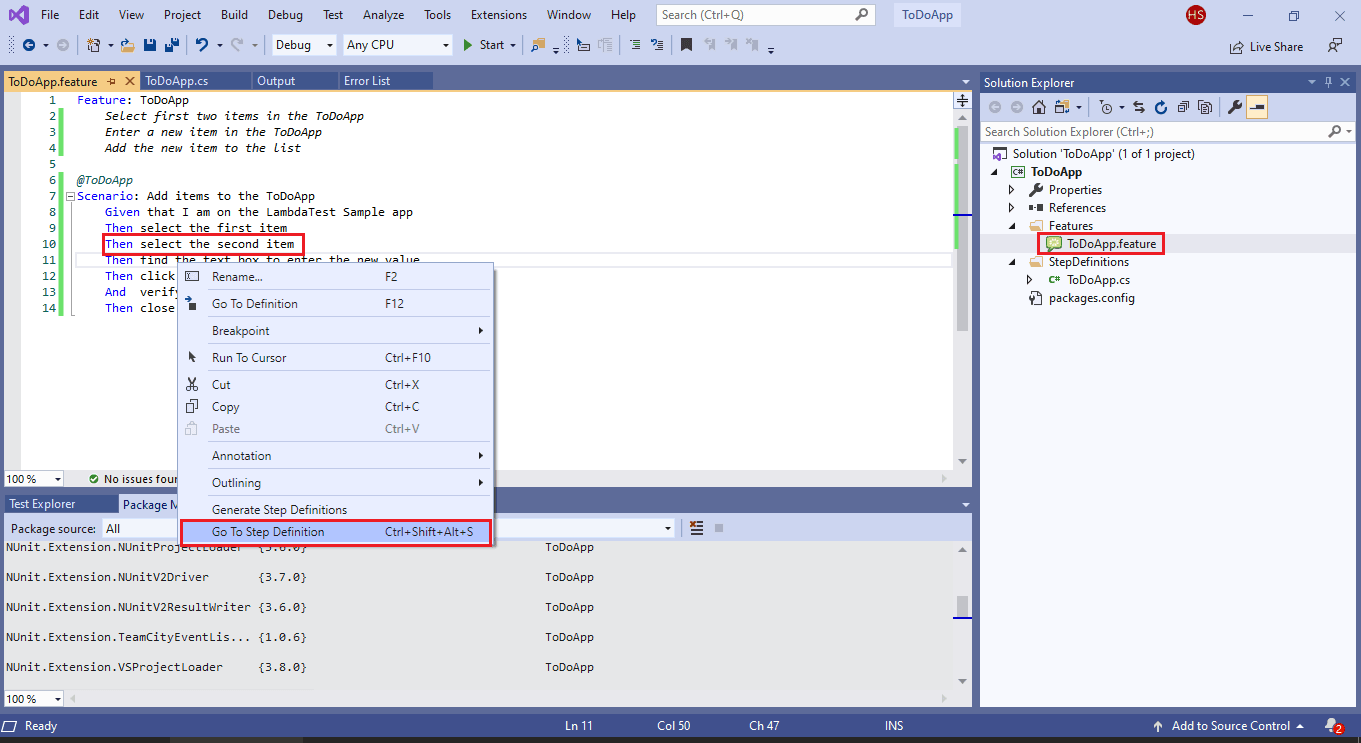
Once the Step Definitions are created, we remove the default code present in it. Shown below is a snippet of a Scenario Step bound with Step Definition:
Scenario Step –
Given that I am on the LambdaTest Sample app
Step Definition –
[Given(@"that I am on the LambdaTest Sample app")]
public void GivenThatIAmOnTheLambdaTestSampleApp()
{
     driver = new FirefoxDriver();
     driver.Url = test_url;
     driver.Manage().Window.Maximize();
     System.Threading.Thread.Sleep(2000);
}
The complete implementation is shown below:
using System;
using System.Collections.Generic;
using System.Linq;
using System.Text;
using OpenQA.Selenium;
using OpenQA.Selenium.Firefox;
using TechTalk.SpecFlow;
using NUnit.Framework;
using System.Threading.Tasks;
using System.Text.RegularExpressions;
using OpenQA.Selenium.Support.UI;
using OpenQA.Selenium.Interactions;

namespace ToDoApp.StepDefinitions
{
    [Binding]
    public sealed class ToDoApp
    {
        String test_url = "https://lambdatest.github.io/sample-todo-app/";
        String itemName = "Adding item to the list";
        IWebDriver driver;

        // For additional details on SpecFlow step definitions see https://go.specflow.org/doc-stepdef

        private readonly ScenarioContext context;

        public ToDoApp(ScenarioContext injectedContext)
        {
            context = injectedContext;
        }

        [Given(@"that I am on the LambdaTest Sample app")]
        public void GivenThatIAmOnTheLambdaTestSampleApp()
        {
            driver = new FirefoxDriver();
            driver.Url = test_url;
            driver.Manage().Window.Maximize();
            System.Threading.Thread.Sleep(2000);
        }

        [Then(@"select the first item")]
        public void ThenSelectTheFirstItem()
        {
            // Click on First Check box
            IWebElement firstCheckBox = driver.FindElement(By.Name("li1"));
            firstCheckBox.Click();
        }

        [Then(@"select the second item")]
        public void ThenSelectTheSecondItem()
        {
            // Click on Second Check box
            IWebElement secondCheckBox = driver.FindElement(By.Name("li2"));
            secondCheckBox.Click();
        }

        [Then(@"find the text box to enter the new value")]
        public void ThenFindTheTextBoxToEnterTheNewValue()
        {
            // Enter Item name
            IWebElement textfield = driver.FindElement(By.Id("sampletodotext"));
            textfield.SendKeys(itemName);
        }

        [Then(@"click the Submit button")]
        public void ThenClickTheSubmitButton()
        {
            // Click on Add button
            IWebElement addButton = driver.FindElement(By.Id("addbutton"));
            addButton.Click();
        }

        [Then(@"verify whether the item is added to the list")]
        public void ThenVerifyWhetherTheItemIsAddedToTheList()
        {
            // Verified Added Item name
            IWebElement itemtext = driver.FindElement(By.XPath("/html/body/div/div/div/ul/li[6]/span"));
            String getText = itemtext.Text;

            // Check if the newly added item is present or not using
            // Condition constraint (Boolean)
            Assert.That((itemName.Contains(getText)), Is.True);

            /* Perform wait to check the output */
            System.Threading.Thread.Sleep(2000);

            Console.WriteLine("Firefox - Test 1 Passed");
        }

        [Then(@"close the browser instance")]
        public void ThenCloseTheBrowserInstance()
        {
            driver.Quit();
        }
    }
}
Code WalkThrough
Step (a) – Creation of instance of Selenium Firefox WebDriver and setting the URL as the ToDo app (https://lambdatest.github.io/sample-todo-app/). This must be done as a part of the StepDefinition GivenThatIAmOnTheLambdaTestSampleApp(). In case required, You can also parameterize the Step Definition.
Step (b) – We ‘select the first item’ and locate the web element using its Name. For getting the properties of the web element, you can make use of the Inspect Tool option in the web browser.
[Then(@"select the first item")]
public void ThenSelectTheFirstItem()
{
        // Click on First Check box
        IWebElement firstCheckBox = driver.FindElement(By.Name("li1"));
        firstCheckBox.Click();
}
The same approach is followed for all the other Step Definitions where the equivalent code is added corresponding to the task that is to be done in the Step Definition.
Below are the Step Definitions for ‘adding new text in the text box’ and clicking the ‘Add’ button on the page.
[Then(@"find the text box to enter the new value")]
public void ThenFindTheTextBoxToEnterTheNewValue()
{
     // Enter Item name
     IWebElement textfield = driver.FindElement(By.Id("sampletodotext"));
     textfield.SendKeys(itemName);
}

[Then(@"click the Submit button")]
public void ThenClickTheSubmitButton()
{
     // Click on Add button
     IWebElement addButton = driver.FindElement(By.Id("addbutton"));
     addButton.Click();
}
In case you require in-depth information about Selenium WebDrivers and web element locators, we recommend you check the Selenium C# tutorial that covers those topics in more detail.
Step (c) – Close the Firefox WebDriver instance once the job is complete else it might result in unwanted memory leaks.
[Then(@"close the browser instance")]
public void ThenCloseTheBrowserInstance()
{
     driver.Quit();
}
6. Compilation and Execution
Now that the Code Binding is complete in this SpecFlow tutorial, we compile the project to check if there are any Build Errors. Once the compilation is done, we execute the tests by triggering “Run Tests” for the selected test.
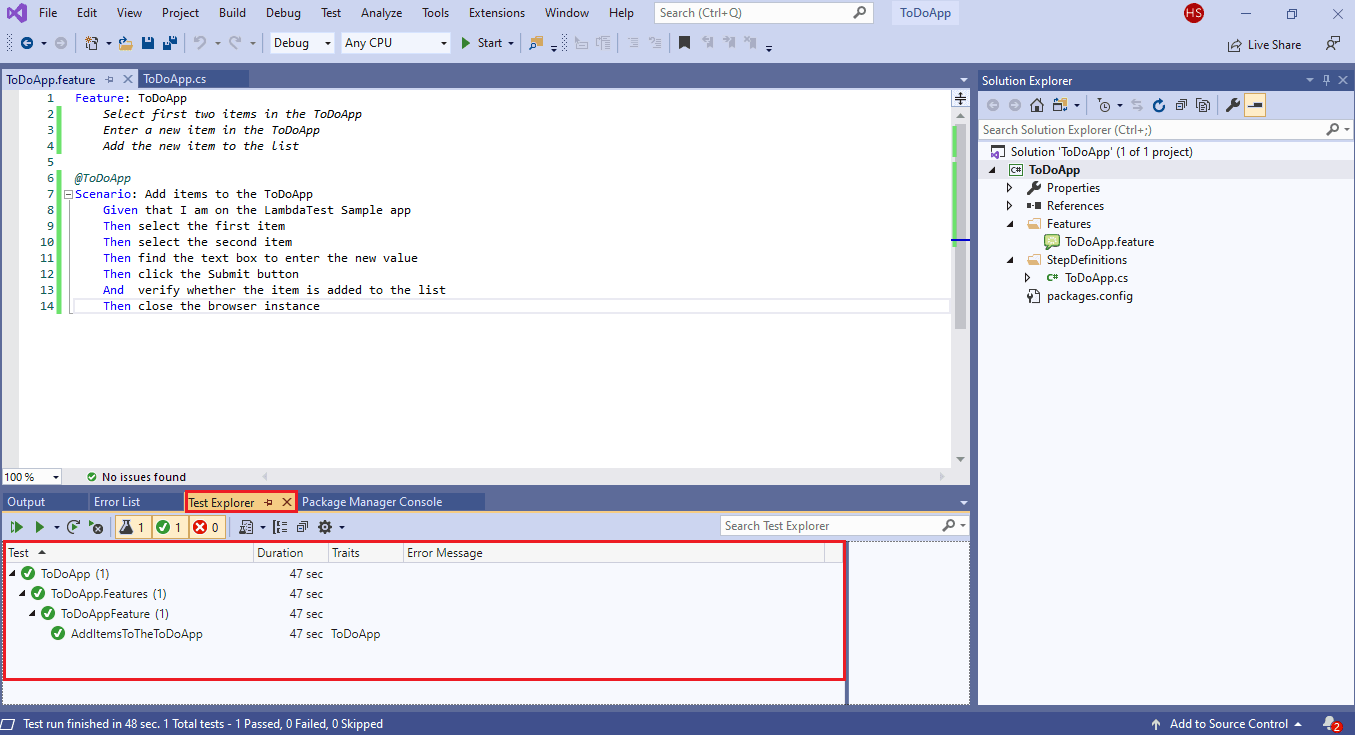

Using SpecFlow With Remote Selenium Grid
One major hurdle in using the local Selenium Grid is that it cannot be scaled for full-fledged automated cross browser testing. Building an in-house infrastructure where you can execute automated browser tests on different combinations & versions of web browsers, operating systems, and devices would turn out to be very costly & time-consuming.
Not performing thorough cross browser automated testing reduces the test coverage of the product which in turn might result in functionality issues. A scalable solution is to use cloud-based cross browser testing services like LambdaTest where the tests are performed on a Remote Selenium Grid. On LambdaTest, you can perform cross browser tests on 2000+ different combinations of browsers, operating systems, and devices.
Porting the existing implementation to remote Selenium Grid does not require much effort since the code changes are only ‘infrastructure-related’. Once an account on LambdaTest has been created, you should make a note of the user-name & access-key from Profile Section since that combination is used for accessing the remote Selenium Grid on LambdaTest. The Dashboard is used to view all your text logs, screenshots, and video recording for your entire Selenium tests using SpecFlow Selenium C#. The desired browser and platform capabilities used for automation testing are generated using the LambdaTest capabilities generator).
Below are the capabilities for Firefox 62.0 on Windows 10 platform:
DesiredCapabilities capabilities = new DesiredCapabilities();
capabilities.SetCapability("user","Your Lambda Username")
capabilities.SetCapability("accessKey","Your Lambda Access Key")
capabilities.SetCapability("build", "your build name");
capabilities.SetCapability("name", "your test name");
capabilities.SetCapability("platform", "Windows 10");
capabilities.SetCapability("browserName", "Firefox");
capabilities.SetCapability("version","62.0");

SpecFlow With NUnit On Remote Selenium Grid
For demonstrating using SpecFlow Selenium C# on a remote Selenium WebDriver, we port the existing To-Do app to the remote Selenium Grid.
Below are the overall infrastructure requirements
- Browser – Firefox
- Browser version – 62.0
- Operating System – Windows 10
- Resolution – 1024 * 768
Implementation
using System;
using System.Collections.Generic;
using System.Linq;
using System.Text;
using OpenQA.Selenium;
using OpenQA.Selenium.Chrome;
using OpenQA.Selenium.Firefox;
using TechTalk.SpecFlow;
using NUnit.Framework;
using System.Threading.Tasks;
using System.Text.RegularExpressions;
using OpenQA.Selenium.Support.UI;
using OpenQA.Selenium.Interactions;
/* For using Remote Selenium WebDriver */
using OpenQA.Selenium.Remote;

namespace ToDoApp.StepDefinitions
{
    [Binding]
    public sealed class ToDoApp
    {
        String test_url = "https://lambdatest.github.io/sample-todo-app/";
        String itemName = "Adding item to the list";
        IWebDriver driver;

        String username = "user-name";
        String accesskey = "access-key";
        String gridURL = "@hub.lambdatest.com/wd/hub";

        // For additional details on SpecFlow step definitions see https://go.specflow.org/doc-stepdef

        private readonly ScenarioContext context;

        public ToDoApp(ScenarioContext injectedContext)
        {
            context = injectedContext;
        }

        [Given(@"that I am on the LambdaTest Sample app")]
        public void GivenThatIAmOnTheLambdaTestSampleApp()
        {
            /* Local Selenium WebDriver */
            /* driver = new FirefoxDriver(); */

            //Start - Implementation of Remote Selenium WebDriver
            DesiredCapabilities capabilities = new DesiredCapabilities();

            capabilities.SetCapability("user", username);
            capabilities.SetCapability("accessKey", accesskey);
            capabilities.SetCapability("build", "SpecFlow - Using Firefox WebDriver using C# and NUnit");
            capabilities.SetCapability("name", "SpecFlow - Using Firefox WebDriver using C# and NUnit");
            capabilities.SetCapability("platform", "Windows 10");
            capabilities.SetCapability("browserName", "Firefox");
            capabilities.SetCapability("version", "62.0");

            driver = new RemoteWebDriver(new Uri("https://" + username + ":" + accesskey + gridURL), capabilities, TimeSpan.FromSeconds(600));

            driver.Url = test_url;
            driver.Manage().Window.Maximize();
            System.Threading.Thread.Sleep(2000);
        }

        [Then(@"select the first item")]
        public void ThenSelectTheFirstItem()
        {
            // Click on First Check box
            IWebElement firstCheckBox = driver.FindElement(By.Name("li1"));
            firstCheckBox.Click();
        }

        [Then(@"select the second item")]
        public void ThenSelectTheSecondItem()
        {
            // Click on Second Check box
            IWebElement secondCheckBox = driver.FindElement(By.Name("li2"));
            secondCheckBox.Click();
        }

        [Then(@"find the text box to enter the new value")]
        public void ThenFindTheTextBoxToEnterTheNewValue()
        {
            // Enter Item name
            IWebElement textfield = driver.FindElement(By.Id("sampletodotext"));
            textfield.SendKeys(itemName);
        }

        [Then(@"click the Submit button")]
        public void ThenClickTheSubmitButton()
        {
            // Click on Add button
            IWebElement addButton = driver.FindElement(By.Id("addbutton"));
            addButton.Click();
        }

        [Then(@"verify whether the item is added to the list")]
        public void ThenVerifyWhetherTheItemIsAddedToTheList()
        {
            // Verified Added Item name
            IWebElement itemtext = driver.FindElement(By.XPath("/html/body/div/div/div/ul/li[6]/span"));
            String getText = itemtext.Text;

            // Check if the newly added item is present or not using
            // Condition constraint (Boolean)
            Assert.That((itemName.Contains(getText)), Is.True);

            /* Perform wait to check the output */
            System.Threading.Thread.Sleep(2000);

            Console.WriteLine("Firefox - Test Passed");
        }

        [Then(@"close the browser instance")]
        public void ThenCloseTheBrowserInstance()
        {
            driver.Quit();
        }
    }
}
Code Walkthrough
Step 1 – OpenQA.Selenium.Remote package/namespace is imported as RemoteWebDriver class is defined in it.
/* For using Remote Selenium WebDriver */
using OpenQA.Selenium.Remote;
Step 2 – The LambdaTest credentials are passed for accessing the remote Selenium Grid.
String username = "user-name";
String accesskey = "access-key";
String gridURL = "@hub.lambdatest.com/wd/hub";
.......................................................................
Step 3 – Browser & Device capabilities are generated using the LambdaTest capabilities generator and the same is passed to the Remote WebDriver API.
DesiredCapabilities capabilities = new DesiredCapabilities();

capabilities.SetCapability("user", username);
capabilities.SetCapability("accessKey", accesskey);
capabilities.SetCapability("build", "Using Firefox WebDriver using C# and NUnit");
capabilities.SetCapability("name", "Using Firefox WebDriver using C# and NUnit");
capabilities.SetCapability("platform", "Windows 10");
capabilities.SetCapability("browserName", "Firefox");
capabilities.SetCapability("version", "62.0");

.................................................................................
.................................................................................
.................................................................................

driver = new RemoteWebDriver(new Uri("https://user-name:access-key@hub.lambdatest.com/wd/hub"), capabilities, TimeSpan.FromSeconds(600));
There is no change in the SpecFlow feature file and remaining business logic remains completely unchanged.
You can visit Automation Dashboard to check the execution status of the test.
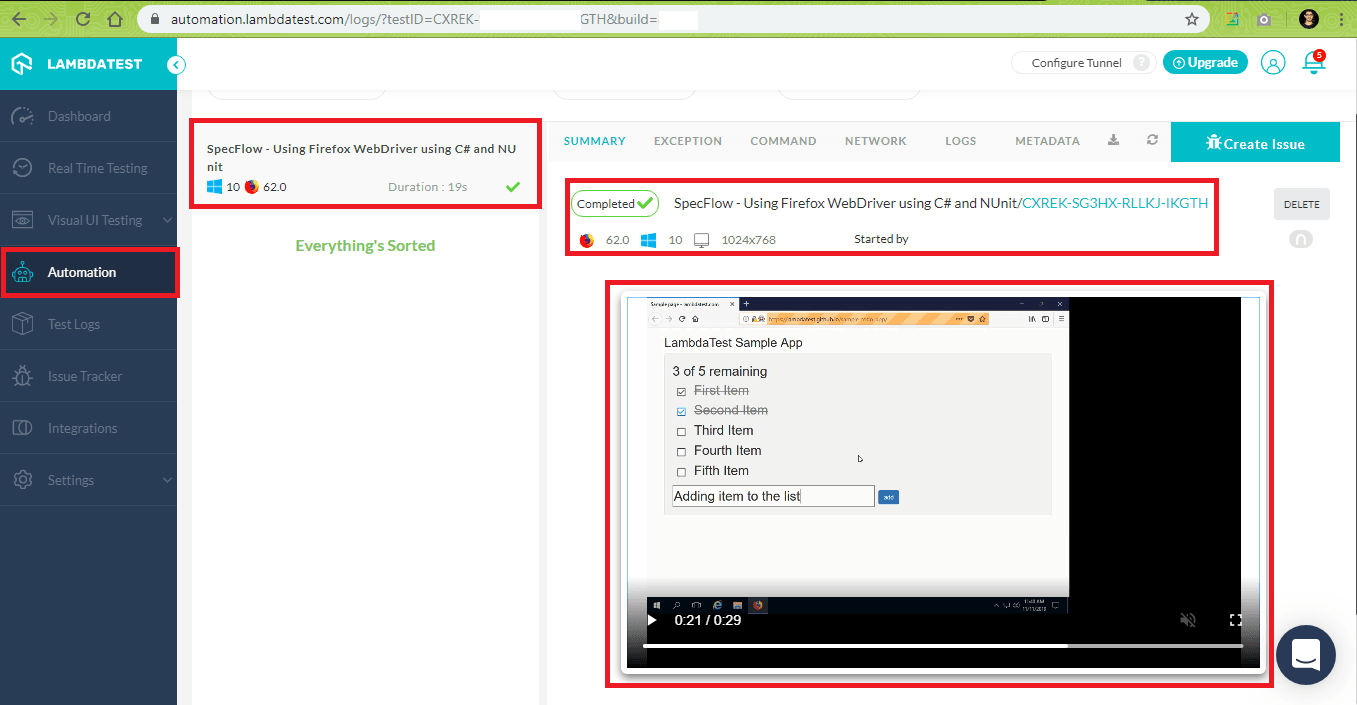
The snapshot above shows that the test has Completed i.e. passed and the video grab shows the overall execution of the test.
It’s A Wrap!
SpecFlow is an open-source version of Cucumber for the .Net framework. Using SpecFlow with Selenium C#, BDD tests can be generated using the Gherkin language and executed using the NUnit test framework. It can also be used with other test frameworks like MSTest, xUnit, etc. Feature files are simple text files that contain Features and Scenarios. As Gherkin is used in this SpecFlow tutorial, creation of feature files does not require any technical know-how.
Automation testing with Selenium Grid has scalability issues hence, it is recommended to use remote Selenium Grid for improved test coverage. By doing minimal changes in the existing local Selenium WebDriver implementation, existing tests can be ported to a more scalable Remote Selenium Grid. I hope this SpecFlow tutorial gave you good insights about using SpecFlow with Selenium, C#. Share your thoughts about this SpecFlow tutorial below. Happy testing!
