Test Automation Using Pytest and Selenium WebDriver


Table of contents


No headings in the article.
In today’s times, one of the challenges that developers face is ensuring that their website/web-app works seamlessly across a different set of devices, browsers, and Operating Systems (OS)/platforms. This is where cross browser testing plays a very crucial role in testing the website/web-app since it helps in testing across different combinations. Based on the target market, development & product team need to chart out a plan about the various activities involved in browser compatibility testing.
Selenium – Introduction & WebDriver Interface As far as testing a web application is concerned, there a couple of web frameworks are available that automate the tests performed across different web browsers. Selenium is a very popular framework that is primarily used for automation testing of web applications. It is an open-source tool using which web testing can be performed against popular browsers like Chrome, Firefox, Opera, Microsoft Edge, etc. The framework can also be used if the test has to be performed on Internet Explorer (latest version or the legacy versions).
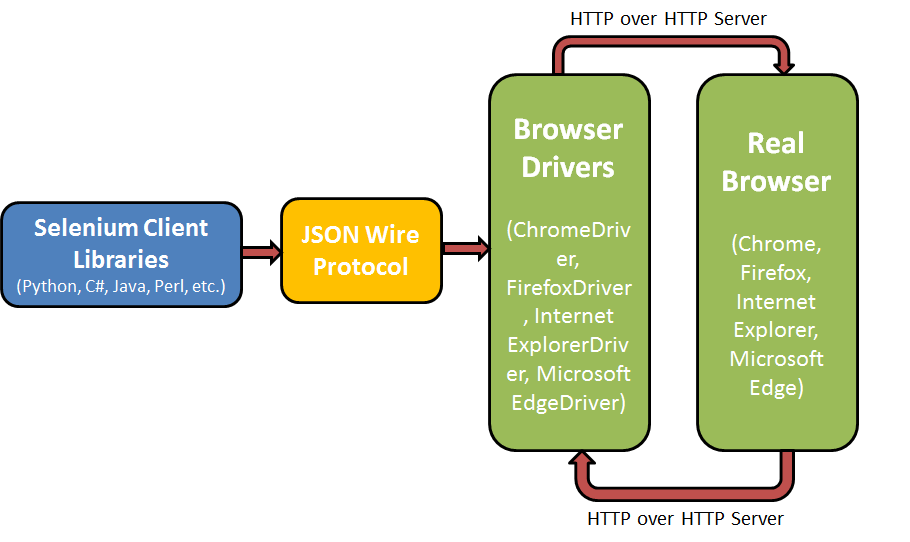
Selenium WebDriver is considered as one of the core components of the Selenium framework. Selenium WebDriver API is a collection of open-source APIs/language specific bindings that accepts commands and sends them to the browser (against which the testing is performed). The individual who is responsible for developing the tests need not bother about the ‘architecture details or other technical specifications’ of the web-browser since WebDriver acts as an interface between the test –suite/test-case & web-browser (achieved using browser-specific WebDriver). Selenium WebDriver supports different programming languages like Python, C#, Ruby, PERL, Java, etc. The diagram below shows the simplified view of the Selenium WebDriver Interface. We have already covered Selenium WebDriver Architecture in depth in our earlier post.
Pytest Test Framework – Introduction And Advantages Python language has couple of test frameworks that ease the task of web application testing, unittest & pytest are the most widely used frameworks. unittest is a part of the standard library (in Python) and comes as a part of the Python installation. For test automation using pytest with Selenium WebDriver, you need to install pytest separately, it is more popular than unittest framework, below are some of the advantages of the Pytest framework.
- Can be used by development teams, test teams, teams that are practising Test Driven Development(TDD), as well as in open-source projects.
- Can be used to simple, as well as complex functional test cases for applications & libraries.
- Easy to port existing test suites to pytest for performing test automation using pytest with Selenium WebDriver.
- Compatibility with other test frameworks like unittest & nose, hence switching to this framework is very easy.
- Supports Parameterizing, which is instrumental in executing the same tests with ‘different configurations’ using a simple marker. Hence, you can come up with more effective test cases/test suites with ‘less repetitive code implementation’.
- Number of Asserts that provide more detailed information about the failure scenarios.
- Support of Fixtures & Classes. Using Fixtures, it becomes easy to make common test objects available throughout a module/session/function/class. Fixtures & Classes would be covered in more detail in subsequent sections.
- Good & upto date documentation.
- xdist support through which test cases can be parallelized.
Now that you are aware of the advantages of pytest over other test frameworks, let’s have a detailed look at the pytest framework and how it can be used with Selenium WebDriver framework in order to perform automated cross browser testing for web applications.
To summarize, Pytest is software test framework which can be used to make simple, yet scalable test cases with ease.
Hey are you looking for Hexo Testing it tests your Hexo CSS framework based websites across 3000+ different desktop and mobile browsers.
Test Automation Using Pytest – Installation And Getting started
As mentioned earlier, pytest is not a part of the standard Python installation and needs to be installed separately. In order to install pytest, you should execute the following command on the prompt/terminal:
pip install –U pytest
Once the installation is complete, you can verify whether the installation is successful, by typing the following command:
pytest --version
Below is the output when the above command is executed on Linux and Windows machine.

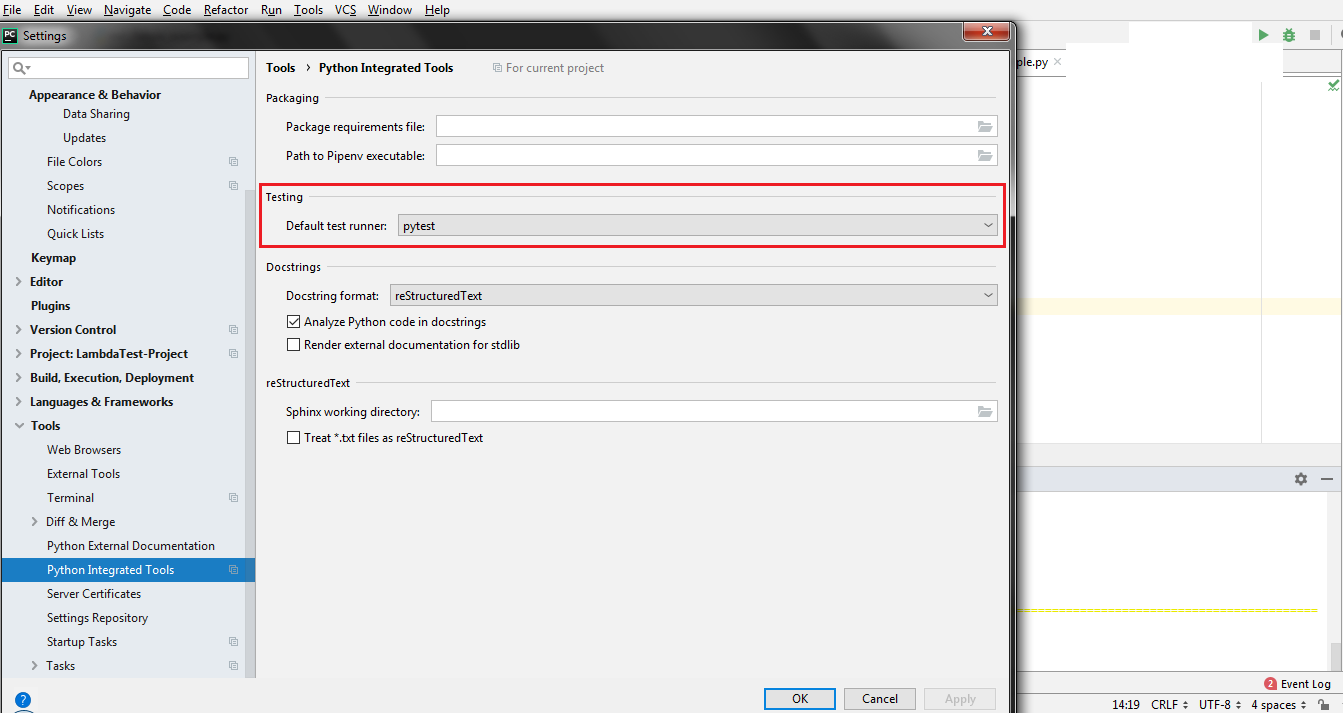
PyCharm is a popular IDE that is used for pytest development. You can install PyCharm Edu version for Windows, Linux, or macOS from here. For development, we are using PyCharm for Windows. Once PyCharm is installed, you should make sure that the default test runner is pytest. In order to change the default test runner, you should navigate to File->Settings->Tools->Python Integrated Tools and change Default test runner for performing test automation using pytest with Selenium WebDriver.
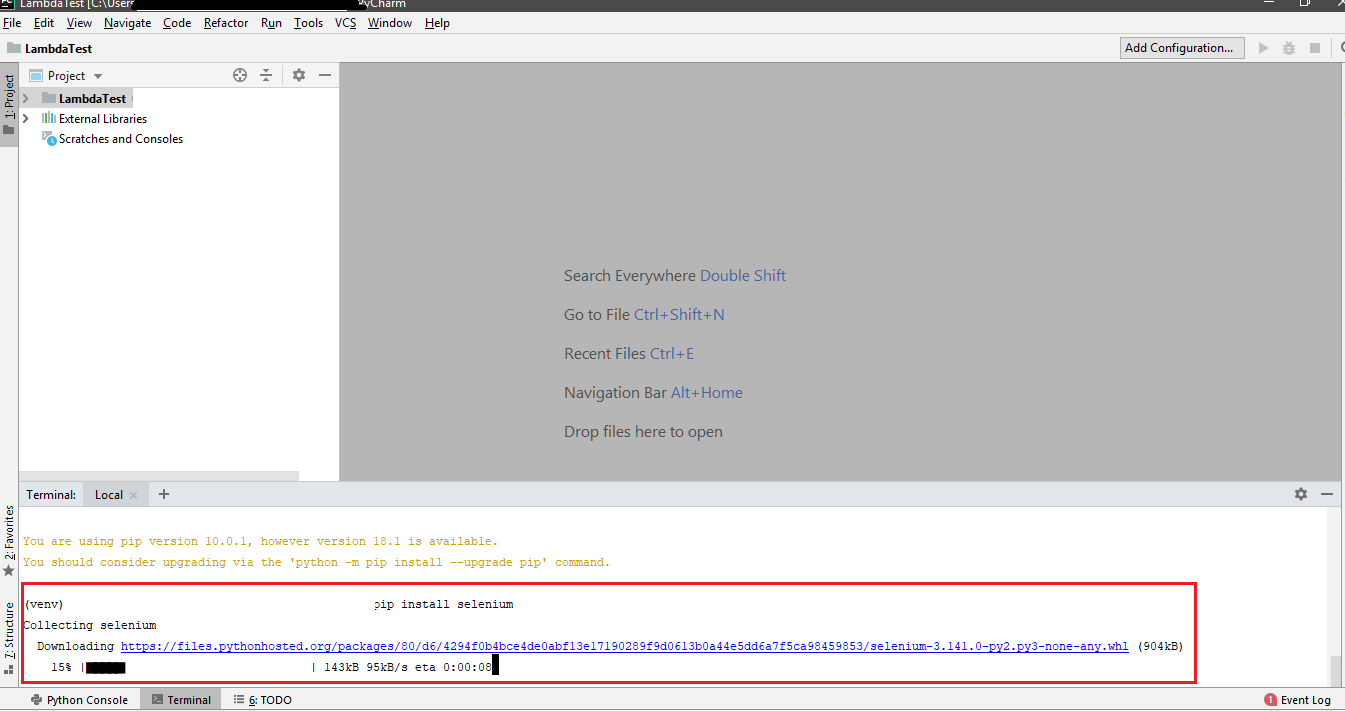
Now that PyCharm Edu version is installed and default test runner is set to pytest, you need to install the Selenium package for Python to perform test automation using pytest with Selenium WebDriver. In order to install Selenium, you should invoke the command mentioned below in the Terminal of PyCharm.
pip install -U selenium ( Syntax – pip install –U )
Shown below is the snapshot of the command execution.
Now that your development environment is all set i.e. PyCharm to execute test automation using pytest with Selenium installed, we look into some of the features & aspects of pytest.
Pytest – Usage, Exit Codes, And Compilation
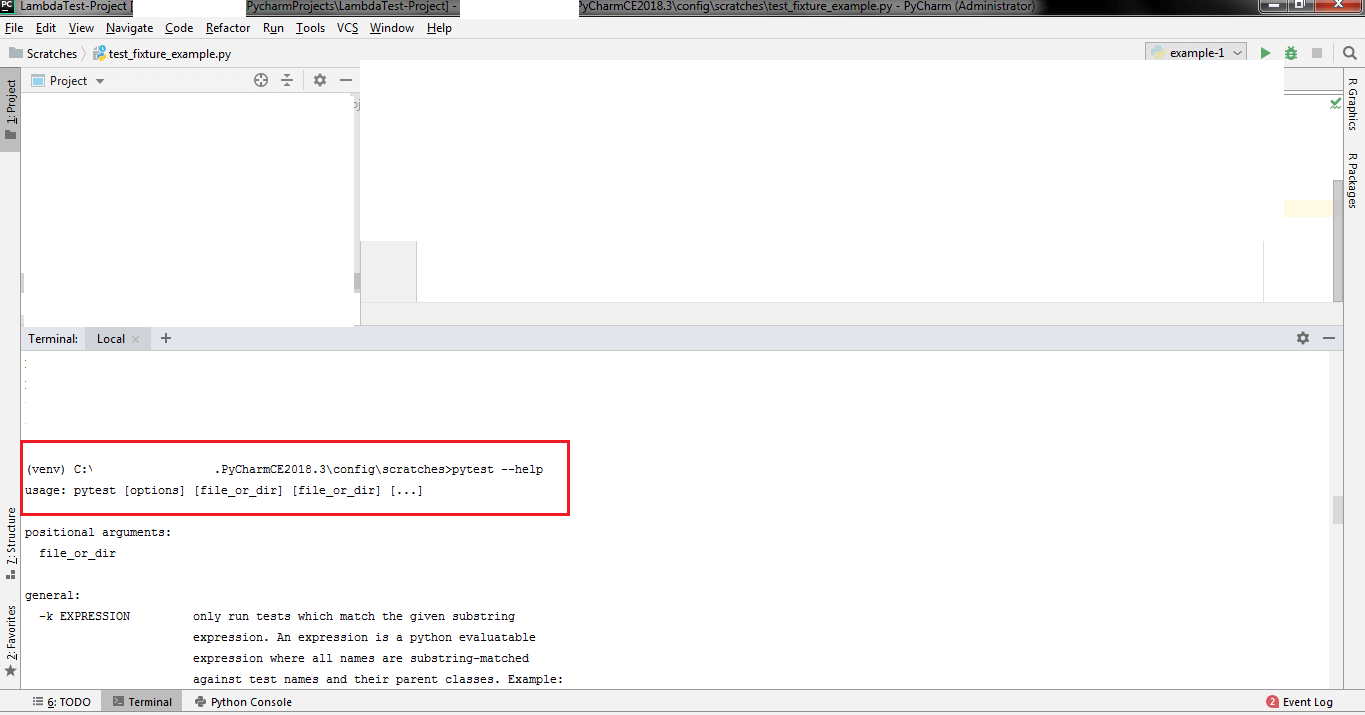
pytest and py.test can be used interchangeably. In order to get information about the arguments that can be used with pytest, you can execute the command mentioned below on the terminal
pytest --help     #Command to get help about the options that can be used with pytest command
# Details about fixtures
pytest --fixtures  #Shows the available built-in function arguments
When pytest code is executed, it results in one of the following exit codes.
| Exit Code | Description |
|---|---|
| 0 | Test cases/test suites are executed successfully and end result was PASS |
| 1 | Test cases/test suites were executed, but some tests FAILED |
| 2 | Test execution was stopped by the user |
| 3 | Unknown error occurred when the tests were executed |
| 4 | Usage of pytest command is incorrect |
| 5 | No tests were collected |
It is important that the file containing pytest code should be named as test_.py or _test.py. In order to compile & execute pytest source code for performing test automation using pytest with Selenium WebDriver, you can use the following command on the terminal.
pytest --verbose --capture=no
Let’s have a look at some examples of test automation using pytest. We start with a very simple example – test_pytest_example_1.py (Self-explanatory)
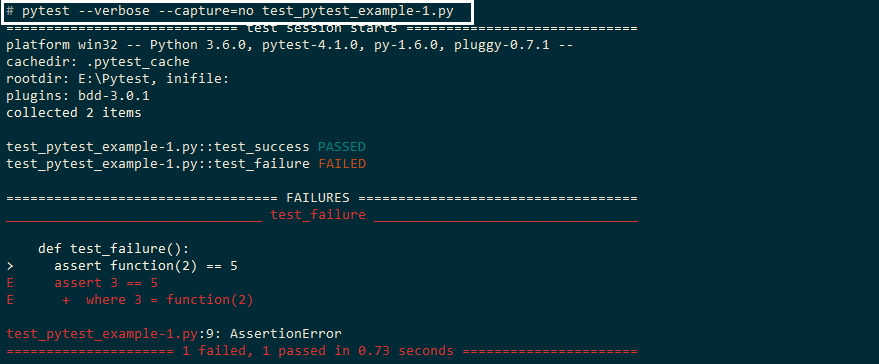
#pytest in action – test_pytest_example_1.py
def function_1(var):
  return var + 1

def test_success():
  assert function_1(4) == 5

def test_failure():
  assert function_1(2) == 5
In the above code snippet, we create a function named function_1 which takes one argument named var. There are two test cases – test_success() and test_failure(). The test cases are executed in serial order and assert is issued on an execution of the test cases. Compile the code using the command mentioned below.
pytest --verbose --capture=no test_pytest_example_1.py
As seen in the output, the result of the first test case is PASS (shown in BLUE) and a result of the second test case is FAIL (shown in RED).
pytest makes use of assert available in Python for verification of results, it gives out meaningful information which can be used for verification & debugging. pytest.raises is commonly used to raise exceptions, below is an example where Factorial of a number is calculated. In one test case, negative number is passed as an input to the factorial function and AssertionError is raised.
factorial_example.py – Contains the implementation that uses recursion in order to calculate factorial of the input number. Before the factorial is calculated, the input parameter check is performed. Assert would be raised in case the input number is negative.
def factorial_function(number):
   # Perform a check whether the input number is positive or not, if it is not
   # positive, raise an assert
    assert number >= 0. and type(number) is int, "The input is not recognized"

    if number == 0:
        return 1
    else:
      # recursive function to calculate factorial
        return number * factorial_function(number – 1)
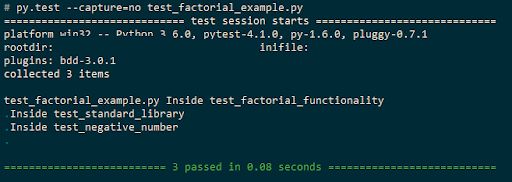
test_factorial_example.py – pytest implementation which use factorial functionality. Three test cases are implemented – test_standard_library (output from factorial_function is compared with output obtained from math.factorial module), test_negative_number (assertion is raised when the input number is negative), and (results of output from factorial_function are compared with specific values).
# Import the necessary modules/packages required for implementation
import pytest
import math

from factorial_example import factorial_function

def test_factorial_functionality():
    print("Inside test_factorial_functionality")

    assert factorial_function(0) == 1
    assert factorial_function(4)== 24

def test_standard_library():
    print("Inside test_standard_library")

    for i in range(5):
# verify whether factorial is calculated correctly
      # by checking against result against  standard
      # library - math.factorial()
        assert math.factorial(i) == factorial_function(i)

def test_negative_number():
    print("Inside test_negative_number")

   # This test case would pass if Assertion Error
   # is raised. In this case, the input number is negative
   # hence, the test case passes
    with pytest.raises(AssertionError):
        factorial_function(-10)
You can execute the code using the command py.test –capture=no test_factorial_example.py either on the command prompt or on the Terminal of PyCharm IDE. As seen in the snapshot, all the test cases have passed and logs under ‘print statement’ are outputted on the console.
Test Automation Using Pytest – Fixtures (Usage and Implementation)
Consider an example where you have to execute certain MySQL queries on a database that contains employee information within an organization. The time taken to execute a query would depend on the number of records (i.e. employees) in the database. Before queries are executed, required operations (w.r.t database connectivity) have to be performed and the ‘returned handle’ would be used in a subsequent implementation involving the database. Database operations can be CPU intensive (as the number of records increase) hence, repetitive implementation & execution should be avoided. There are two ways in which this issue can be solved.
- With the help of classic xunit style setup along with teardown methods.
- By using fixtures (recommended).
xunit style of fixtures is already supported in unittest but pytest has a much better way of dealing with fixtures. Fixtures are a set of resources that have to set up before the test starts and have to be cleaned up after the execution of tests is complete. It contains a lot of improvements over the classic implementation of setup & teardown functions. The main advantages of using fixtures are:
- A developer can set the lifetime & scope of the fixture. The scope of the implemented fixture could be modules, functions, classes, or the entire project.
- Fixtures are implemented in a modular manner; hence there is no learning curve involved.
- Function-scoped fixtures bring the necessary readability & consistency in your test code. This makes the maintainability easy & lesser daunting task.
- Fixture functions leverage the Object-oriented programming design concept termed ‘Dependency Injection’ where fixture functions take up the role of the injector & the test functions are considered as consumers of the fixture objects.
- Each fixture has a name (similar to a function name), which in turn can call other fixture functions.
- Fixtures can be reused and it can be used for simple unit testing to testing complex use cases.
Ever since the launch of version 3.5, the fixtures of higher scope are prioritized above the lower scope fixtures in terms of instantiating. Higher scope fixture includes sessions, lower scope fixture would include classes, functions etc. You can even ‘‘parameterize’ these fixture functions in order to execute them multiple times along with the execution of dependent tests. Fixture parameterization has been widely used to write exhaustive test functions. Below is a simple code for test automation using pytest where setup() and teardown() of ‘resource 1’ is called, even when the test_2 is executed. Since this is a simple implementation (with fewer computations), there are not many overheads even when ‘unnecessary setup & module calls are invoked’, but it could hamper the overall code performance in case any ‘CPU intensive’ operations (like database connectivity) are involved:
#Import all the necessary modules
import pytest

def resource_1_setup():
    print('Setup for resource 1 called')

def resource_1_teardown():
    print('Teardown for resource 1 called')

def setup_module(module):
    print('\nSetup of module is called')
    resource_1_setup()

def teardown_module(module):
    print('\nTeardown of module is called')
    resource_1_teardown()

def test_1_using_resource_1():
    print('Test 1 that uses Resource 1')

def test_2_not_using_resource_1():
    print('\nTest 2 does not need Resource 1')
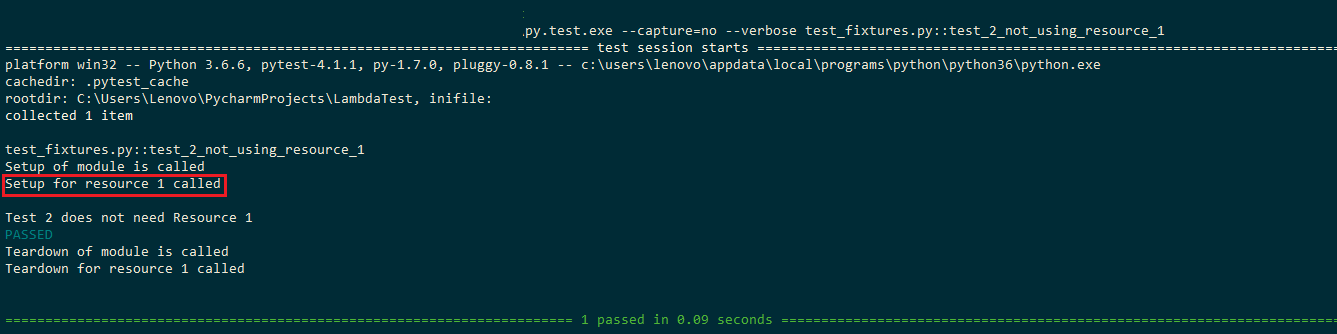
Execute the test case ‘test_2_not_using_resource_1’ by invoking the following command on the terminal.
pytest --capture=no --verbose test_fixtures.py::test_2_not_using_resource_1
As observed from the output [Filename – Pytest-Fixtures-problem.png], even though ‘test_2’ is executed, the fixture functions for ‘resource 1’ are unnecessarily invoked. This problem can be fixed by using fixtures; we would have a look at the same in the upcoming example.
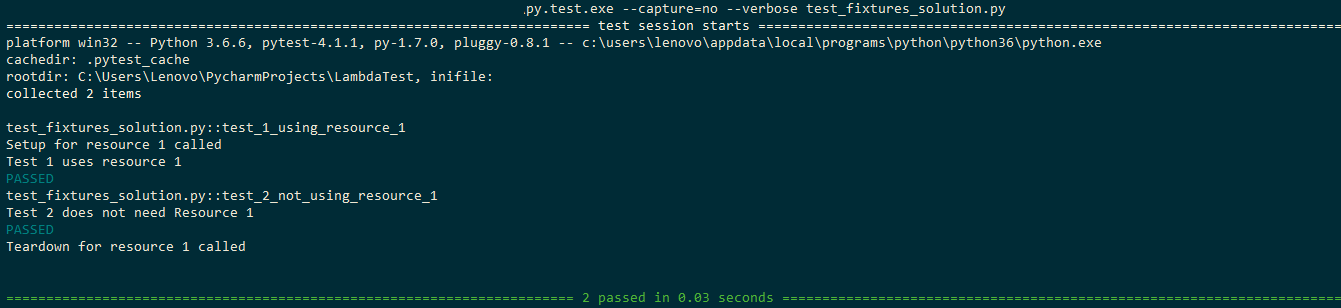
As seen in the example below, we define a fixture function resource_1_setup() (similar to setup in xunit style implementation) and resource_1_teardown() (similar to teardown in xunit style implementation). The fixture function has ‘module scope’ using @pytest.fixture(scope=’module’).
#Import all the necessary modules
import pytest

#Implement the fixture that has module scope
@pytest.fixture(scope='module')
def resource_1_setup(request):
    print('\nSetup for resource 1 called')

    def resource_1_teardown():
        print('\nTeardown for resource 1 called')

    # An alternative option for executing teardown code is to make use of the addfinalizer method of the request-context
    # object to register finalization functions.
    # Source - docs.pytest.org/en/latest/fixture.html
    request.addfinalizer(resource_1_teardown)

def test_1_using_resource_1(resource_1_setup):
    print('Test 1 uses resource 1')

def test_2_not_using_resource_1():
    print('\n Test 2 does not need Resource 1')
We execute the code by triggering all the testcases i.e. test_1_using_resource_1() & test_2_not_using_resource_1(). As shown in the output below [Filename – Pytest-Fixtures-all-tests-executed.png], ‘setup for resource 1’ is called only for Test 1 and not for Test 2.
Now, we execute only testcase 2 i.e. test_2_not_using_resource_1(). As seen in the output below [Filename – Pytest-Fixtures-only-2-tests-executed.png], setup & teardown functions for ‘Resource 1’ are not called since the only testcase – 2 is executed. This is where fixtures can be highly effective since it eliminates ‘repetitive code’ and ‘execution of unnecessary code’. Official documentation about fixtures in pytest can be found here.

Hey are you looking for HubSpot Testing it tests your HubSpot CSS framework based websites across 3000+ different desktop and mobile browsers.
Test Automation Using Pytest with Selenium WebDriver
When you are looking out for a test automation framework, you would probably require a test framework that would suffice all your requirements i.e. unit test, functional test, acceptance tests, etc. The framework should have the ability to log events, generate test reports, and should have good community support. Pytest fulfils all these requirements and test automation using pytest with Selenium WebDriver is highly recommended as it does not involve a steep learning curve.
When you are planning to develop test automation using pytest with Selenium WebDriver, the first concern that you need to look into is when should load the browser. Loading a new browser instance after each test is not recommended since it is not a scalable solution and might increase the overall test execution time. It is recommended to load the browser (under test) before the actual test cases have started & unloaded/closed the browser instance as soon as the tests are complete. This is possible by using Fixtures [discussed below in Automation Testing Using Pytest – Fixtures (Usage and Implementation) section] in pytest. As mentioned earlier, Fixtures make extensive use of a concept termed as ‘Dependency Injection’ where dependencies can be loaded before the actual tests have started.
By default fixtures have ‘function’ scope, depending on the requirements; you can change the implemented fixture’s scope to a module, session, or class. Like ‘lifetime of variables in C language’, the scope of fixtures indicates how many times the particular fixture will be created.
| Fixture Scope | Explanation |
|---|---|
| Function | Fixture is executed/run once per test session |
| Session | One fixture is created for the entire test session |
| Class | Only one fixture is created per class of tests |
| Module | Fixture is created once per module |
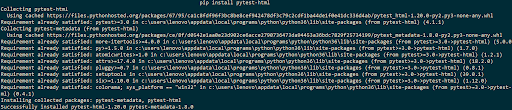
Once the tests have been executed, you might be interested to capture the test results in a report format (like HTML). You need to install pytest-html module for the same.
pip install pytest-html
Below is the snapshot of the command in execution.
Now that you have knowledge about pytest fixtures, Selenium, and Selenium WebDriver interface; let’s have a look at an example with all these things in action. Before you start the implementation, please ensure that you download Gecko driver for Firefox & ChromeDriver for Chrome from here & here respectively. In order to avoid mentioning the ‘path/location’ where the drivers have been downloaded, make sure that you place these respective drivers at the location where the corresponding browsers are present. In the snapshot below, you can see that we have copied Geckodriver.exe in the location where Firefox browser (firefox.exe) is present.

Now that you have the setup ready, let’s get started with the implementation. Import all the necessary modules in the beginning so that you avoid errors. In our case, the modules imported are selenium, pytest, pytest-html. Two fixture functions – driver_init() and chrome_driver_init() have the ‘class’ scope. As seen in the fixture function driver_init(), an instance of Firefox is created using GeckoDriver, whereas in chrome_driver_init(), an instance of Chrome browser is created using ChromeDriver. yield contains the implementation of teardown i.e. code inside yield is responsible for doing the cleanup activity. A class is used to group test cases, in this case, there are two important classes namely Test_URL() and Test_URL_Chrome(). The implemented classes are making use of the fixtures that were implemented using mark.usefixtures [@pytest.mark.usefixtures(“driver_init”)]. The test case performs a simple test of invoking the respective browser (Firefox/Chrome) and opening the supplied URL i.e. lambdatest.com Filename – test_selenium_webdriver-2.py
# Import the 'modules' that are required for execution

import pytest
import pytest_html
from selenium import webdriver
from selenium.webdriver.chrome.options import Options
from selenium.webdriver.common.keys import Keys
from time import sleep

#Fixture for Firefox
@pytest.fixture(scope="class")
def driver_init(request):
    ff_driver = webdriver.Firefox()
    request.cls.driver = ff_driver
    yield
    ff_driver.close()

#Fixture for Chrome
@pytest.fixture(scope="class")
def chrome_driver_init(request):
    chrome_driver = webdriver.Chrome()
    request.cls.driver = chrome_driver
    yield
    chrome_driver.close()

@pytest.mark.usefixtures("driver_init")
class BasicTest:
    pass
class Test_URL(BasicTest):
        def test_open_url(self):
            self.driver.get("lambdatest.com")
            print(self.driver.title)

            sleep(5)

@pytest.mark.usefixtures("chrome_driver_init")
class Basic_Chrome_Test:
    pass
class Test_URL_Chrome(Basic_Chrome_Test):
        def test_open_url(self):
            self.driver.get("lambdatest.com")
            print(self.driver.title)

            sleep(5)
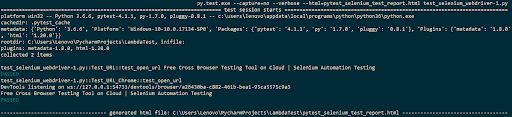
Since we require the test output in an HTML file, we make us of –html= argument while executing the test code. The complete command to execute test automation using pytest with Selenium WebDriver:
py.test.exe --capture=no --verbose --html=pytest_selenium_test_report.html test_selenium_webdriver-1.py
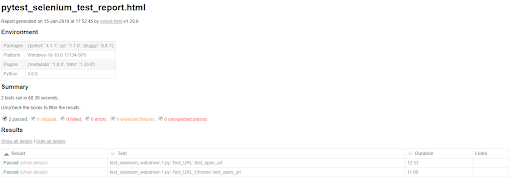
Below is the execution output, testcase test_open_url() is executed for the class Test_URL & Test_URL_Chrome(). The test report is pytest_selenium_test_report.html [Image – PyTest-Selenium-Output-1.png]. Here is a test report for further clarity.
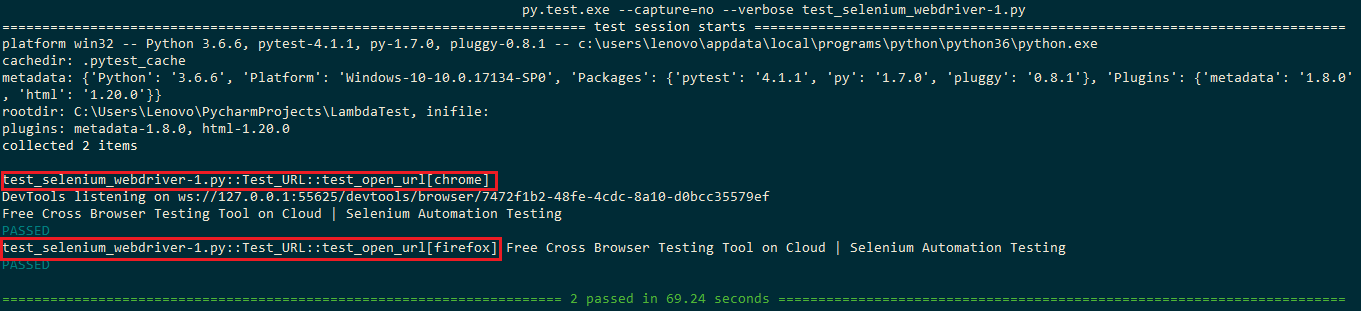
As seen in the above implementation, the only difference between fixture function for Firefox & Chrome browser is the ‘setting up of the respective browser’. Majority of the implementation is same for both the browsers [have a look at Test_URL(), Test_URL_Chrome()], hence it becomes important to optimize the code by avoiding ‘repetition of code’. This is possible by making use of ‘parameterized fixtures’. As seen in the implementation [Filename – test_selenium_webdriver-1.py], the major change is addition of ‘parameters’ to fixtures i.e. @pytest.fixture(params=[“chrome”, “firefox”],scope=”class”). Depending on the browser in use, the corresponding WebDriver is used to invoke the browser.
# Import the 'modules' that are required for execution

import pytest
import pytest_html
from selenium import webdriver
from selenium.webdriver.chrome.options import Options
from selenium.webdriver.common.keys import Keys
from time import sleep

#Fixture for Firefox
@pytest.fixture(params=["chrome", "firefox"],scope="class")
def driver_init(request):
    if request.param == "chrome":
        web_driver = webdriver.Chrome()
    if request.param == "firefox":
        web_driver = webdriver.Firefox()
    request.cls.driver = web_driver
    yield
    web_driver.close()

@pytest.mark.usefixtures("driver_init")
class BasicTest:
    pass
class Test_URL(BasicTest):
        def test_open_url(self):
            self.driver.get("lambdatest.com")
            print(self.driver.title)

            sleep(5)
In our case, we are using the Chrome & Firefox browsers and the test case Test_URL() would be executed for each browser separately. As seen in the output, the test case is invoked once with parameters as ‘firefox’ and ‘chrome’.
Hey are you looking for Hugo Testing it tests your Hugo CSS framework based websites across 3000+ different desktop and mobile browsers.
Cross Browser Testing WithPytest, Selenium & Lambdatest
There is always a limitation on the amount of testing that you can perform on your local machine or test machines since thorough testing has to be performed on different kinds of devices (mobiles, tablets, desktops, etc.), Operating Systems (Windows, Linux, macOS, Chrome, etc.) and browsers such as Chrome, Firefox, Safari, Opera, and so on. Setting up a ‘local test environment/test farm’ is not a scalable & economical option. This is where your test team can utilize the power of Lambdatest’s cross-browser testing on the cloud capabilities.
You can perform manual as well as automated cross browser testing of your web application/website on different browsers (even old versions), devices, etc. You can also perform real-time testing by using their Tunnel feature which lets you use their test infrastructure from the terminal. LambdaTest Selenium Automation Grid enables you to perform end-to-end automation tests on a secure, reliable, and scalable selenium infrastructure. You can utilize the LambdaTest Selenium Grid to not only increase the overall code-coverage (via testing), but to also decrease the overall time required to execute your automation scripts written in Python.
Conclusion
Test automation using Pytest with Selenium WebDriver is a very favourable option as a framework that has good features with which test engineers can come up with implementation that is easy to implement & which is scalable. It can be used for writing test cases for simple scenarios, as well as highly complex scenarios. A developer/tester who is well versed with the Python, unittest/other test frameworks based on Python would find pytest easy to learn. Since pytest leverages concepts like ‘Dependency Injection’, there is less cost involved in ‘maintainability of the source code’.
If you are looking for testing web-applications or websites, you can execute test automation using pytest with Selenium framework. Since the number of devices are increasing with each passing day, it becomes highly impossible to test your code against different devices, operating systems, and browsers; this is where testers/developers can utilize Lambdatest’s ‘cross-browser testing tool’ which allow you to perform test automation using pytest with Selenium WebDriver, effortlessly.
Original Source: lambdatest.com
Related Articles: